tuxpaint-devel Mailing List for Tux Paint (Page 8)
An award-winning drawing program for children of all ages
Brought to you by:
wkendrick
You can subscribe to this list here.
| 2005 |
Jan
|
Feb
|
Mar
(15) |
Apr
(5) |
May
(12) |
Jun
(15) |
Jul
(21) |
Aug
(2) |
Sep
(14) |
Oct
(32) |
Nov
(47) |
Dec
(39) |
|---|---|---|---|---|---|---|---|---|---|---|---|---|
| 2006 |
Jan
(33) |
Feb
(59) |
Mar
(17) |
Apr
(5) |
May
|
Jun
(6) |
Jul
(7) |
Aug
(19) |
Sep
(64) |
Oct
(161) |
Nov
(9) |
Dec
(23) |
| 2007 |
Jan
(6) |
Feb
(46) |
Mar
(55) |
Apr
(41) |
May
(43) |
Jun
(44) |
Jul
(46) |
Aug
(25) |
Sep
(16) |
Oct
(29) |
Nov
(50) |
Dec
(64) |
| 2008 |
Jan
(11) |
Feb
(18) |
Mar
(52) |
Apr
(37) |
May
(40) |
Jun
(78) |
Jul
(85) |
Aug
(31) |
Sep
(23) |
Oct
(13) |
Nov
(19) |
Dec
(37) |
| 2009 |
Jan
(36) |
Feb
(24) |
Mar
(86) |
Apr
(43) |
May
(36) |
Jun
(151) |
Jul
(23) |
Aug
(40) |
Sep
(11) |
Oct
(91) |
Nov
(68) |
Dec
(27) |
| 2010 |
Jan
|
Feb
(11) |
Mar
(79) |
Apr
(50) |
May
(26) |
Jun
(44) |
Jul
(31) |
Aug
(6) |
Sep
(2) |
Oct
(16) |
Nov
(11) |
Dec
(4) |
| 2011 |
Jan
(14) |
Feb
(5) |
Mar
(22) |
Apr
(1) |
May
(5) |
Jun
(5) |
Jul
(13) |
Aug
(1) |
Sep
(3) |
Oct
(18) |
Nov
(15) |
Dec
(25) |
| 2012 |
Jan
(1) |
Feb
(9) |
Mar
(41) |
Apr
(32) |
May
|
Jun
(2) |
Jul
(5) |
Aug
(2) |
Sep
|
Oct
|
Nov
|
Dec
(2) |
| 2013 |
Jan
|
Feb
(5) |
Mar
(16) |
Apr
(21) |
May
(3) |
Jun
(1) |
Jul
(1) |
Aug
|
Sep
|
Oct
(13) |
Nov
(1) |
Dec
(3) |
| 2014 |
Jan
|
Feb
(12) |
Mar
(6) |
Apr
(35) |
May
|
Jun
(12) |
Jul
(35) |
Aug
(98) |
Sep
(3) |
Oct
(8) |
Nov
(4) |
Dec
(1) |
| 2015 |
Jan
(4) |
Feb
(9) |
Mar
(58) |
Apr
(9) |
May
(15) |
Jun
(23) |
Jul
|
Aug
(32) |
Sep
(12) |
Oct
(21) |
Nov
(5) |
Dec
(14) |
| 2016 |
Jan
(6) |
Feb
(3) |
Mar
(37) |
Apr
(18) |
May
(5) |
Jun
(8) |
Jul
|
Aug
(21) |
Sep
(5) |
Oct
(20) |
Nov
(4) |
Dec
(6) |
| 2017 |
Jan
(2) |
Feb
|
Mar
|
Apr
(19) |
May
(8) |
Jun
(3) |
Jul
(3) |
Aug
(5) |
Sep
|
Oct
(4) |
Nov
(4) |
Dec
(6) |
| 2018 |
Jan
(3) |
Feb
|
Mar
|
Apr
|
May
(1) |
Jun
|
Jul
|
Aug
(4) |
Sep
(4) |
Oct
|
Nov
|
Dec
(3) |
| 2019 |
Jan
|
Feb
|
Mar
(5) |
Apr
|
May
|
Jun
(2) |
Jul
(1) |
Aug
(3) |
Sep
(14) |
Oct
(2) |
Nov
(1) |
Dec
|
| 2020 |
Jan
|
Feb
|
Mar
(1) |
Apr
(1) |
May
(2) |
Jun
|
Jul
|
Aug
(3) |
Sep
(15) |
Oct
(9) |
Nov
(11) |
Dec
(7) |
| 2021 |
Jan
(12) |
Feb
(2) |
Mar
(16) |
Apr
|
May
|
Jun
(11) |
Jul
|
Aug
(4) |
Sep
(24) |
Oct
(68) |
Nov
(61) |
Dec
|
| 2022 |
Jan
(42) |
Feb
(17) |
Mar
(20) |
Apr
(2) |
May
(23) |
Jun
(4) |
Jul
(6) |
Aug
|
Sep
(27) |
Oct
(4) |
Nov
(10) |
Dec
(31) |
| 2023 |
Jan
(4) |
Feb
(18) |
Mar
(8) |
Apr
(11) |
May
(18) |
Jun
(47) |
Jul
(1) |
Aug
(1) |
Sep
|
Oct
(1) |
Nov
(1) |
Dec
(2) |
| 2024 |
Jan
(10) |
Feb
|
Mar
|
Apr
(3) |
May
(4) |
Jun
(3) |
Jul
(6) |
Aug
|
Sep
(2) |
Oct
(1) |
Nov
|
Dec
(3) |
| 2025 |
Jan
(2) |
Feb
(11) |
Mar
(3) |
Apr
(1) |
May
(22) |
Jun
(5) |
Jul
(15) |
Aug
(5) |
Sep
|
Oct
|
Nov
|
Dec
|
|
From: Bill K. <nb...@so...> - 2023-04-20 18:05:42
|
On Thu, Apr 13, 2023 at 10:18:56AM -0700, Bill Kendrick wrote:
>
> I've extended Tux Paint's Magic "API", and added a UI element to the
> Magic tool, to allow magic tools to support sizes.

Whew!  This has been tedious, and some of the older Magic tools that I
don't fully understand the operation of (fancy math, etc.) have taken
(or will take) a bit of work to retrofit... but I've so far gone through
a lot of the plugins already, and either:

(a) added support for sizes (e.g., Toothpaste can come out different
thicknesses, the Bricks tool collapses down to one item in the
toolbar, with two size options -- unless "--nomagicsizes" is
specified, in which case it splits into two separate tools again, to
avoid removing any pre-existing functionality),

or (b) had them respond correctly to the updated API, so they load
again (e.g., Stretch, Perspective, Checkerboard, etc. do not offer
sizing options, as it wouldn't make sense).


For those interested in what has been involved, generally it's:

In all cases:

1. add the "Uint32 disabled_features" argument to _init()
2. create a new "Uint8 _accepted_sizes()" function
3. create a new "Uint8 _default_size()" function
4. create a new "void _set_size()" function
5. update/add function prototypes to correspond to all those


And, in the case of (a), adding sizing support:

1. Change a global "const int" or "#define" value into a regular
   global "int", or add a new global "int" if none existed
   (or sometimes it was a "float")

2. Have "_accepted_sizes()" return some value > 1

3. Have "_default_size()" return a value that will end up matching
   the tool's size (e.g., the radius of a painted brush or applied
   effect) as it has been all along (in 0.9.29 & earlier).

   This way, "out of the box" (that is, without the user having
   to make adjustments to the size setting), it will work like it
   always has, prior to 0.9.30.  And, importantly, if the
   "--nomagicsizes" option is set, and the sizing controls are
   therefore not available, it will simply work like it always has.

4. Have "_set_size()" accept the size setting (which will be
   a value between '1' and the maximum -- what we returned in
   "_accepted_sizes()") and place it into the global variable.

   Some calculation may take place here. i.e., if the default size
   was 16, I might choose to offer 6 size settings, with the default
   being "4", and then multiply the size by 4 to get the radius
   in pixels.  (Therefore the tool would suppport 4px, 8px, 12px, 16px,
   20px, and 24px radii.)

   It's all a bit arbitrary, which is where alpha & beta testing
   might come in handy.  "Did the numbers Bill selected late at
   night after a long day's work _actually make sense?_" ;)

5. If the radius was hard-coded, or perhaps some other calculations
   were hard-coded, update them as necessary to use the new global
   variable.

   (For example, "confetti.c" used "CONFETTI_BRUSH_SIZE", but _also_ had
   some hard-coded numbers related to how the effect should be spread
   out, which I updated to be based on a multiple of CONFETTI_BRUSH_SIZE,
   so that it also scaled up/down properly.)

6. Watch out for other unintended consequences related to size
   changes!

   (For example, "toothpaste.c" had "toothpaste_RADIUS = 10", which
   I was able to utilize, but then I noticed the effect didn't work
   properly at sizes larger than the original.  It turns out there was
   a kind of cached 'intensity' matrix, "toothpaste_weights",
   which was allocated & filled during _init().  The solution was to
   free(), re-malloc(), and re-fill it every time the size was changed
   via "_set_size()")

7. Always remember to mention new features ("tool X now supports sizes")
   in the changelog!  (docs/CHANGES.txt)  ;-)


For some plugins, it's a little more complicated.  Many plugins offer
multiple tools, and/or run in different modes...

 * Size options may only make sense with some of the plugin's tools.
   Or, the sizes you want to make available may differ for each tool.

   Consult the "which" variable sent to each function, especially in
   "_accepted_sizes()".

 * For tools that offer both "painting" (brush) and "entire picture"
   (full canvas) application of an effect -- such as the "Blur" tool,
   and where the size option is being used to set the radius of the
   applied effect when "painting" it -- the size option doesn't make
   sense in the "entire picture" mode.

   Check the "mode" variable against "MODE_FULLSCREEN" in your
   "_accepted_sizes()", and return 0 or 1 (both mean the same),
   in that case.

   Note: This isn't a hard and fast rule.  As long as it's not
   confusing to users, it might actually make sense for the
   "sizing" options to have different meanings in the two different
   modes.

   While I'm generally using for the literal size (radius) of an
   effect, the sizing option could also be used to indicate "intensity".
   And, for example, the "Bricks" tools use size to dictate the size of
   the brick shapes, not a specific "radius".

Finally, in the case of (b), making plugins work again (without
supporting size options), simply extend the plugin so it contains
all of the functions that the updated API requires.  This was handled
in the "in all cases" steps above, but to wrap that up, you need to:

1. Have "_accepted_sizes()" return a 0 (or a 1), which means
   "I only offer one size; do not make the sizing controls available".

2. Have "_default_size()" return anything (0 makes sense).

3. "_set_size()" can be an empty function.


Unfortunately, I'm not sure how to get Tux Paint to detect whether
a function knows to accept certain arguments or not, but it does
complain (& avoid trying to load any Magic tools from a plugin) if
functions are completely missing.

So when you run Tux Paint, you will see complaints like:

  Error: plugin /usr/local/lib/tuxpaint/plugins/clone.so is missing accepted_sizes
  Error: plugin /usr/local/lib/tuxpaint/plugins/clone.so is missing default_size
  Error: plugin /usr/local/lib/tuxpaint/plugins/clone.so is missing set_size

(Despite this, I'm also also being sure to update every plugin's "init()"
function, to accept the new "Uint32 disabled_features" argument.)


For examples of where plugins detect "--nomagicsizes" being set
("_init()" receives the bit "MAGIC_FEATURE_SIZE" in "disabled_features"),
and then behave differently, see "googlyeyes.c" and "bricks.c".

Those plugins historically provided two different tools (large & small).
Now, they can just provide one tool which offers two (or more) sizes via
the new sizing feature.

However, if the sizing feature is disabled, they revert back to providing
two separate tools, as they did in 0.9.29 & prior.

Whew!  I hope this all makes sense; typing it up over a long period
while doing other things. :-)

-bill!
|
|
From: Bill K. <nb...@so...> - 2023-04-13 17:19:11
|
I've extended Tux Paint's Magic "API", and added a UI element to the
Magic tool, to allow magic tools to support sizes.

For example, for 20 years now, tools like "Darken" have been locked at
a particular size -- e.g., a 16px diameter circle -- making it
difficult to make finer adjustments.

Now, it will be possible for such tools to tell Tux Paint, for example,
"I accept 4 different sizes, and my default is '2'".  The Magic tool
will then show a little 4-step sizing selector (similar to the options
for stamp sizes, brush spacing, and slideshow playback speed).

Almost none of the Magic tools support the updated API yet (I need to
go in and edit every single pluin source!), so if you `git pull` right
now, don't be surprised when you see almost all of the Magic tools
missing. ;-)

I've so far worked on three plugins:

 * Kaleidoscope, Symmetry, Tile, Pattern -- offer different thickness
   levels for the lines you paint.

 * Blur -- offer different radiuses for the blur effect.

   Since the Blur tool offers both 'paint'/freehand mode, and
   'fullscreen'/affect-the-whole-canvas-at-once mode, I had to
   make sure the sizing option was not just tool-specific,
   but also mode-specific.

 * Googly Eyes -- offer four different sizes of googly eyes.

   But wait!  Tux Paint already has two different googly eye
   tools -- large & small!  Well, it won't any more.
   That is, unless Tux Paint is invoked with "--nomagicsizes",
   which disables this new feature altogether, thus simplifying
   the UI for younger kids.

It isn't a requirement that size option needs to affect the
radius of an applied effect (like darken, blur, etc.), or the thickness
of a painted effect (like toothpaste or fur); it's entirely up
to the Magic tool to decide how to interpret the user's choice.
(Of course, we need to avoid too many 'surprises'.)

For example, the new Kaleido-X tools could be collapsed into a
single tool (when this new sizing UI hasn't been disabled), and
offer the different variations (-4, -6, and -8 -- and perhaps more!)
via the 'sizing' interface.  Some tools may end up using the setting
more as an 'intensity' option.  (I've actually thought of providing
TWO sliders, but... I need to not go overboard, here, I think!)

Why did I do this?  It's by popular demand.  Obviously, folks I hear
from on Twitter are not the youngest users of Tux Paint, and are
skewed more in the teen-to-twenties age range, but of course that's
why I always try to make it possible to turn off new "advanced"
features for the younger users.  (The option to disable this
is already in tuxpaint-config git master. :) )

Long story short, basically there are a lot of places where we
(mostly me) picked an arbitrary hard-coded value that gets used
by Magic tools, but now it's possible to let the user pick
from a variety of sizes :)


-  for (yy = -8; yy < 8; yy++)
-  {
-    for (xx = -8; xx < 8; xx++)

+  for (yy = -kalidescope_sz; yy < kalidescope_sz; yy++)
+  {
+    for (xx = -kalidescope_sz; xx < kalidescope_sz; xx++)


--
-bill!
Sent from my computer
|
|
From: Bill K. <nb...@so...> - 2023-04-11 16:58:07
|
In an attempt to make Tux Paint's buttons _slightly_ more usable, last night I updated the label generation to apply a word-wrap to the label text. It looks for a space character around the middle-ish of the string, and turning it into a "\n" newline; h/t Jozef for pointing out that this 'just works', if entering them manually in the "msgstr" in the PO files!) When the text gets word-wrapped, it is allowed to take up about 1.5 times the height as a single-line string. If the text + icon end up overlapping, the icon will be scaled (vertically only; so it gets squished a little, which I feel is acceptable). This helps a bit, even improving some of the longer English strings. In some cases, the strings are still VERY long (especially with the default buttonsize of '48' pixels), and when there's nowhere to split (no space character), it doesn't help at all. Greek is still quite unsatisfactory, but overall I think it's an improvement. Some screenshots can be seen in the very old bug about this (2009! ;-( ) https://sourceforge.net/p/tuxpaint/bugs/131/ Please take a look, check that things are working okay for you, and if anyone else has any ideas for improvements, let me know! Sadly, Tux Paint's UI is all homegrown, and handled individually within each 'part' of the app. A long time ago, there were very few 'places', but there are a few more now (the various color pickers, slideshow, ...). So I feel like before we could overhaul things in a big way, we'd need to generalize/modularize a bit more. Alas, it's just a hobby and doesn't pay the bills or give me health insurance, so I can only pick away at things slowly over many decades. ;-) -- -bill! Sent from my computer |
|
From: Albert C. <aca...@gm...> - 2023-03-22 15:16:32
|
>> I went with simply making the outline thicker, and I totally >> cheated, but I think it looks fine and will hopefully be >> helpful on devices with high dot pitch (like my phone). > > Before/after screenshots: > https://twitter.com/TuxPaintTweets/status/1638427499649712128 You may remember the RAM sizes that we used to use and the number of CPUs that we used to have when Tux Paint was started. The OLPC XO-1 B2 prototype had 64 MB of RAM. You might have started with 8 MB, which was enough for X. I have upgraded well beyond that, but not enough to view Twitter without locking up my system. I have 8 GB RAM, 4 cores, and an SSD. Granted, I have other tabs open, but still... So a non-Twitter screenshot would be very helpful. >From the description, I think there is an asymmetry, which feels really wrong. Could you go both directions evenly? Also it just isn't very much when DPI has gone up by a factor of 6. I can vaguely remember how the "8" came about. I wasn't going to use strings originally, and the original stiple pattern was 4x4. I had hex numbers. I replicated the patterns to fill something larger. Eventually I noticed that the stiple pattern appeared in the hex, so I just used that. Any digit would work, so I picked the 8. I don't think the pattern should change, except getting larger. It was well tested against the stamps. The stop sign is a notable source of trouble for other patterns. It would tend to align with the edges, making the dots disappear. You can't see it now, but at low resolution the stiple pattern actually looks really good. It's not just a grey blur. |
|
From: Bill K. <nb...@so...> - 2023-03-22 06:29:45
|
On Tue, Mar 21, 2023 at 11:26:37PM -0700, Bill Kendrick wrote: <snip> > I went with simply making the outline thicker, and I totally > cheated, but I think it looks fine and will hopefully be > helpful on devices with high dot pitch (like my phone). Before/after screenshots: https://twitter.com/TuxPaintTweets/status/1638427499649712128 -bill! |
|
From: Bill K. <nb...@so...> - 2023-03-22 06:26:46
|
On Fri, Mar 17, 2023 at 07:30:46AM -0400, Albert Cahalan wrote: > On 3/17/23, Bill Kendrick <nb...@so...> wrote: > > On Fri, Mar 17, 2023 at 12:41:19AM +0100, Pere Pujal i Carabantes wrote: > > >> Pixels are too tiny that make hard to see the Xor, > >> of course it is there and with a little of attention > >> one sees it but it is hard to see. > >> > >> I wonder if we could make the Xor thicker so it is > >> easy to see. > > Thicker in which way? The dots could be thicker, > or the outline could be thicker, or both. <snip> Thanks for the description of how it works. (Funny to learn only that "8" was ever used... room for some simplification?) I went with simply making the outline thicker, and I totally cheated, but I think it looks fine and will hopefully be helpful on devices with high dot pitch (like my phone). When it decides it's worth XOR'ing a pixel, it now also does this: * If it's _NOT_ already going to XOR the adjacent pixel to the right, XOR it too * Ditto for the adjacent pixel below * Ditto for the adjacent pixel below & to the right So basically -- ASCII art coming -- if before we were doing this: #-#-#- -....# #....- -....# #-#-#- (where "#" is an XOR'd pixel, and "-" would be a XOR'd pixel, except for the stiple pattern telling us to skip it) We will now do this: #-#-#-# -#-#-#- #-...-# -#...#- #-#-#-# -#-#-#- It tries to turn what was a point before into a square (but still stipled). It looks fine to me on my laptop and my external monitors. Both are 1920x1080. The external is a 23", so about 96ppi. The laptop is 14", so almost 160ppi. Wikipedia tells me my phone (a plain (non pro) Pixel 7) has a PPI of 416. Wow, no wonder I can't see anything on it! Pere & others, how does it look to you with this change? -bill! |
|
From: Albert C. <aca...@gm...> - 2023-03-17 11:30:55
|
On 3/17/23, Bill Kendrick <nb...@so...> wrote: > On Fri, Mar 17, 2023 at 12:41:19AM +0100, Pere Pujal i Carabantes wrote: >> Pixels are too tiny that make hard to see the Xor, >> of course it is there and with a little of attention >> one sees it but it is hard to see. >> >> I wonder if we could make the Xor thicker so it is >> easy to see. Thicker in which way? The dots could be thicker, or the outline could be thicker, or both. > There's a stiple[] array used when doing the stamp XOR, > but I honestly don't understand it. I need to look at it. It defines the dot pattern. Oddly, only the "8" matters. I don't remember why. This is the one in use: #define STIPLE_W 5 #define STIPLE_H 5 static char stiple[] = "84210" "10842" "42108" "08421" "21084"; To make dots thicker, that must be scaled. To make the outlines thicker, something else needs to be scaled. (something about calculating the stamp outline probably) If both should be scaled, which seems likely, then perhaps that should be done together when acting on the screen, leaving the non-screen data small. To try out scaling only the dots: #define STIPLE_W 10 #define STIPLE_H 10 static char stiple[] = "8844221100" "8844221100" "1100884422" "1100884422" "4422110088" "4422110088" "0088442211" "0088442211" "2211008844" "2211008844" ; I just doubled everything, making dots 2x2 instead of 1x1. Of course this is no good for compiling a single binary to support multiple screen sizes, and again it doesn't do anything about the thickness of the stamp outline that is being XORed onto the screen. These things should scale directly with screen size, not like the stamps do. (stamps scale with the square root of the screen size in order to balance the competing desires of using larger screens for more detail and for more room to draw) There is something to be said for keeping Tux Paint small in the pixels it internally handles, then asking the GPU to upscale the whole thing. If there isn't a GPU, high resolution is unlikely. The bad combo is probably only seen with virtual machines. |
|
From: Bill K. <nb...@so...> - 2023-03-17 09:48:50
|
On Fri, Mar 17, 2023 at 12:41:19AM +0100, Pere Pujal i Carabantes wrote: > Hi all, > > Pixels are too tiny that make hard to see the Xor, > of course it is there and with a little of attention > one sees it but it is hard to see. > > I wonder if we could make the Xor thicker so it is > easy to see. Ah, drat. > Line and Shapes Xors are better seen. Hrm, interesting! > I don't think it is a stoper for release, but wanted > to mention here before I forget about it, > recently I got a replacement for my old phone > and saw this problem. There's a stiple[] array used when doing the stamp XOR, but I honestly don't understand it. I need to look at it. I'll open a ticket tomorrow. I won't call it a "showstopper" for 0.9.29, unless anyone thinks I should. -bill! |
|
From: Pere P. i C. <per...@gm...> - 2023-03-16 23:41:38
|
Hi all, Pixels are too tiny that make hard to see the Xor, of course it is there and with a little of attention one sees it but it is hard to see. I wonder if we could make the Xor thicker so it is easy to see. Line and Shapes Xors are better seen. I don't think it is a stoper for release, but wanted to mention here before I forget about it, recently I got a replacement for my old phone and saw this problem. Best Pere |
|
From: Bill K. <nb...@so...> - 2023-03-07 23:07:27
|
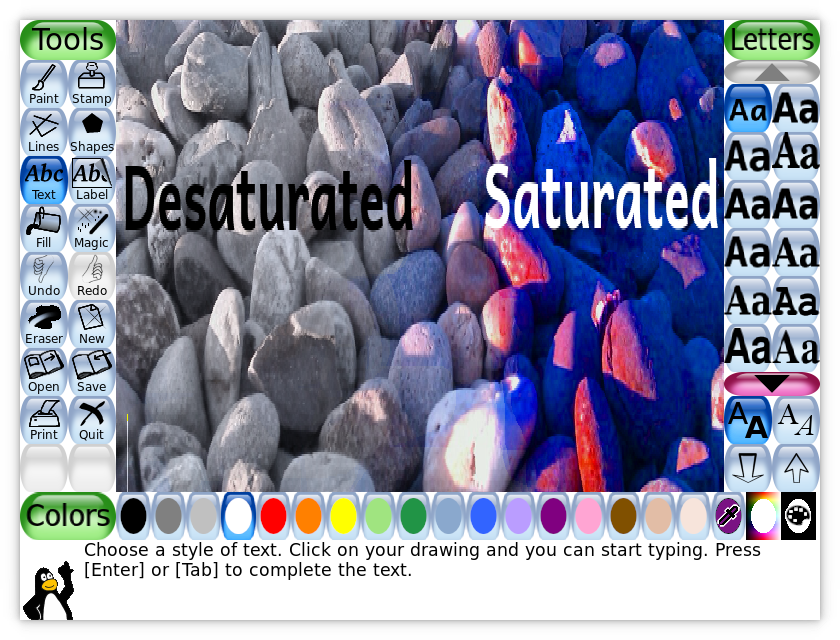
B0;115;0c Briefly, here are a few other things I've committed recently, in case anyone out here wants to try them out, provide feedback, or propose code changes... (Apologies if I've already mentioned any of these here!) * "Saturate" & "Desaturate" magic tools Similar to how "Darken" and "Lighten" let you adjust the value of pixels, this lets you adjust the saturation levels. Example: https://tuxpaint.org/latest/sshots/tuxpaint-0.9.29-sat-desat.png * "Remove Color" & "Keep Color" magic tools Variations on the "Desaturate" tool, these use the currently-selected color (i.e., what you'd paint with), and apply 100% desaturation to pixels on the canvas that are the same hue ("Remove") or NOT the same hue ("Keep") as that color. Example: https://tuxpaint.org/latest/sshots/tuxpaint-0.9.29-kaleidoscope-keep-remove-colors.png * "Kaleido-#" magic tools Various versions of a kaleidoscopic lens effect; attempts to simulate looking at your canvas through kaleidoscopes with various mirror angles (and hence levels of repetition): 90-degrees (4-way), 60-degress (6-way), and 456-degrees (8-way). (It's interactive; move the mouse around to adjust which parts of the drawing appear in the slices. It's fun!) Example: https://twitter.com/TuxPaintTweets/status/1633033494799736833/photo/1 * Cross-color-tool "grabbing" of colors When using the rainbow (HSV) color-picker, I kept wishing I could start with a color I picked up from the canvas using the pipette tool, or a color I created myself with the mixer. Now you can! It will show 2 or 3 buttons that will set the crosshairs on the rainbow color-picker so that they match either of those (or one of the built-in colors, if that's what was chosen at the time you opened up the rainbow color-picker dialog). Then you can move the crosshairs to "fine tune" the color. Note: I considered adding a similar function to the color mixer (where you blend ratios of red, yellow, blue, black, grey, and white), but (1) it's not easy, (2) the only way I could think of doing it was brute-force, and (3) I _think_ we can probably live with out. (More features = more complexity, and potential for confusion!) Video: https://twitter.com/TuxPaintTweets/status/1631595240208613377 Screenshot: https://sourceforge.net/p/tuxpaint/tuxpaint/ci/master/tree/docs/html/images/colors_rainbow_palette.png * Shapes tool improvements I kept finding it annoying when I'd using the Shapes tool in the "from the corner" (vs. the old-style "from the center") mode, shapes would always appear in the same orientation regardless as to whether I clicked and dragged downwards, or upwards. So now, an upwards drag will cause shapes (where it makes any difference, like triangle or the 5-pointed star) to start out rotated 180-degrees versus how they always appeared before. (A downward drag starts them at 0-degrees, as before.) Also, the "from the corner" shapes always rotated ABOUT their initial click point (the corner of their bounding box), and not AROUND their own center! That bugged me so much, so I finally tackled that. Video: https://twitter.com/TuxPaintTweets/status/1632671412245925889 I'm gearing up for a release soon (unless I have any other hair-brained ideas!) The major to-do items I have left right now is creating some icons and sound effects for some of the new Magic tools. All told, this new version (0.9.29) will have 15 new Magic tools! (Maze, Googly Eyes, Circles & Rays, Fur, 3D Glasses & Color Separation, Saturate & Desaturate, Keep & Remove color, Kaleido-4, -6, and -8, and Bloom) Plus: * It will introduce a rotation step with the Stamps tool. * The Fill tool gains a Shaped (bevel) gradient mode. * The rainbow color-picker can utilize colors chosen in other parts of the color palette. * Deleted images go into the Trash on macOS. * Templates & Starters can be (and many are) scaled in different ways when they don't match the canvas' aspect ratio. * A very brief Quickstart Guide has been added. * There'll be a keyboard shortcut to access the small Eraser. * An "auto" button size option is now available. ...plus many other small improvements, bug fixes, translation updates, and what-not! It's been a busy 7- or 8-months since the last release! Please test all these new things, if you have time & interest. Thanks in advance! -- -bill! Sent from my computer |
|
From: Bill K. <nb...@so...> - 2023-03-01 09:53:41
|
I've added a pair of new tools, "Kaleido-4" and "Kaleido-6", which apply a kaleidoscopic lens effect to the image, either 4-way (90-degree) or 6-day (60-degree). It's interactive (with a low-res preview), which is a lot of fun :) https://twitter.com/TuxPaintTweets/status/1630858851154264064 Feedback welcome, as usual! -- -bill! Sent from my computer |
|
From: Bill K. <nb...@so...> - 2023-02-28 22:52:36
|
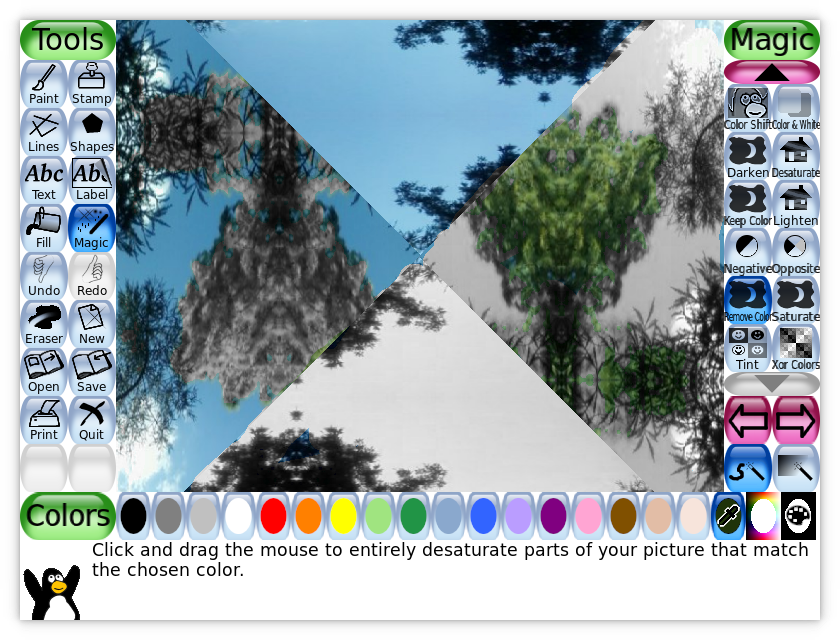
Other than the "Tint" tool, when used with a saturation-less color selection (like black or white), there was no way to desaturate parts of a picture in Tux Paint. And that was all-or-nothing -- you could 'tint' parts of your picture into greyscale, but not do anything more subtle. So I added a pair of new tools, "Desaturate" and "Saturate", to go along with the "Darken" and "Lighten" which affect the <getting into dangerous waters, terminology-wise!> value or luminosity of the pixels. In the end, I simply convert the RGB values into HSV, and then adjust the S amount. Right now I'm doing S = S * 3/4 for reduction, and S = S * 4/3 for increase. I could probably do better. Here's an example, using the rocky beach template, and applying "Desaturate" (via brush) a number of times on the left, and "Saturate" on the right: https://tuxpaint.org/latest/sshots/tuxpaint-0.9.29-sat-desat.png At one point, I went on a wild goose chase looking into whether using different color spaces might produce even better results (i.e., converting the RGB to XYZ then to LUV or L*a*b*) but then I remembered this is a program meant for young kids, and I don't need to worry _too_ much about perfection. Then I decided to add two other saturation-related tools that might be useful (if people think they are too strange or confusing to use, I could be convinced to shelve them). I called them "Keep Color" and "Remove Color". They totally desaturate parts of the image (turn it completely greyscale -- the S in HSV becomes 0.0) based on the currently selected color. So for example say you have a colorful drawing with some red balloons. They idea was to make it easy to turn the entire picture _except the balloons_ into greyscale. In this picture, I used "Reflection" to get a mirror-image of the tree-and-sky photo template (so it's easy to see what's happening), and the used "Remove Color" to remove the colors from blue sky at the bottom, and [most of] the green tree leaves at the top. https://tuxpaint.org/latest/sshots/tuxpaint-0.9.29-keep-remove-colors.png Note - All these tools need their own icons and sound effects. I really need to stop adding new features, so we can get a release out soon. Our followers on Twitter are clamouring for some of these new effects. ;-D -- -bill! Sent from my computer |
|
From: Bill K. <nb...@so...> - 2023-02-28 06:42:26
|
On Sun, Feb 26, 2023 at 03:28:03PM +0100, Karl Ove Hufthammer wrote: > Bill Kendrick skreiv 07.02.2023 10:43: > >I got a little obsessed over the "bloom" effect, and was struggling to > >understand Fast Fourier Transforms to get it done. Maybe some day. > >In the end, I brute-forced it and came up with an okay-looking (if not > >awesome, and not fast) effect. It's in the Git repo, please try it out. > > I’m sure the math is complex, but at least on my system, it just > looks like a *very* subtle ‘lighten’ effect. It's meant to add a fringe around light parts of the image, to simulate how bright lights affect how things look to a camera or even to human eyes. Here's an example where I created a brown background, with a slightly lighter brown radial gradient, then drew some basic color bars (white, yellow, cyan, green, etc.). The 'glow' seen comes entirely from the bloom effect being applied. https://pbs.twimg.com/media/Fp9DImxacAA-Bj2?format=png&name=small Frankly, I would have loved to implement it using Fast Fourier Transforms, but _that_ level of math has eluded me so far. > And at first, I didn’t think it worked *at all*, as the thing I was > drawing disappeared as soon as I let go of the mouse button. But > after a bit more testing, I see that it does lighten (non-dark) > areas somewhat and adds a (too) subtle glow effect. Okay, I've tried changing "BLOOM_WEIGHT_CONST" from 0.025 to 0.05, basically doubling it, and it's more obvious, without being too overwhelming, I think. -bill! |
|
From: Bill K. <nb...@so...> - 2023-02-28 06:30:51
|
On Sun, Feb 26, 2023 at 02:40:46PM +0100, Karl Ove Hufthammer wrote: > Bill Kendrick skreiv 30.12.2022 01:21: > >I recently added a "Googly Eyes" Magic tool to Tux Paint > >(it appears as two options; small and large variations, > >not unlike "Bricks" tool). > > > >Please pull from master, try it out, and report any issues! > > Two issues: > > Word puzzle in the .po file: ‘Click to place a %s, then drag and > release to make it look that direction.’, where %s is replaced by > either ‘large googly eye‘ and ‘small googly eye’. This probably > won’t work for all languages. Replace it with two separate > sentences. Okay, done! Thanks, as always. > You wrote ‘Googly Eyes’ here and in the documentation, but in the > actual application, it’s ‘Google Eyes’. !! Wow I'm blind !! > And shouldn’t it really be > ‘Goggle-eyed’ (with one o and a hyphen), cf. > https://dictionary.cambridge.org/dictionary/english/goggle-eyed? But > there’s also https://en.wikipedia.org/wiki/Googly_eyes. In any case, > ‘Google Eyes’ is probably wrong. Goggle-eyed describes a look on someone's face, whereas googly-eyes are a craft-making item that this Magic tool is meant to simulate. :) Thanks! -bill! |
|
From: Karl O. H. <ka...@hu...> - 2023-02-26 14:28:24
|
Bill Kendrick skreiv 07.02.2023 10:43: > I got a little obsessed over the "bloom" effect, and was struggling to > understand Fast Fourier Transforms to get it done. Maybe some day. > In the end, I brute-forced it and came up with an okay-looking (if not > awesome, and not fast) effect. It's in the Git repo, please try it out. I’m sure the math is complex, but at least on my system, it just looks like a *very* subtle ‘lighten’ effect. And at first, I didn’t think it worked *at all*, as the thing I was drawing disappeared as soon as I let go of the mouse button. But after a bit more testing, I see that it does lighten (non-dark) areas somewhat and adds a (too) subtle glow effect. -- Karl Ove Hufthammer |
|
From: Karl O. H. <ka...@hu...> - 2023-02-26 14:06:08
|
Bill Kendrick skreiv 30.12.2022 01:21: > I recently added a "Googly Eyes" Magic tool to Tux Paint > (it appears as two options; small and large variations, > not unlike "Bricks" tool). > > Please pull from master, try it out, and report any issues! Two issues: Word puzzle in the .po file: ‘Click to place a %s, then drag and release to make it look that direction.’, where %s is replaced by either ‘large googly eye‘ and ‘small googly eye’. This probably won’t work for all languages. Replace it with two separate sentences. You wrote ‘Googly Eyes’ here and in the documentation, but in the actual application, it’s ‘Google Eyes’. And shouldn’t it really be ‘Goggle-eyed’ (with one o and a hyphen), cf. https://dictionary.cambridge.org/dictionary/english/goggle-eyed? But there’s also https://en.wikipedia.org/wiki/Googly_eyes. In any case, ‘Google Eyes’ is probably wrong. -- Karl Ove Hufthammer |
|
From: Bill K. <nb...@so...> - 2023-02-23 09:04:27
|
On Wed, Feb 22, 2023 at 03:51:36PM -0800, Bill Kendrick wrote: > > I've created a new magic tool that allows you to separate > one channel of a picture's color from another, via translation. <snip> Alright, I decided to split it into two tools: * 3D Glasses (red/cyan, horizontal only), and * Color Sep. (any color, any direction) Off to bed with me! -bill! |
|
From: Bill K. <nb...@so...> - 2023-02-22 23:51:50
|
I've created a new magic tool that allows you to separate one channel of a picture's color from another, via translation. For example, the red/cyan option, when separating horizontally, is useful to make anaglyphic pictures you can view with 3D glasses. Here's a simple example: https://twitter.com/TuxPaintTweets/status/1628278912446009344 And here's a video of it in action: https://twitter.com/TuxPaintTweets/status/1628295483470024704 Currently, I let you choose a color to determine how the colors separate. If the color you pick contains more red than the other two colors (blue & green), or conversely more of the other two colors (i.e., cyan), then it will be a Red/Cyan separation. If the color is fairly monochrome (black, grey, white), it will default to the Red/Cyan setting. Alternatively, I could just make three distinct tools, and deactivate the color selections, if that seems less confusing. Thoughts? A couple more things to consider, that I'd love feedback on... The Blue/Yellow (blue vs. red + green) separation is fairly difficult to notice, but I'm assuming that's because human eyes are the least sensitive to blue. (Maybe even more so for me, as a male?) I'm leaning towards keeping it as an option, to provide as much variety as possible, though. It reads individual pixels from the snapshot (input) canvas twice, from two different offset positions, and then applies the results (mixing different combinations of one or the other input pixels' red/green/blue values) to the output canvas. It does this for _every pixel_, even as you're dragging the mouse around. I'm curious whether this performs okay for everyone. I could make a preview that's much lower resolution, and then upon release, it would process every single pixel. It uses Tux Paint magic API's "getpixel", so when the offset is off the edge of the canvas (as it literally always be, at least in one direction), it smears. (See the video.) That seems okay to me. As you drag, rather than moving one channel the direction of the mouse, it moves one channel half that direction, and the other two half in the opposite direction. (See the video.) If you simply click & release (no drag), it will offset horizontally a small amount. The 3D frog picture (static image linked above) was created with the following steps: 1. pick frog, shrink size & place it 2. red/cyan offset (click+release) 3. enlarge frog & place it again 4. repeat steps 2 & 3 a few more times The most-recently placed frog appears "close" to when I use my red (left lens) / blue (right lens) 3D glasses. The ones I placed longest ago appear "far away". It really had me giggling when I tested it out. It worked perfectly! >:-D (Bonus silly image: https://twitter.com/billkendrick/status/1628298259327488001) I was thinking there might be ways for me to separate other color combinations, but I'm not sure the best way of doing this. Perhaps using percentages? (This is why I based the separation mode on the currently-chosen color.) Maybe if I figure that out, I could have two tools: * 3D Glasses + Red/cyan mode only + Therefore, color options disabled + Only translates horizontally (ignores vertical motion) * Color Separation + Any color combination + Therefore. color options enabled + Translations in both dimensions (horizontal & vertical) I can never leave well enough alone, can I? ;) -- -bill! Sent from my computer |
|
From: Pere P. i C. <per...@gm...> - 2023-02-20 09:51:24
|
El dg. 19 de 02 de 2023 a les 18:20 -0800, en/na Bill Kendrick va escriure: > On Sat, Feb 18, 2023 at 11:30:43PM +0100, Pere Pujal i Carabantes wrote: > > El dv. 17 de 02 de 2023 a les 21:48 -0800, en/na Bill Kendrick va escriure: > > > On Thu, Feb 09, 2023 at 12:21:49AM +0100, Pere Pujal i Carabantes wrote: > > > > That was in a debug build, a more regular build speeds up a lot > > > > Check it at > > > > https://provant.freeddns.org/pere/public_html/developing/20230109/ > > > > > > Thanks! > > > > > > BTW, in testing this I realize the new stamp rotation feature is > > > pretty terrible on a touchscreen, so I'm going to try and think of > > > a way to make it easier to use. :-/ > > > > I see you are currently working in it, let me know if/when you want a new build to test > > Basically, I've made it an option (default: off, to avoid changing > behavior too much from earlier Tux Paint), and only rotate when > dragging outside of the shape. > > I think for larger shapes, this may be difficult, since you can't reach > outside of them, but I'll keep thinking about it. Maybe click+drag will > act differently than simply dragging...? Maybe also reduce the "0 rotation space" to the size of buttons instead of the stamp size? Or just reduce it to 0 if the drag has already started to rotate? > > It's definitely difficult trying to design something that makes sense > with _both_ a mouse _and_ touchscreen! :-) > > Please make a new build when you have time, and I'll play with it, and > maybe see what my family members think of it. I haven't tested it, my phone has some problems, https://provant.freeddns.org/pere/public_html/developing/20230220/ > > -bill! > > > _______________________________________________ > Tuxpaint-devel mailing list > Tux...@li... > https://lists.sourceforge.net/lists/listinfo/tuxpaint-devel |
|
From: Bill K. <nb...@so...> - 2023-02-20 02:20:48
|
On Sat, Feb 18, 2023 at 11:30:43PM +0100, Pere Pujal i Carabantes wrote: > El dv. 17 de 02 de 2023 a les 21:48 -0800, en/na Bill Kendrick va escriure: > > On Thu, Feb 09, 2023 at 12:21:49AM +0100, Pere Pujal i Carabantes wrote: > > > That was in a debug build, a more regular build speeds up a lot > > > Check it at > > > https://provant.freeddns.org/pere/public_html/developing/20230109/ > > > > Thanks! > > > > BTW, in testing this I realize the new stamp rotation feature is > > pretty terrible on a touchscreen, so I'm going to try and think of > > a way to make it easier to use. :-/ > > I see you are currently working in it, let me know if/when you want a new build to test Basically, I've made it an option (default: off, to avoid changing behavior too much from earlier Tux Paint), and only rotate when dragging outside of the shape. I think for larger shapes, this may be difficult, since you can't reach outside of them, but I'll keep thinking about it. Maybe click+drag will act differently than simply dragging...? It's definitely difficult trying to design something that makes sense with _both_ a mouse _and_ touchscreen! :-) Please make a new build when you have time, and I'll play with it, and maybe see what my family members think of it. -bill! |
|
From: Pere P. i C. <per...@gm...> - 2023-02-18 22:30:57
|
El dv. 17 de 02 de 2023 a les 21:48 -0800, en/na Bill Kendrick va escriure: > On Thu, Feb 09, 2023 at 12:21:49AM +0100, Pere Pujal i Carabantes wrote: > > That was in a debug build, a more regular build speeds up a lot > > Check it at > > https://provant.freeddns.org/pere/public_html/developing/20230109/ > > Thanks! > > BTW, in testing this I realize the new stamp rotation feature is > pretty terrible on a touchscreen, so I'm going to try and think of > a way to make it easier to use. :-/ I see you are currently working in it, let me know if/when you want a new build to test Pere > > -bill! > > > _______________________________________________ > Tuxpaint-devel mailing list > Tux...@li... > https://lists.sourceforge.net/lists/listinfo/tuxpaint-devel |
|
From: Bill K. <nb...@so...> - 2023-02-18 05:48:41
|
On Thu, Feb 09, 2023 at 12:21:49AM +0100, Pere Pujal i Carabantes wrote: > That was in a debug build, a more regular build speeds up a lot > Check it at > https://provant.freeddns.org/pere/public_html/developing/20230109/ Thanks! BTW, in testing this I realize the new stamp rotation feature is pretty terrible on a touchscreen, so I'm going to try and think of a way to make it easier to use. :-/ -bill! |
|
From: Bill K. <nb...@so...> - 2023-02-12 18:54:11
|
On Sat, Feb 11, 2023 at 02:57:20AM -0500, Albert Cahalan wrote: > You might want a gravity direction.This would cause the filling (smear > or solid) or cropping to avoid one or two of the sides. > > 0. center > 1. left > 2. right > 3. top > 4. bottom > 5. bottom-left > 6. bottom-right > 7. top-left > 8. top-right Excellent idea, I've implemented this (as a separate option), and somehow it wasn't too difficult. I'm working to document it now; that might be the hard part. ;) Thanks to both you and Pere for putting though into this. > Another option is to tile. This probably ought to scale the way stamps > do, proportional to the fourth root of the canvas area. (that being a > compromise for how to make use of larger screen size) Maybe the tiled > ones should appear as 2x2 in the selection UI. Simple tiling is enough > I think; there is no need for weird symmetries. I'm gonna hold off on this idea, but I'll let it percolate in my brain. Thanks :) -bill! |
|
From: Albert C. <aca...@gm...> - 2023-02-11 07:57:31
|
You might want a gravity direction.This would cause the filling (smear or solid) or cropping to avoid one or two of the sides. 0. center 1. left 2. right 3. top 4. bottom 5. bottom-left 6. bottom-right 7. top-left 8. top-right Another option is to tile. This probably ought to scale the way stamps do, proportional to the fourth root of the canvas area. (that being a compromise for how to make use of larger screen size) Maybe the tiled ones should appear as 2x2 in the selection UI. Simple tiling is enough I think; there is no need for weird symmetries. |
|
From: Pere P. i C. <per...@gm...> - 2023-02-10 23:31:45
|
El dv. 10 de 02 de 2023 a les 02:40 -0800, en/na Bill Kendrick va escriure: > When a starter image or template is not the exact same size > as the canvas, it will of course be scaled up or down. > We do not change the aspect ratio (change the shape, aka > squash or stretch) of the picture, though. > > If the aspect ratio is not the same as the canvas (which it > frequently is note), it will scale up as large as it can > and then "smear" the edges that did not fill the canvas. > This can look really weird & ugly, especially with the > photographic ones (e.g., the rocky beach template). > > I just started work to allow option files (plaintext config > files with the same name as the image file, but with ".dat" > extension; same as we do with stamps and brushes) to allow > this to be overridden for some starters & templates. > > I have done so already with the wool mill machinery, the > rocky beach, and the reef (2-layer starter). They've all > been set to use the same option, "autoscale=both". > > The "autoscale" option allows you to tell Tux Paint whether it's okay > to scale the image up so much that the edges will be cropped away. > For example, a wide starter on a narrow canvas can be scaled up so > that it fits vertically, with the left/right sides getting discarded. > > And conversely, a narrow starter on a wide canvas can be scaled up > so that it fits horizontally, with the top/bottom discarded. > > If it only makes sense to allow one dimension to be discarded > (i.e., right & left is okay, but cutting off the top & bottom > would be bad), you can specify either "autoscale=horizontal" > or "autoscale=vertical". Maybe also "autoscale=bottom" since in some starters is better to retain the upper part. > > If no scaling is specified, it will scale up as much as it > can without cropping anything, like it has been doing already. > > Now, though, you can also specify whether or not to "smear" > (which will be the default), or to simply use a solid background color > (which you specify with "background=..." in the file; it supports > 6- and 3-digit hex (e.g., #FFFFFF & #000) and decimal, just like the > color palette file does. This would be good for B&W coloring-book > style starters (e.g., the skull SVG) which can sometimes end up > with a very faint edge getting smeared all the way down the canvas. > > Note: If the "autoscale=both" option is set, the image will NEVER have > any bare edges, no matter the shape of the canvas. So the background > setting (smear, or use a background color) is moot. > > I posted a tweet on Twitter showing the rocky beach template, > with before & after in both portrait & landscape canvases of > rather extreme sizes (Tux Paint running at 1280x640 and 640x960). > > https://twitter.com/billkendrick/status/1623989004436901890 > > For the rocky beach template, for example, I don't think what's > at the extreme edges "matters". And I'd prefer to have a drawing > that looks like some nice rocks, regardless of my canvas' > aspect ratio, rather than weird smeary edges. :) > > I need to test this a bunch more, document it (EXTENDING), and > add sensible defaults for any starters & templates that would > benefit from the different settings. > > I cannot guarantee that Tux Paint will behave very well with starters > & templates [*] if you save a drawing, quit, change the canvas size > (via setting a different window size), launch Tux Paint again, and > open the image up again. However, I don't think it's done a great > job with this _already_, so I'm not super concerned. > > What you'll see is that I only apply this "scale & crop?" and > "background color or smear?" decision when loading the actual > starter/template images, and don't do it to the saved drawing. > > It also gets a little tricky because as of late, we jam some > of the starter & template stuff (including the entire background > and foregrounds?!) into the PNG files, if I recall correctly. Yes, IIRC this is drawing surface, old dat file contents, starter bakground and foreground surfaces, label surface (if any) and contents of labels. As I see it, starter back and fore surfaces MUST be tied to the saved drawing and suffer the same changes as the saved drawing if the canvas change. Currently, on Open, it regenerates the starter surfaces from the stored data without taking account of the changes in the drawing, so if the drawing has scaled because canvas changes, then the starter and drawing will not match anymore. Also, some magic tools woul benefit of starter sync with drawing, like move, zoom, perspective... my 2 cents Pere > > Basically, woe is me, I don't think I can make this "perfect"... > but I think this improvement is probably beneficial. > > Holler if you have other ideas or concerns! > > -bill! > > [*] Starters would be more adversely affected since there is a top > layer that applies itself to the image after every modification > (paint, stamp, etc.) Warped & zoom-in/out effects could be seen. > Templates are less of a concern, as they only come into play -- the > same way as the starters' background layers -- when you use the > Eraser tool. > > PS - This is https://sourceforge.net/p/tuxpaint/feature-requests/190/ > > > _______________________________________________ > Tuxpaint-devel mailing list > Tux...@li... > https://lists.sourceforge.net/lists/listinfo/tuxpaint-devel |