For Linux users with the PicKit3 you will have to use MPLAB-X in the "Prebuilt (Hex, Loadable Image) Project" mode of operation.
If you have an official MicroChip PicKit2 you can use MPLAB-X as for the PicKit3. However, if you have a cheap clone, or you don't want the bulk of the MPLAB-X program (let's face it, it's not very quick) you can use the pk2cmd utility:
For all of these methods you will either need to turn on the option to make the PicKit provide power to the target (at 3.3V or thereabouts), or power the board from an Arduino.
If your cheap clone of the PicKit2 isn't capable of providing 3.3V (some will only do 5V) you will have to ensure you disconnect pin 2 of the programming header (you can pull a pin out of a header strip to miss it out) so you don't toast the board.
If you would like to refer to this comment somewhere else in this project, copy and paste the following link:
Thanks Matt - I managed to upgrade to the R8 firmware - not exactly on the first try (I managed to overwrite the freshly downloaded firmware with the version on the chip on the first try). But everything is up to date for now firmware wise. Happy to confirm the ebay bought pickit2 clone does the job!
If you would like to refer to this comment somewhere else in this project, copy and paste the following link:
sorry I havent posted until now (new to sourceforge)..
I posted my initial feedback/review by EMAIL a while back to Matt.
and have been keeping up a bit.. but now how have questions about the flashing of the PIC chip using PICKit2 programmer.
(havent messed with any PIC stuff in a long time)..
Is there a header and/or pinout posted for the WavePro on where to flash the PIC chip? (vias next to the SD socket?.. what is the pin out/order?)
So to ensure I dont mess anything I wanted to post:
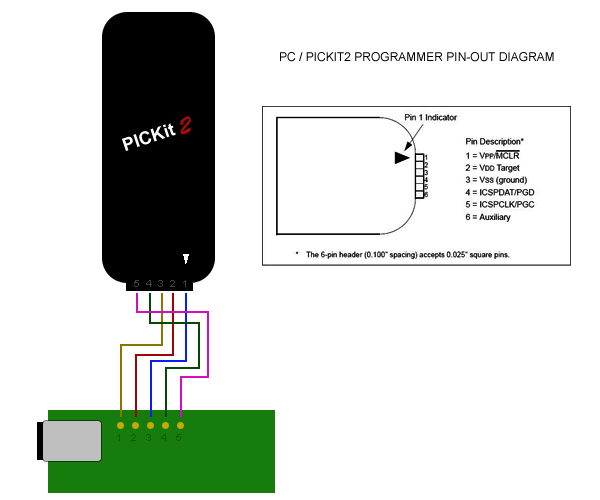
1.) (ignore the board used in diagram..old image)
PINOUT IS?
The pin out for making your data cable from PROGRAMMER to PC is as follows
(see attached pic)
PICKit pin 1 >> WavePro pin x
PICKit pin 2 >> WavePro pin x
PICKit pin 3 >> WavePro pin x
PICKit pin 4 >> WavePro pin x
PICKit pin 5 >> WavePro pin x
2.) boot up PICKit2 software
3.) choose correct device family (chip version)
**in this case you would pic dsPIC33 from the menu options
4.) double check you have correct versions picked (again dsPIC33 is what you want.. not what image shows)
5.) Select HEX file you want to burn/write
6.) Make sure it imported ok
7.) Enable code protect (if applicable)
8.) Write HEX file to chip:
9.) Done:
10.) Verify: Click the read button.. You do this to 'test' out if you did in fact checked 'enable code protect' before writing firmware to chip..
It the test FAILS you are good to go.. if get a READ/DUMP, then start over..and make you sure enable code protect before writing. (seems to be in the HEX?)
If you would like to refer to this comment somewhere else in this project, copy and paste the following link:
There is a set of 6 hole to one side of the SD card - this is a friction-fit ICSP header slot. You need a 5 or pin header strip to push in there, then you can just plug the pickit direct in to it. The square hole is pin 1 (MCLR) - everything else is as on the pickit from there.

How you update your firmware depends on the programmer you have and the operating system you use.
For Windows users there is a stand-alone program for flashing pre-built hex files:
For Linux users with the PicKit3 you will have to use MPLAB-X in the "Prebuilt (Hex, Loadable Image) Project" mode of operation.
If you have an official MicroChip PicKit2 you can use MPLAB-X as for the PicKit3. However, if you have a cheap clone, or you don't want the bulk of the MPLAB-X program (let's face it, it's not very quick) you can use the pk2cmd utility:
http://ww1.microchip.com/downloads/en/DeviceDoc/pk2cmdv1-20Linux2-6.tar.gz
pk2cmd -p -r -m -f WavePro-r8.hex
For all of these methods you will either need to turn on the option to make the PicKit provide power to the target (at 3.3V or thereabouts), or power the board from an Arduino.
If your cheap clone of the PicKit2 isn't capable of providing 3.3V (some will only do 5V) you will have to ensure you disconnect pin 2 of the programming header (you can pull a pin out of a header strip to miss it out) so you don't toast the board.
Thanks Matt - I managed to upgrade to the R8 firmware - not exactly on the first try (I managed to overwrite the freshly downloaded firmware with the version on the chip on the first try). But everything is up to date for now firmware wise. Happy to confirm the ebay bought pickit2 clone does the job!
Hey guys-
sorry I havent posted until now (new to sourceforge)..
I posted my initial feedback/review by EMAIL a while back to Matt.
and have been keeping up a bit.. but now how have questions about the flashing of the PIC chip using PICKit2 programmer.
(havent messed with any PIC stuff in a long time)..
Is there a header and/or pinout posted for the WavePro on where to flash the PIC chip? (vias next to the SD socket?.. what is the pin out/order?)
So to ensure I dont mess anything I wanted to post:
1.) (ignore the board used in diagram..old image)
PINOUT IS?
The pin out for making your data cable from PROGRAMMER to PC is as follows
(see attached pic)
PICKit pin 1 >> WavePro pin x
PICKit pin 2 >> WavePro pin x
PICKit pin 3 >> WavePro pin x
PICKit pin 4 >> WavePro pin x
PICKit pin 5 >> WavePro pin x
2.) boot up PICKit2 software

3.) choose correct device family (chip version)

**in this case you would pic dsPIC33 from the menu options
4.) double check you have correct versions picked (again dsPIC33 is what you want.. not what image shows)

5.) Select HEX file you want to burn/write

6.) Make sure it imported ok

7.) Enable code protect (if applicable)

8.) Write HEX file to chip:

9.) Done:

10.) Verify: Click the read button.. You do this to 'test' out if you did in fact checked 'enable code protect' before writing firmware to chip..

It the test FAILS you are good to go.. if get a READ/DUMP, then start over..and make you sure enable code protect before writing. (seems to be in the HEX?)
Yep, my bad.
There is a set of 6 hole to one side of the SD card - this is a friction-fit ICSP header slot. You need a 5 or pin header strip to push in there, then you can just plug the pickit direct in to it. The square hole is pin 1 (MCLR) - everything else is as on the pickit from there.