Hello all. This is my first post. I’ve been lurking around for a while trying to gather information and such. Long story short I’m an IT instructor (mostly all Cisco and networking) and was looking for a way to inject network bandwidth issues, jitter, and so on into our training networks. I found the WANem live disc and realized that it fit about 95% of what I needed but that other 5% would be kind of difficult to come by. I wanted to run WANem off a hard drive vs. being a live disc. Now, there are several “How to’s” out there on how to do this but few really touched on how to do it the way I needed it to work. Long story short many of the ways that folks describe doing it would leave you with a halfway responsive box or just wouldn’t work at all. I needed something that was fairly responsive and worked as it should. I also needed it to act as a static router and dhcp server.
Now, I want to disclose this right away. I am not a Linux/Unix guru by any stretch of the imagination. I’ve learned just enough about it over the years to make me dangerous. In fact some of the things that I have done might be just bad practices on real live boxes. To me this doesn’t matter because it’s a training/baselining box, but please comment if I have done something terrible if I haven't already disclosed it. A few of the things I did I will note their weakness, but some I just didn’t know any better to be honest if they exist. But I figured it would be best to post up my steps and processes to help with the community and if it helps another person get onboard and install this great program to their hard drive and reap its wonderful benefits that much quicker then that’s terrific.
If you would like to refer to this comment somewhere else in this project, copy and paste the following link:
First things first my simulator box is a box running ESXI. I developed the OS using VMPlayer and then converted it over using a converter that VMware offers. The VM has a 2 GB hard drive, 512 MB of ram and two NICS operating in a bridged mode (doesn’t really matter once you put it on ESXI though). I started with a stable release of Debian for an I386 http://hammurabi.acc.umu.se/debian-cd/6.0.6/i386/iso-cd/debian-6.0.6-i386-netinst.iso. Note this file can change at any time so just note that I started with the newest stable release of Debian at the time of this post. I started the install in VMPlayer. Did all the normal things and set my passwords and such. The only two additional services I installed were SSH and Web Server. Everything else I left unchecked. I planned to run multiple VMs at the same time on the server so I wanted the VMs to be running as little as possible and to have as little as possible cause problems on the boxes.
If you would like to refer to this comment somewhere else in this project, copy and paste the following link:
After I got it installed and rebooted I logged back into the box and made the box ready to install all the needed updates and add-ons I needed to make life easy for file editing. These are the first two commands you need to run. This makes sure everything is up to date.
NOTE: From here on out for almost all commands you need to execute as a root user so if you didn’t do a sudo su when you logged in (recommended) make sure you put sudo in front of the below commands.
apt-get update
apt-get dist-upgrade
The next thing you need to get is to download the VIM editor. You are going to need to edit files with the “vi” command and quite frankly the version that is loaded at this point is very clunky, so we execute the following to update it to a much nicer and more friendly version.
apt-get install vim
Lastly for this post, we will change our graphics options. The 640x480 screen just doesn’t cut it when you’re looking at 100’s of lines of code. You need something with a bit more resolution. Being we aren’t running any login agents the resolution is rather clunky. 1024x768 is a good resolution for me and that’s what I am going to set it at in my example. We need to edit the grub file in the /etc/default/ directory so we type in the following
vi /etc/default/grub
In the file edit the line that states GRUB_CMDLINE_LINUX="" to GRUB_CMDLINE_LINUX="video=vesa vga=791" and exit and save the file.
Now execute the update-grub command.
update-grub
Then reboot your machine and enjoy much better resolution.
NOTE: I do understand that various login agents such as Gnome and KSD can also change the resolution of the console screen and also add a degree of security, but I opted not to do this being the device isn’t used on a live network, but I may change my mind on this in the future based on possible input and saboteurs (IE students messing around).
If you would like to refer to this comment somewhere else in this project, copy and paste the following link:
The WANem live CD from the best I can tell has it’s foundations in an older British telecom project called phpnetemgui http://tcn.hypert.net. In summary the web pages you are clicking on in WANem is in essence executing commands on the Linux box from the TCN emulator which now is included in most Linux distributions. WANem (or even phpnetemgui) just implements a web GUI to give you easier administration access of the functions you wish to simulate. One of the features we need to enable our box to do is to run PHP scripts, because without PHP scripting enabled our webpage will not be able to execute commands on our box so we need to do this.
apt-get install php5
If you are planning to use your box as a router like I did then you will also need to download the DHCP server at this time
apt-get install dhcp3-server (NOTE: It may tell you DHCP server failed on startup, that’s fine you haven’t configured it yet).
Next post we’ll talk about DHCP and network configurations.
If you would like to refer to this comment somewhere else in this project, copy and paste the following link:
Being I planned to use the box as a router and dhcp server for the simulation network then we need to make those changes. We need to edit the /etc/network/interfaces file to configure at least one interface statically and to also set routes and such. The following image below should explain it all
vi /etc/network/interfaces
Ensure you save the file. Now you need to ensure the box will redirect packets that it receives out the appropriate interface per its routing table IE act like a router. You need to enable IP forwarding by editing the sysctl.conf file found in the /etc directory and unremarking the field where it states “net.ipv4.ip_forward=1” See the image below.
vi /etc/sysctl.conf
Ensure you save the file and now to ensure the file is applied during boot up you have to update it to a persistent status by executing the sysctl –p command. If it is successful it will echo your last settings in the sysctl.conf file. Screen shot below
If you would like to refer to this comment somewhere else in this project, copy and paste the following link:
Lastly for this post you need to configure your DHCP server. In my situation it needed to be very basic. Mind what IP address and subnet mask you are using on your interface and go from there. Based on my example above my scope is going to be from 10.0.0.2 – 10.0.0.254. You need to edit the dhcpd.conf file found in the /etc/dhcp/ directory. For this I will recommend renaming the dhcpd.conf file as dhcpd.conf.bak and start with a clean file that way you know exactly what you have. Below is a screen shot of the file in question.
vi /etc/dhcp/dhcpd.conf
I actually followed a very good explanation of how to configure the DHCP server here. http://www.howtoforge.com/dhcp_server_linux_debian_sarge
If you would like to refer to this comment somewhere else in this project, copy and paste the following link:
Well, almost there guys, but this is what I feel is the hardest part of the whole thing. We need to fire up the live CD of WANem and copy all the files and subdirectories from the /root directory of the WANem live cd and the /var/www/WANem directory + subdirectories of the WANem live cd to some sort of media so we can get them onto the hard drive version of the software which we are creating. My weapon of choice was a thumb drive and porting it back and forth between virtual machines. You may choose otherwise. Pick your weapon accordingly. Once done before moving around the media make sure you umount the media first (ask me how I learned that lesson LOL).
Now onto your bootable box. You need to create a /root directory and copy all the files that were in root from the WANem box into here. Then you need to make a directory called /var/www/WANem on your box and copy all files from the WANem box into this folder.
NOTE: Ensure these files and directories have retained ALL OF THEIR PERMISSIONS from the live CD version of WANem. This applies to users, groups, and of course others. If the file permissions did not copy over correctly you need to do a chmod to correct the permissions are correct. THIS IS VERY IMPORTANT!!!!!!
If you would like to refer to this comment somewhere else in this project, copy and paste the following link:
On the home stretch. We now need to give the www-data user (the default username that Apache2 uses) root privileges without a password
DANGER DANGER DANGER……
The following step basically gives the www-data user full reign and control over this box. This is a needed step, but understand the risk involved. To do this, type in the command and give the www-data user root privileges without password. Follow the screenshot below.
visudo
If you would like to refer to this comment somewhere else in this project, copy and paste the following link:
This next step might be totally unneeded or absolutely needed. In a perfect world everything should be ready to rock and roll, but I ran into a problem when I initially built my WANem box and recreated it for this write-up. It didn’t work at this point! I did some testing and noticed while I could get to the WANem webpage, the options I specified in the click downs would not be applied to the box. From the console I did a su www-data and attempted to execute these commands (by clicking the display commands vs. applying) and threw the commands in the console and it failed. Mentioned “command could not be found”. I’m uncertain as to why at this point. I suspect that the Apache2 user is not being given sudo privileges without a password. Initially I thought I did the visudo setup incorrectly, but the more and more I looked into it via Google from various sources it seems that there is a bug in with the Linux kernel 2.6.x where this may happen and some say put the line at the very end etc etc. Well, that never worked for me, so what I had to do was to upgrade the kernel itself. I followed the steps listed here. http://www.cyberciti.biz/faq/debian-linux-6-apt-get-install-linux-kernel-3-2/
NOTE: I ended up using the bpo4-486 version of the kernel. I feel that you don’t need multithreading and such and quite frankly you aren’t going to be doing a bunch of true crunching with this box so IMO the 486 version will be fine. Again my whole idea was to keep this as crunched as I could.
If you would like to refer to this comment somewhere else in this project, copy and paste the following link:
Well folks that’s it, you should have a decent “recipe” for how to build your own hard drive based WANem without the annoying broken dependencies and such that I’ve seen with other ways of doing it. Sorry for the long initial topic, but I felt I needed to document the entire process to ensure
A. Any improvements can be intelligently provided (I'm certain they can be recommended, but it does work)
B. Give a Linux Noob a fighting chance to get something like this up and working with minimal experience.
Thanks guys and again revisions and recommendations are always welcome.
Jason
If you would like to refer to this comment somewhere else in this project, copy and paste the following link:
I am sooo close! I have followed you nearly exactly. (I didn't need DHCP but I also added quagga for OSPF.) I'm installing on Debian i386 NetISO which brings me up to the most current packages by default. Oh, also, I scp'ed over the /root, /var/www/WANem, and /etc/profile files to their respective places.
I had to "fix" some issues with their PHP code and this might be where my problem is but now the WANem GUI doesn't seem to see any interfaces when I click on the "Advanced Settings" link.
Thoughts?
If you would like to refer to this comment somewhere else in this project, copy and paste the following link:
Are you sure you edited your sudoers file correctly. If the www-data user doesn't have root permissions then you won't be able to see the status of the interfaces. I would check that first. Something simple most likely.
If you would like to refer to this comment somewhere else in this project, copy and paste the following link:
Hello all. This is my first post. I’ve been lurking around for a while trying to gather information and such. Long story short I’m an IT instructor (mostly all Cisco and networking) and was looking for a way to inject network bandwidth issues, jitter, and so on into our training networks. I found the WANem live disc and realized that it fit about 95% of what I needed but that other 5% would be kind of difficult to come by. I wanted to run WANem off a hard drive vs. being a live disc. Now, there are several “How to’s” out there on how to do this but few really touched on how to do it the way I needed it to work. Long story short many of the ways that folks describe doing it would leave you with a halfway responsive box or just wouldn’t work at all. I needed something that was fairly responsive and worked as it should. I also needed it to act as a static router and dhcp server.
Now, I want to disclose this right away. I am not a Linux/Unix guru by any stretch of the imagination. I’ve learned just enough about it over the years to make me dangerous. In fact some of the things that I have done might be just bad practices on real live boxes. To me this doesn’t matter because it’s a training/baselining box, but please comment if I have done something terrible if I haven't already disclosed it. A few of the things I did I will note their weakness, but some I just didn’t know any better to be honest if they exist. But I figured it would be best to post up my steps and processes to help with the community and if it helps another person get onboard and install this great program to their hard drive and reap its wonderful benefits that much quicker then that’s terrific.
First things first my simulator box is a box running ESXI. I developed the OS using VMPlayer and then converted it over using a converter that VMware offers. The VM has a 2 GB hard drive, 512 MB of ram and two NICS operating in a bridged mode (doesn’t really matter once you put it on ESXI though). I started with a stable release of Debian for an I386 http://hammurabi.acc.umu.se/debian-cd/6.0.6/i386/iso-cd/debian-6.0.6-i386-netinst.iso. Note this file can change at any time so just note that I started with the newest stable release of Debian at the time of this post. I started the install in VMPlayer. Did all the normal things and set my passwords and such. The only two additional services I installed were SSH and Web Server. Everything else I left unchecked. I planned to run multiple VMs at the same time on the server so I wanted the VMs to be running as little as possible and to have as little as possible cause problems on the boxes.
After I got it installed and rebooted I logged back into the box and made the box ready to install all the needed updates and add-ons I needed to make life easy for file editing. These are the first two commands you need to run. This makes sure everything is up to date.
NOTE: From here on out for almost all commands you need to execute as a root user so if you didn’t do a sudo su when you logged in (recommended) make sure you put sudo in front of the below commands.
apt-get update
apt-get dist-upgrade
The next thing you need to get is to download the VIM editor. You are going to need to edit files with the “vi” command and quite frankly the version that is loaded at this point is very clunky, so we execute the following to update it to a much nicer and more friendly version.
apt-get install vim
Lastly for this post, we will change our graphics options. The 640x480 screen just doesn’t cut it when you’re looking at 100’s of lines of code. You need something with a bit more resolution. Being we aren’t running any login agents the resolution is rather clunky. 1024x768 is a good resolution for me and that’s what I am going to set it at in my example. We need to edit the grub file in the /etc/default/ directory so we type in the following
vi /etc/default/grub
In the file edit the line that states GRUB_CMDLINE_LINUX="" to GRUB_CMDLINE_LINUX="video=vesa vga=791" and exit and save the file.
Now execute the update-grub command.
update-grub
Then reboot your machine and enjoy much better resolution.
NOTE: I do understand that various login agents such as Gnome and KSD can also change the resolution of the console screen and also add a degree of security, but I opted not to do this being the device isn’t used on a live network, but I may change my mind on this in the future based on possible input and saboteurs (IE students messing around).
The WANem live CD from the best I can tell has it’s foundations in an older British telecom project called phpnetemgui http://tcn.hypert.net. In summary the web pages you are clicking on in WANem is in essence executing commands on the Linux box from the TCN emulator which now is included in most Linux distributions. WANem (or even phpnetemgui) just implements a web GUI to give you easier administration access of the functions you wish to simulate. One of the features we need to enable our box to do is to run PHP scripts, because without PHP scripting enabled our webpage will not be able to execute commands on our box so we need to do this.
apt-get install php5
If you are planning to use your box as a router like I did then you will also need to download the DHCP server at this time
apt-get install dhcp3-server (NOTE: It may tell you DHCP server failed on startup, that’s fine you haven’t configured it yet).
Next post we’ll talk about DHCP and network configurations.
Hmm ok… Fifth post why can't I post you?
Being I planned to use the box as a router and dhcp server for the simulation network then we need to make those changes. We need to edit the /etc/network/interfaces file to configure at least one interface statically and to also set routes and such. The following image below should explain it all
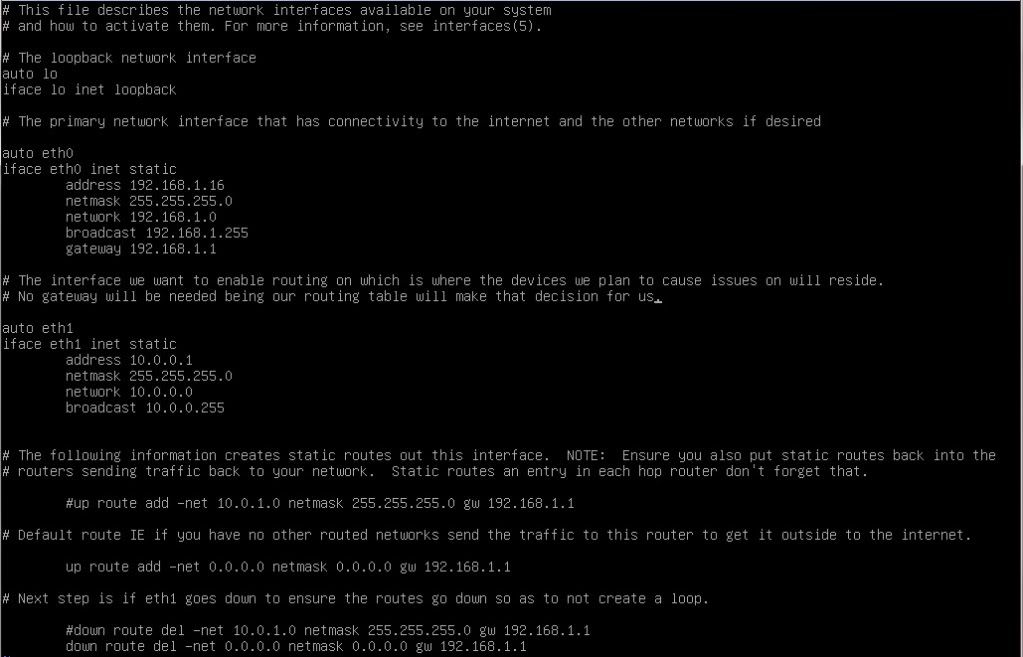


vi /etc/network/interfaces
Ensure you save the file. Now you need to ensure the box will redirect packets that it receives out the appropriate interface per its routing table IE act like a router. You need to enable IP forwarding by editing the sysctl.conf file found in the /etc directory and unremarking the field where it states “net.ipv4.ip_forward=1” See the image below.
vi /etc/sysctl.conf
Ensure you save the file and now to ensure the file is applied during boot up you have to update it to a persistent status by executing the sysctl –p command. If it is successful it will echo your last settings in the sysctl.conf file. Screen shot below
Lastly for this post you need to configure your DHCP server. In my situation it needed to be very basic. Mind what IP address and subnet mask you are using on your interface and go from there. Based on my example above my scope is going to be from 10.0.0.2 – 10.0.0.254. You need to edit the dhcpd.conf file found in the /etc/dhcp/ directory. For this I will recommend renaming the dhcpd.conf file as dhcpd.conf.bak and start with a clean file that way you know exactly what you have. Below is a screen shot of the file in question.
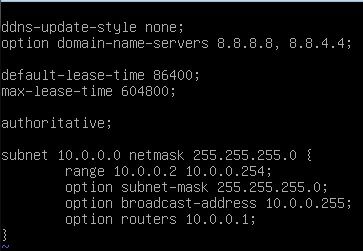
vi /etc/dhcp/dhcpd.conf
I actually followed a very good explanation of how to configure the DHCP server here. http://www.howtoforge.com/dhcp_server_linux_debian_sarge
Well, almost there guys, but this is what I feel is the hardest part of the whole thing. We need to fire up the live CD of WANem and copy all the files and subdirectories from the /root directory of the WANem live cd and the /var/www/WANem directory + subdirectories of the WANem live cd to some sort of media so we can get them onto the hard drive version of the software which we are creating. My weapon of choice was a thumb drive and porting it back and forth between virtual machines. You may choose otherwise. Pick your weapon accordingly. Once done before moving around the media make sure you umount the media first (ask me how I learned that lesson LOL).
Now onto your bootable box. You need to create a /root directory and copy all the files that were in root from the WANem box into here. Then you need to make a directory called /var/www/WANem on your box and copy all files from the WANem box into this folder.
NOTE: Ensure these files and directories have retained ALL OF THEIR PERMISSIONS from the live CD version of WANem. This applies to users, groups, and of course others. If the file permissions did not copy over correctly you need to do a chmod to correct the permissions are correct. THIS IS VERY IMPORTANT!!!!!!
On the home stretch. We now need to give the www-data user (the default username that Apache2 uses) root privileges without a password
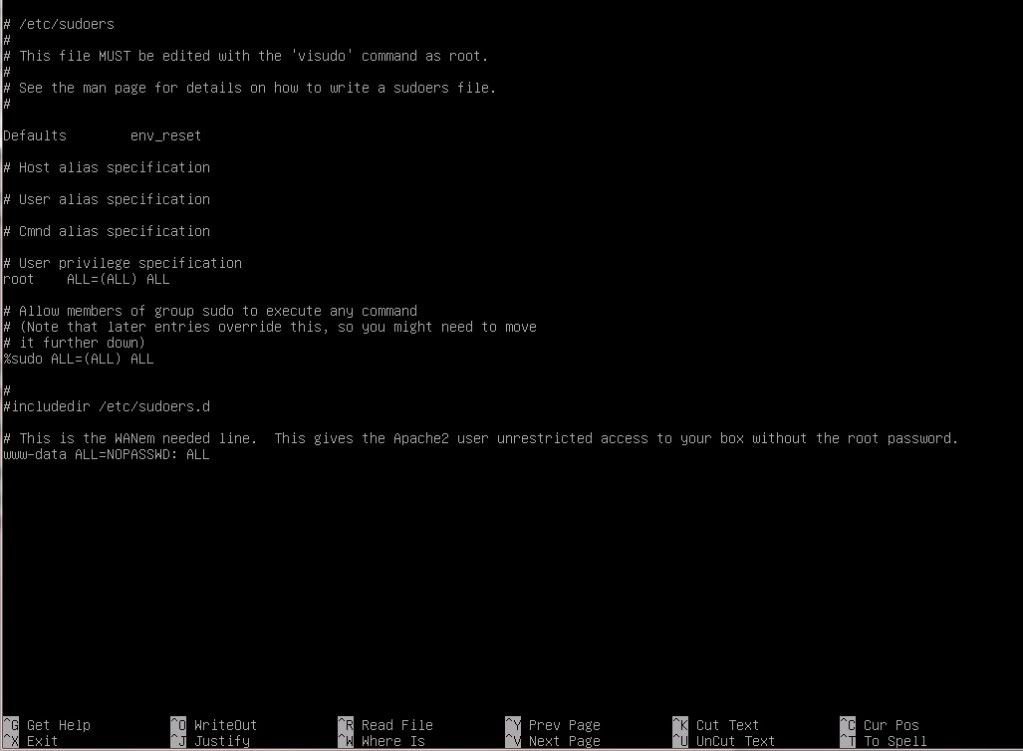
DANGER DANGER DANGER……
The following step basically gives the www-data user full reign and control over this box. This is a needed step, but understand the risk involved. To do this, type in the command and give the www-data user root privileges without password. Follow the screenshot below.
visudo
This next step might be totally unneeded or absolutely needed. In a perfect world everything should be ready to rock and roll, but I ran into a problem when I initially built my WANem box and recreated it for this write-up. It didn’t work at this point! I did some testing and noticed while I could get to the WANem webpage, the options I specified in the click downs would not be applied to the box. From the console I did a su www-data and attempted to execute these commands (by clicking the display commands vs. applying) and threw the commands in the console and it failed. Mentioned “command could not be found”. I’m uncertain as to why at this point. I suspect that the Apache2 user is not being given sudo privileges without a password. Initially I thought I did the visudo setup incorrectly, but the more and more I looked into it via Google from various sources it seems that there is a bug in with the Linux kernel 2.6.x where this may happen and some say put the line at the very end etc etc. Well, that never worked for me, so what I had to do was to upgrade the kernel itself. I followed the steps listed here. http://www.cyberciti.biz/faq/debian-linux-6-apt-get-install-linux-kernel-3-2/
NOTE: I ended up using the bpo4-486 version of the kernel. I feel that you don’t need multithreading and such and quite frankly you aren’t going to be doing a bunch of true crunching with this box so IMO the 486 version will be fine. Again my whole idea was to keep this as crunched as I could.
Well folks that’s it, you should have a decent “recipe” for how to build your own hard drive based WANem without the annoying broken dependencies and such that I’ve seen with other ways of doing it. Sorry for the long initial topic, but I felt I needed to document the entire process to ensure
A. Any improvements can be intelligently provided (I'm certain they can be recommended, but it does work)
B. Give a Linux Noob a fighting chance to get something like this up and working with minimal experience.
Thanks guys and again revisions and recommendations are always welcome.
Jason
I am sooo close! I have followed you nearly exactly. (I didn't need DHCP but I also added quagga for OSPF.) I'm installing on Debian i386 NetISO which brings me up to the most current packages by default. Oh, also, I scp'ed over the /root, /var/www/WANem, and /etc/profile files to their respective places.
I had to "fix" some issues with their PHP code and this might be where my problem is but now the WANem GUI doesn't seem to see any interfaces when I click on the "Advanced Settings" link.
Thoughts?
Are you sure you edited your sudoers file correctly. If the www-data user doesn't have root permissions then you won't be able to see the status of the interfaces. I would check that first. Something simple most likely.