Virtual Pilot Dashboard has three main pages...first, I will provide an introduction to the main page that loads up when you start the application. On the image below, notice that there are five grouped areas, and then, at the bottom, one ungrouped area.
Below, are screenshots of the grouped areas of the main page. Just a few notes...
1: The pilot can edit Personal Information and then click the Update button to save the changes.
2: Useful Websites can be selected from the dropdown box - web site(s) selected will pop up in the pilot's default web browser; if more than one, they will be tabbed. To close one or more web pages, just close them on the browser itself.
3: The Metrics are pretty much self explanatory, note that the pilot can log non-flying ATC hours, on the Pilot Log, and they will also be tracked in the Metrics area.
4: As of version 7.6, there are four Controls, three of them call up additional forms for the Pilot Log, the Tours and Training forms. Of course, clicking on Exit exits the program...make sure to save all entered data prior to exiting!
5: As the pilot completes various "tours", achievement ribbons automatically appear in the Awards area. In the example pic provided, four tours have been completed, and the appropriate ribbons appear to recognize the achievements.
6: Below the Awards area, there are two noteworthy items. First, on the left side the pilot can check the checkbox to cause the form to always stay on top...it doesn't always work, on commercial programs that have priority programmed into the code, but it can be handy, nevertheless.
The workhorse of this desktop application is the Pilot Log, which facilitates input and tracking for individual flights.
Notes follow:
The largest area is the Flight Record, which contains a grid which tracks flights. Column header labels indicate the exact data tracked.
The Flight Record is populated from the smaller Flight Input grid, located just below it. The Flight Input grid has two rows, one for the column header labels, and the other for data input. It is recommended that the pilot start the data input process before the actual flight.
Clicking the Start Flight button populates the Date and Departure (Dep) time, and after the flight is complete, clicking the Transfer button transfers the Flight Input data to the Flight Record, which is then automatically updated and saved to file.
If the pilot needs to pause the flight sim, he/she can also click on the End Flight button, which stops the timer and populates the Arrival (Arr) time; also, the Duration of the flight is calculated by determining the difference between the Dep and Arr times. The pilot can pause any number of times, and when the Transfer button is clicked, the Flight Input data, including the most recent Duration value is sent to the Flight Record and updated/saved.
There is an indicator light just to the left of the Start/End Flight button, which status lit when the timer is on. The date box to the left of the indicator light offers the ability to select the desired date, but it defaults to today's date.
There are two editing buttons that allow for editing of the Flight Record, to correct any errors - these are the Delete Row and Save Log buttons. The pilot can click on the row to be deleted, in any cell, and when the cursor is blinking in a cell, click on the Delete Row button - then click on the Save Log button to update the file.
Additional controls in the Controls group offer flight planning capabilities. Clicking the Aircraft Specs button will pop up the default browser, populated with the Wiki page relating to the Aircraft selected in the Flight Input grid.
The GPS 530 button pops up a pdf file which has a tutorial for operating the GPS...while this is for the X-Plane flight Sim, it can be referred to as a generic description, as most GPS's are more or less similar.
The How To Plan button pops up a SkyVector tutorial for doing flight planning using the SkyVector charts. The virtual pilot should refrain from doing any formal submittals, as those go to real world ATC officials! However, virtual pilots should take advantage of the charts and the excellent route planning capabilities of the SkyVector web site.
The final route can be copy-pasted to the comments block of the Flight Input grid, if desired. The SkyVector route planning method is easy, visual, and the final route includes the airways between waypoints.
Finally, the Tours button pops up the Tours tracking form, and the Hide button hides the Pilot Log form.
The Tour Completions group on the left side tracks the pilot’s completion of individual tours. The criteria for completion of a tour are determined from the "Set Nbr of Flights for a Tour" control in the Control group at the bottom of the form.
The pilot determines the number of flights which will comprise a standard tour by entering the integer number desired in the white text box just to the right of the Set button in the control group. When the number has been entered into the little white text box, the pilot then clicks on the Set button and the new number is saved into a file and the Tour Completions are recalculated and updated automatically. The ribbons on the main form will also reflect awards based on the new number for the standard tour.
The Tour Status grid tracks the number of flights completed for each tour, with status reflected in the Status column.
The pilot can view the DepArr ICAOs by clicking on the radio button for a particular tour in the Selected Tour group. The grid to the right then populates with the ICAOs for that tour. In the event of an error, there are buttons at the bottom of the Detail Flight List grid for adding or deleting rows, and the Update button will save the revised grid to the file.
There are two online virtual pilot training programs, sponsored by the international VATSIM and its ZLA ARTCC, based in California.
The application displays a "Certified Pilot" award on the main page when the pilot records achievement under either program.
After clicking on a radio button to reflect a new achievement, the pilot then should click on the Update button to save the new level of achievement to file.


Virtual Pilot Dashboard has three main pages...first, I will provide an introduction to the main page that loads up when you start the application. On the image below, notice that there are five grouped areas, and then, at the bottom, one ungrouped area.

Below, are screenshots of the grouped areas of the main page. Just a few notes...
1: The pilot can edit Personal Information and then click the Update button to save the changes.
2: Useful Websites can be selected from the dropdown box - web site(s) selected will pop up in the pilot's default web browser; if more than one, they will be tabbed. To close one or more web pages, just close them on the browser itself.
3: The Metrics are pretty much self explanatory, note that the pilot can log non-flying ATC hours, on the Pilot Log, and they will also be tracked in the Metrics area.
4: As of version 7.6, there are four Controls, three of them call up additional forms for the Pilot Log, the Tours and Training forms. Of course, clicking on Exit exits the program...make sure to save all entered data prior to exiting!
5: As the pilot completes various "tours", achievement ribbons automatically appear in the Awards area. In the example pic provided, four tours have been completed, and the appropriate ribbons appear to recognize the achievements.
6: Below the Awards area, there are two noteworthy items. First, on the left side the pilot can check the checkbox to cause the form to always stay on top...it doesn't always work, on commercial programs that have priority programmed into the code, but it can be handy, nevertheless.
Last edit: Greer Trumble 2016-12-22
The workhorse of this desktop application is the Pilot Log, which facilitates input and tracking for individual flights.

Notes follow:
The largest area is the Flight Record, which contains a grid which tracks flights. Column header labels indicate the exact data tracked.
The Flight Record is populated from the smaller Flight Input grid, located just below it. The Flight Input grid has two rows, one for the column header labels, and the other for data input. It is recommended that the pilot start the data input process before the actual flight.
Clicking the Start Flight button populates the Date and Departure (Dep) time, and after the flight is complete, clicking the Transfer button transfers the Flight Input data to the Flight Record, which is then automatically updated and saved to file.
If the pilot needs to pause the flight sim, he/she can also click on the End Flight button, which stops the timer and populates the Arrival (Arr) time; also, the Duration of the flight is calculated by determining the difference between the Dep and Arr times. The pilot can pause any number of times, and when the Transfer button is clicked, the Flight Input data, including the most recent Duration value is sent to the Flight Record and updated/saved.
There is an indicator light just to the left of the Start/End Flight button, which status lit when the timer is on. The date box to the left of the indicator light offers the ability to select the desired date, but it defaults to today's date.
There are two editing buttons that allow for editing of the Flight Record, to correct any errors - these are the Delete Row and Save Log buttons. The pilot can click on the row to be deleted, in any cell, and when the cursor is blinking in a cell, click on the Delete Row button - then click on the Save Log button to update the file.
Additional controls in the Controls group offer flight planning capabilities. Clicking the Aircraft Specs button will pop up the default browser, populated with the Wiki page relating to the Aircraft selected in the Flight Input grid.
The GPS 530 button pops up a pdf file which has a tutorial for operating the GPS...while this is for the X-Plane flight Sim, it can be referred to as a generic description, as most GPS's are more or less similar.
The How To Plan button pops up a SkyVector tutorial for doing flight planning using the SkyVector charts. The virtual pilot should refrain from doing any formal submittals, as those go to real world ATC officials! However, virtual pilots should take advantage of the charts and the excellent route planning capabilities of the SkyVector web site.
The final route can be copy-pasted to the comments block of the Flight Input grid, if desired. The SkyVector route planning method is easy, visual, and the final route includes the airways between waypoints.
Finally, the Tours button pops up the Tours tracking form, and the Hide button hides the Pilot Log form.
Last edit: Greer Trumble 2016-12-19
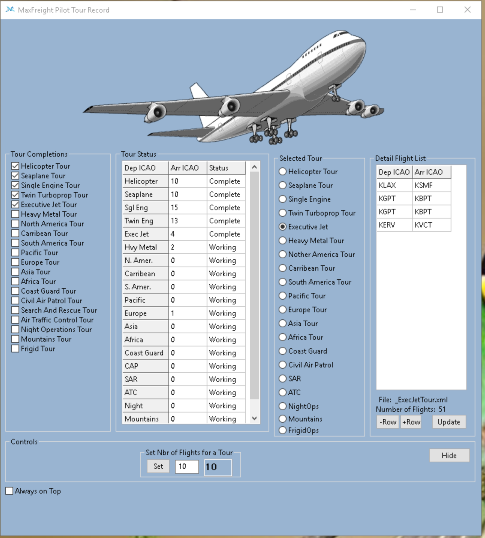
The Tours form...
Notes:
The Tour Completions group on the left side tracks the pilot’s completion of individual tours. The criteria for completion of a tour are determined from the "Set Nbr of Flights for a Tour" control in the Control group at the bottom of the form.
The pilot determines the number of flights which will comprise a standard tour by entering the integer number desired in the white text box just to the right of the Set button in the control group. When the number has been entered into the little white text box, the pilot then clicks on the Set button and the new number is saved into a file and the Tour Completions are recalculated and updated automatically. The ribbons on the main form will also reflect awards based on the new number for the standard tour.
The Tour Status grid tracks the number of flights completed for each tour, with status reflected in the Status column.
The pilot can view the DepArr ICAOs by clicking on the radio button for a particular tour in the Selected Tour group. The grid to the right then populates with the ICAOs for that tour. In the event of an error, there are buttons at the bottom of the Detail Flight List grid for adding or deleting rows, and the Update button will save the revised grid to the file.
Last edit: Greer Trumble 2016-12-19
ssfsdf
The Training pform...

Notes:
There are two online virtual pilot training programs, sponsored by the international VATSIM and its ZLA ARTCC, based in California.
The application displays a "Certified Pilot" award on the main page when the pilot records achievement under either program.
After clicking on a radio button to reflect a new achievement, the pilot then should click on the Update button to save the new level of achievement to file.
Last edit: Greer Trumble 2016-12-20