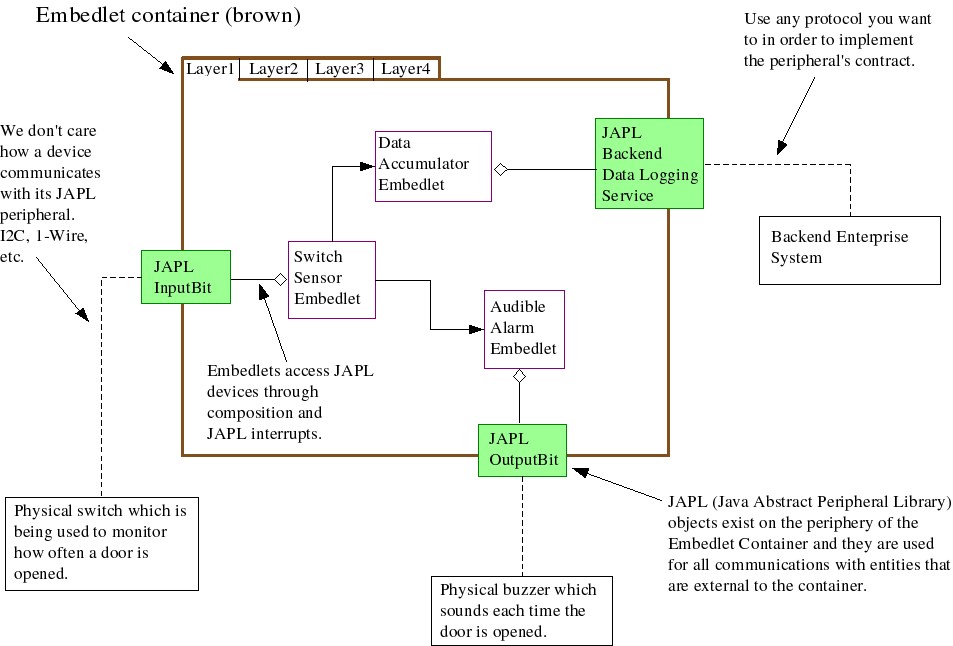
[Embedlets-developer] JAPL use scenario walk through
Status: Alpha
Brought to you by:
tkosan

|
From: Ted K. <tk...@ya...> - 2003-01-21 07:43:12
|
JAPL (Java Abstract Peripheral Library) use scenario walk through. Here is a short JAPL scenario I put together in order to add more realism to the following Embedlet application I posted earlier: http://embedlets.sourceforge.net/devdocs/diagrams/embedlets_v.05.jpg First there is a couple of paragraphs on the purpose of JAPL and then the scenario follows. PURPOSE OF the JAPL The purpose of the JAPL is to allow Embedded Java code to be compiled against a standard library of Abstract Peripherals. The incentive for creating a library like this is that even though most microcontroller and computer system peripherals are very similar, the specific details of how these peripherals are accessed is quite diverse. For example, the 8 bit wide I/O port is a very common peripheral but the way that the data direction for each bit is configured, and the manner in which the port itself is accessed, is usually different across systems. Even Java based embedded systems like TINI and JStamp encapsulate their I/O ports in proprietary classes. NOTE: Even though the JAPL is not limited to just low level microcontroller peripherals (its definition of peripheral is very broad) this scenario does use such a low level peripheral. EMBEDLET USE SCENARIO 1 - PnP I/O module which has a JAPL interface pre-specified at the factory. The device will assumed to be accessible on a PnP bus like 1-Wire. 1) Place an Outpost on the table and plug it into a workstation that is running the Wiring Tool. Its Outpost Embedlet Container graphically appears in the wiring tool. 1a) A Virtual PnP Bus Adapter is also present somewhere in the wiring tool and one of its jobs is to do the following: a) Discover (or be pre-configured to hold) all PnP adapters that exist in the system. If the 1-Wire API is present then all 1-Wire adapters in the system are encapsulated here. If I2C adapters, etc., are present then these too are encapsulated. 2) Select a physical Switch Sensor module and plug it into the Outpost (lets assume it uses a DS2406 based input port). The Switch Sensor has been designed at the factory to implement the JAPL org.japl.digital.InputBit interface and the URL* of an XML file which describes the module is stored inside of a tagging device which is present within the sensor. 3) The DS2406 enters the 1-Wire network, it is automatically discovered, a OneWireContainer12 object (thanks 1-Wire Java API!) is instantiated for it and this object is passed to the Virtual Bus object. The Virtual Bus object knows all about the tagging standard so it accesses the DS2406's internal memory and finds a URL which points to an XML file on the Internet which holds information about the I/O module that the DS2406 is a part of. Here is some information about the tagging specification: *URLs INSIDE OF THE MODULE'S TAGGING DEVICE The URL which is inside of a tagging device will point to an XML file on the Internet which will hold the following: 1) Module's name. 2) Module's manufacturer. 3) Manufacturer's URL. 4) Module's model number. 5) Fully qualified name of the JAPL peripheral that the module implements. 6) URL of a serialized object that implements the JAPL interface specified in step 5. This object will contain code that will talk to the module using whatever protocol the device uses (in this case the 1-Wire Java API). 7) Class of the serialized object that implements the JAPL interface specified in step 5. For example, a DS2406 based Switch Sensor might contain the following URL alertsensors.com/japl/tags/CT2343.tag.xml which points to the following XML file: <module> <manufacturer>Alert Sensors</manufacturer> <manufacturerURL>alertsensors.com</manufacturerURL> <model>ct2343</model> <implements>org.japl.digital.InputPort</implements> <persistedPeripheralURL>alertsensors.com/japl/persisted/CT2343.xml</persistedPeripheralURL> <peripheralClassURL>alertsensors.com/japl/classes/CT2343.class</peripheralClassURL> </module> 4) The Virtual Bus object downloads the alertsensors.com/japl/tags/CT2343.tag.xml file and obtains the persisted Java object which implements the org.japl.digital.InputPort interface along with its class file. The persisted object is deserialized into the wiring tool container and the OneWireContainer12 object is placed into it. The BeanInfo class for the org.japl.digital.InputPort is then obtained from the japl.org site and a graphic representation of the JAPL org.japl.digital.InputPort peripheral automatically appears in the wiring tool. 5) The wiring tool can then be used to customize the peripheral, attach it to the Embedlet container and then wire it to Embedlets which hold references to JAPL org.japl.digital.InputPort input ports. Ted __________________________________________________ Do you Yahoo!? Yahoo! Mail Plus - Powerful. Affordable. Sign up now. http://mailplus.yahoo.com |