Get an email when there's a new version of The Simplest Manual Counter
| Name | Modified | Size | Downloads / Week |
|---|---|---|---|
| Parent folder | |||
| src | 2010-04-15 | ||
| packages | 2010-03-26 | ||
| install | 2010-03-26 | ||
| Totals: 3 Items | 0 | ||
The Simplest Manual Counter v1.1.0
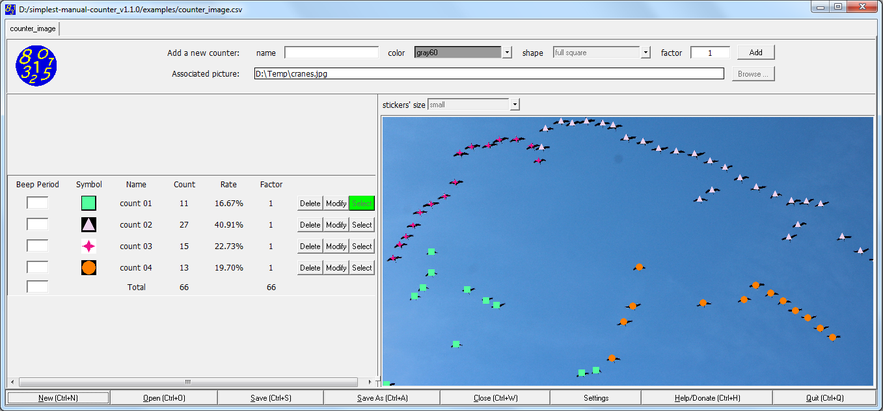
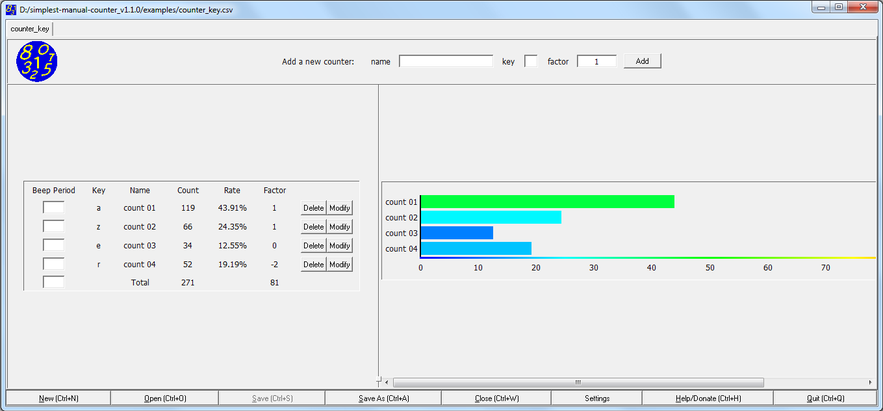
Table of contents
I) Description
The Simplest Manual Counter is an open source software to count any items the simplest and easiest way with the keyboard, or the mouse specifically on images. Each counter is customized with a name, a key (a letter or a number) or a graphical symbol (defined by its shape and color) for images, and a multiplying factor (natural integer) you set at its creation. All counters are gathered in worksheets.
II) User's guide
1) How to...
-
Run The Simplest Manual Counter on Windows 64 bits and 32 bits Follow the chapter III) Installation guide, Step 1 only. Then double clic on simplest-manual-counter.exe which is in the "exe" directory. :warning: Be patient ! The software takes a dozen of seconds or more to display at the very first time, depending of the computer. This is a normal behavior.
-
Run The Simplest Manual Counter on Linux 64 bits Follow the chapter III) Installation guide, Step 1 only. Then double clic on simplest-manual-counter.x which is in the "exe" directory.
-
Run The Simplest Manual Counter from the source code on all platforms Follow firstly all the chapter III) Installation guide. Then run the starter script which is run-src.cmd for Windows or run-src.sh for Linux from the root of The Simplest Manual Counter installation directory, double-clicking on it. It shall open a command prompt displaying the license terms of using, thereafter The Simplest Manual Counter software.
-
Start a new counting Click on the "New" button or press the Ctrl+N keys combination. A new worksheet appears. Then select the type of counter you want between "Keyboard" and "Image". All worksheets are independant from each other: saving, increasing, etc... counters of any of them does not interfere with the other worksheets' counters.
-
Associate a picture to your counting Click on the "Browse..." button at the end of the "Associated picture" line. Then select a ".jpg" or ".png" or ".bmp" file from the dialog box and click on its "Open" button.
-
Open existing counters Click on the "Open" button or press the Ctrl+O keys combination. Then select a ".csv" file from the dialog box and click on its "Open" button.
-
Add a "Keyboard" counter Write the name of the counter in the "name" text zone, its associated key (letter or a number) in the "key" text zone, and optionnaly its factor in the "factor" text zone if the default value '1' has to be adapted. Press the "Enter" key or click "add" to validate the new counter. It is possible to create a counter at any time: after having opened a file, after having started counting. It keeps the existing counters and their values, and warns of any unicity conflicts (same name or same key with another counter in the worksheet).
-
Add an "Image" counter Write the name of the counter in the "name" text zone, select its associated color and its associated shape, and customize optionnaly its factor in the "factor" text zone if the default value '1' has to be adapted. Press the "Enter" key or click "add" to validate the new counter. It is possible to create a counter at any time: after having opened a file, after having started counting. It keeps the existing counters and their values, and warns of any unicity conflicts (same name or same color and shape with another counter in the worksheet).
-
Increment any "Keyboard" counters Each time you press a counter's key, the counter increments of a unit, and the absolute and factors weigthed totals are updated.
-
Increment any "Image" counters Select the "Image" counter with the "Select" related button, and each time you click on the image, the "Image" counter's symbol is displayed on the image at the mouse's pointer location, the counter increments of a unit, and the absolute and factors weigthed totals are updated.
-
Decrement any "Keyboard" counters Each time you press the "Alt" key continuously and a counter's key, the counter decrements of a unit, and the absolute and factors weigthed totals are updated.
-
Decrement any "Image" counters Each time you click on an "Image" counter's symbol on the image, the related counter decrements of a unit, the symbol is erased from the image, and the absolute and factors weigthed totals are updated.
-
Zoom In/Out on image The mouse roller, or two fingers on touch sensitive screens, or the keys "+" and "-" respectively can be used to enlarge/shrink the image accordingly to the location of the mouse pointer (or the fingers accordingly to touch sensitive screens) on the image.
-
Undo a counting The Ctrl+Z keys combination undoes the previous increments/decrements chronologically.
-
Redo a counting (recuperating it) The Ctrl+Y keys combination recuperates the previous undone increments/decrements chronologically.
-
Save in a file Click on the "Save" button or press the Ctrl+S keys combination to save the active worksheet's counters in the active ".csv" file.
-
Save As a specific file Click on the "Save As" button or press the Ctrl+A keys combination to save the active worksheet's counters in any ".csv" file.
-
Recuperate the current work after crash The counters are recorded in a temporary file (in %TEMP% directory for Windows, "/tmp" for Linux) after each specific seconds set through the "Settings" menu. In case of a crash of the software without saving, running it again will propose you to open the temporary file when opening the unsaved file. Usually, the temporary file is destroyed after quiting the software.
-
Set the temporary files recording period against crash Click on "Settings" and select the period (in seconds) from the list beside "Recording period (second):" label.
-
Set the keys combination to switch from a worksheet to another one Click on "Settings" and select the keys combination for switching to a worksheet backward (i.e. previous) and forward (i.e. next) from the proposed lists inside the "Worksheet Shifting Cmd Keys" frame.
2) Hints
-
The "tab" (|<- ->|) key allows jumping between fields/buttons.
-
The "Esc" key activates the keys (letters and numbers) for "Keyboard" counting when the cursor is placed in a textual entry zone ("name", "key", "factor").
-
The "Ctrl+W" keys combination closes the active worksheet while asking for saving the counters if necessary.
-
The "Ctrl+Q" keys combination closes the software while asking for saving the counters of each worksheet if necessary.
III) Installation guide
The installation follows three steps: 1. the download/installation of the The Simplest Manual Counter package. 2. the download/installation of the Perl engine (optional on Windows and Linux). 3. the download/installation of the Perl modules (optional on Windows and Linux).
Step 1 : The Simplest Manual Counter
Download the last system compatible (Windows 32 ou 64 bits, Linux 64 bits) zipped package in your temporary directory from http://sourceforge.net/projects/easycounter/files/latest. Extract all its internal files in a new hosting directory (named "simplest_manual_counter" for instance) at the location of your choice.
Step 2 : The Perl engine (optional on Windows and Linux)
The steps 2 and 3 are only useful to run The Simplest Manual Counter from its source code directly.
a. First check on Windows and Linux
Run the script 'hasPerl.cmd' for Windows, or 'hasPerl.sh' for Linux from the sub-directory "install".
-> If the "Perl engine is NOT INSTALLED" message is prompted, continue on b) or c).
-> If the "Perl engine is already INSTALLED!" message is prompted, go straight to the Step 3.
In both cases, a message invites you to press any key to end the "hasPerl" script.
b. on Windows
In case the result of the previous a) step prompts "Perl engine is NOT INSTALLED", install the engine accepting all the usual configuration parameters of the Strawberry Perl distribution, the open source Perl distribution for Microsoft Windows which is available at http://strawberryperl.com/. Once Perl installed, associate through the files explorer the ".pl" file's extension with the freshly installed perl engine software.
c. on Linux
In case the result of the previous a) step prompts "Perl engine is NOT INSTALLED", use your system package manager (commands "rpm -i Perl", "sudo apt install Perl", etc...).
For more details about Perl, visit https://www.perl.org/get.html#unix_like.
Step 3 : The Perl related modules (optional on Windows and Linux)
The installation of two Perl modules is necessary after step 2.
a. on Windows
Run 'install_Perl_modules.cmd' from the sub-directory "install". A message of success is displayed for each installed module ("Installation of Perl/Tk SUCCESSFUL!" and "Installation of Perl/Digest::SHA1 SUCCESSFUL!").
b. on Linux
Run 'install_Perl_modules.sh' from the sub-directory "install". A message of success is displayed for each installed module ("Installation of Perl/Tk SUCCESSFUL!" and "Installation of Perl/Digest::SHA1 SUCCESSFUL!").
Congratulations! The Perl engine and the mandatory modules are installed. Now, you can use the The Simplest Manual Counter !
IV) Contact
Email to david_balogh at the-simplest-manual-counter.net.
In any case, I'll try to answer you as fast as possible.
V) License
The Simplest Manual Counter is distributed under the GNU General Public License (see COPYING.txt file or http://www.gnu.org/licenses/).
VI) Donation
If you are satisfied using The Simplest Manual Counter, and wish to encourage for next evolutions, you can donate safely while posting a message through Paypal. Mind that 20% of your donation will be returned to the Perl foundation (https://www.perlfoundation.org/).
As a donator, you can ask to add your personal or institution name, its logo on the website of The Simplest Manual Counter.
As well, feel free to give an appreciation through Sourceforge.net.
At last, you can contact me for any suggestion or estimation of any specific need.
Copyright (C) 2010-2022 David BALOGH (david_balogh at the-simplest-manual-counter.net).