Menu
▾
▴

Introduction
What is Yoshi?
Yoshi is used to allow a script to query the user for information. Yoshi displays information to the user and receives the input, then passes the information back to the script. Yoshi doesn't change your script into an interactive gui application. Each query window is closed when the information is returned and the script must open a new window to continue to interact with the user.
Yoshi uses a combination of command-line arguments and command files to build the query window. The command-line arguments over-ride the command file and are used to change the label of an element, or change the default setting. The window itself is defined in the command file.
Example
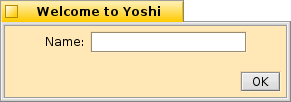
text command file:
*.bgcolor = 255,232,181
*.title = Welcome to Yoshi
tx.type = textfield
tx.label = Name:
tx.single = true
This creates a rather generic text entry window.
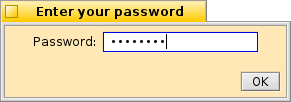
command-line
yoshi text "*.title = Enter your password" "tx.label = Password:" "tx.ispassword = true"
This gives the Window and textfield new labels and changes the textfield to a password entry field.
Yoshi will return:
tx=textentered
cancel=0
default=1
Where "terxtentered" is the text entered into the password field. cancel=0 means the cancel or close button was not pressed. default=1 means that the default button "OK" was pressed.
if the cencel button is pressed yoshi returns:
cancel=1
Yoshi command file
Yoshi needs the complete path to the command file, or, one can place the command file in ~/config/settings/fatelk/yoshi/commands/ and not have to supply the path.
Each element can be used multiple times in a command file but must have a unique name.
The command file directives are:
name.command = parameter
The type command identifies the type of the element. This can be :
- defaultbutton
- cancelbutton
- button
- textfield
- text
- date
- filepanel
- image
- multiselect
- popup
- radiobutton
- checkbox
- spincontrol
- texturl
Each of these is explained in its own page.
The program reads the command file line by line and element by element. The type coimmand, identifying the element must come first and all the parameters for the element must be grouped together. Each command parameter must be on a separate line. Yoshi does its best to ignore lines that it cannot understand, but it is best to comment out programming comments with the hash "#" as the first character on the line.
The elements are placed in the window from top to bottom, with the exception of the buttons that will always be on the bottom of the window.
There is a special type that does not place an element on the screen the | type
Example:
view.type = |
view.type = ||
This will add a second view to the right of the initial view and all of the elements in the command file after this type is encountered will be placed on the second view. view type | just adds the view. view type || adds the view and draws a separator line between the views.