3Tpy - Telnet Testing Tool Wiki
GUI based tool for running tests or configuration via telnet protocol
Brought to you by:
kowalpy
3Tpy - Telnet Testing Tool is a simple Python application which main purpose is creation and execution of tests or configuration over telnet protocol.
3Tpy is released under GNU GPLv3 license http://www.gnu.org/licenses/gpl.html
3Tpy test scenario is a set of test cases. Each test cases is represented by 3 values:

The only precondtition is to have Python 3.2.3 or 3.3.0 installed (At least these version are available at the moment I am writing this. Hopefully 3Tpy will work with later Python releases). @ Linux it might be additionally required to install Python tk library to run GUI (@ Windows, tk is available by default after installing Python). You can download Python from official webpage http://www.python.org/download/. In case of Ubuntu, you can use APT, for example:
sudo apt-get install python3
sudo apt-get install python3-tk
After Python is properly installed, simply download and unzip 3Tpy. It can be started in gui and console mode.
First you need to create a test scenario consisting of 1 or more test cases. To do it, you need to open 3Tpy in GUI mode (of course you can create xml file manually but it is pointless). You can start from scratch by adding empty test cases to a new test scenario or you can use one of example files from exampleInput directory. Definition of a test case is described in test approach chapter. To make everything work properly, also telnet options must be configured:
There are few options while starting an application:
3Tpy GUI is quite intuitive (at least I hope so).
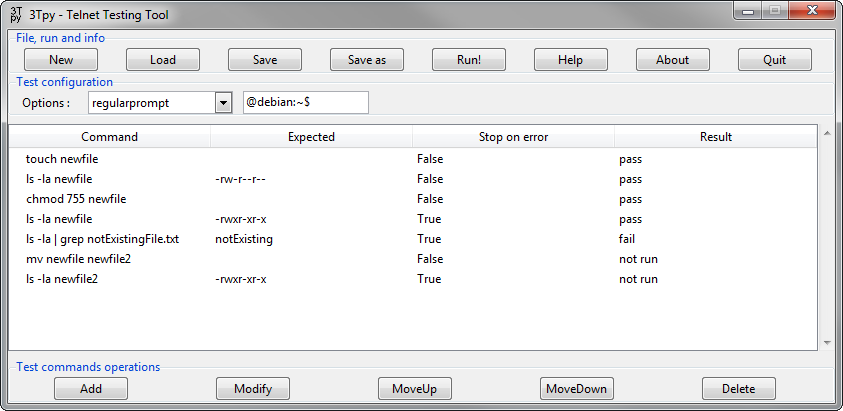
Top buttons are responsible for loading and saving test scenario files, running or creating new test scenario, dipslaying information and closing program. Test configuration area makes it possible to apply telnet related configuration. Test scenario tree (it looks like a table but it is TreeView widget in fact) is a graphical representation of all test cases related to active test scenario. In addition to all test case parameters, it also shows results if run in GUI mode. Finally, bottom buttons modify test cases which are visible in a test scenario tree.
By deafult, there is a text log created in the same directory from which 3Tpy was started. In the end of a test run it is also converted into html format.

Default log name and location can be changed by using -l parameter in non-gui mode. In gui mode, log is additionally presented in a window and updated in real time.

