Menu
▾
▴
Massive parallel management with
NOTE:
parallel-mgmt-with-ilorest
Massive parallel management with ilorest on Linux
NOTE: ilorest is the former hprest tool. Since this article has been written before that name change, you may see screenshots still mentionning hprest.
Thanks to HPE for providing the ilorest python API opening an entire avenue to developers for managing their servers; they can combine it with their favorite deployment tool (i.e. Puppet, Ansible) or other management tools like OneView, ICsp as described in several articles in this Blog... Wonderful.
But what if you are not a python geek? What if you prefer managing your servers the old way with bash / grep / awk / curl / wget? In that case, you can loop over the list of your iLO IP addresses and use curl / wget for getting and setting Redfish parameters.
However, this approach brings out two fundamental problems: 1- Using curl and wget in management scripts implies the creation of smart crawling functions as explained in this article. 2- A sequential management with loops is fine for taking care of five or ten servers. Furthermore, loops are not efficient anymore. A parallel approach should be considered.
This blog explains how to manage many servers in parallel using bash scripts without the need of implementing schema crawlers and thus allowing a long term stability to the scripts.
To achieve this goal, we will combine a parallel task launcher (namely the Clustershell and/or the Parallel Distributed Shell) with ilorest (former hprest) the RESTful Interface Tool in a more detailed and slightly different manner than what you can read already in the ilorest/hprest user guide.
clush and pdsh: Quick (and dirty) overview
The Parallel Distributed Shell (pdsh) and the Clustershell (clush) are both part of the Extra Package for Enterprise Linux (EPEL) repository and they give the ability to perform local or remote commands in parallel. Pdsh came first as a replacement of an IBM utility (DSH) with Google being the main contributor. However, Google pulled out from this project in 2013.
The clustershell is an interesting alternative to pdsh for many reasons. First the basic syntax and most of the switches, options and arguments are identical to pdsh. Hence, moving away from pdsh to clush is easy. Then, clush provides more flexibility for selecting the remote nodes you want to execute commands against or on. Clush is associated with the nodeset(1) command for computing advanced nodeset operations like expand, fold, group... Another advantage of clush over pdsh is that it is written in python and can be used in python scripts whenever you are ready to use this language.
From now on, I’ll choose to continue this article with the clustershell only.
Here are basic examples to illustrate the launch of several commands in parallel on the local node and then one command on several remote nodes: if you want to perform a parallel ping toward node1, node2 and node3 type:
clush –R exec –w node[1-3] ping %h
–R exec specifies a local execution of the ping command toward the list of hosts: node[1-3]. %h is substituted with node1, node2 and node3 for each ping command. When you hit the return key, your system forks in parallel the following 3 tasks:
ping node1
ping node2
ping node3
Imagine now we want the root user of node1, node2 and node4 to ping a remote gateway called aremotegateway. With the above syntax we can issue:
clush -R exec -w node[1-2,4] ssh -l root %h "ping aremotegateway"
However, EPEL provides pdsh and clush compiled with an ssh (default) module allowing the following simplified syntax:
clush -w node[1-2,4] -l root "ping aremotegateway"
Since the -R switch is not present, the ssh default module is used toward node[1-2,4] and the ping command is executed on this list or remote nodes.
Nodeset management
The list of remote nodes following the -w switch can be the result of a nodeset command taking its input from a node set configuration file (default is /etc/clustershell/groups.d/local.cfg). Nodeset management is a real differentiator of clush over pdsh and here is one example showing the power of this clush companion command.
Imagine we define two groups of iLOs names in the nodeset configuration file:
ilo-sales: ilo-sales[1-10]
ilo-marketing: ilo-foo,ilo-bar,ilo-test
The ilo-sales group contains 10 iLO names and ilo-marketing group contains three. If I want to select both groups and exclude node ilo-test, I can do it with:
nodeset --fold @ilo-sales,@ilo-marketing --exclude ilo-test

I can now combine the nodeset command with clush to issue a parallel ping toward this list with:
clush –R exec –w $(nodeset -f @ilo-sales,@ilo-marketing -x ilo-test) ping –c 2 %h
Out-of-band or in-band: that is the question
As discussed in a previous blog, ilorest offers both out-of-band and in-band management. In the first form you need to log into a remote iLO with the credentials of an iLO user. The following sequence of commands retrieves the Bios version of a remote server using an out-of-band management:
ilorest login ilo-IP –u ilo-user –p ilo-password
ilorest select computersystem.
ilorest ls bios/current #On Gen10: Replace with oem/hpe/bios/current
ilorest logout
Note that you can always use out-of-band management even when the server is OFF or when there is no operating system installed. The iLO constantly listens on the network as long as a power cable is plugged in the server.
Performing in-band management with ilorest means that you need to access first the operating system (as root) before launching the local ilorest without the need of supplying any username/password credentials. Ssh takes care of the security:
ssh root@server ilorest login
ssh root@server  ilorest select computersystem.
ssh root@server ilorest ls bios/current #On Gen10: Replace with oem/hpe/bios/current
ssh root@server ilorest logout
Who kicked me out?
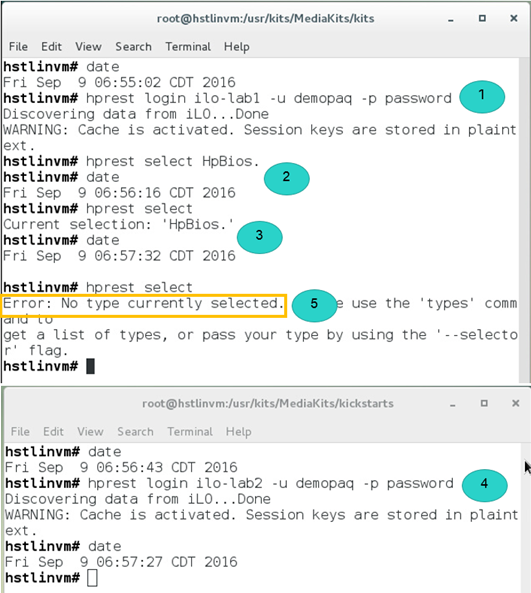
All of this is awesome except that in both examples (out-of-band and in-band) we don’t specify explicitly a cache directory location. Hence, we will be kicked out if a concurrent ilorest session is opened using as well the default cache directory as shown in the following picture.
The sequence in this picture is: we first log into ilo-lab1 (1). Then, we select the HpBios type (2) (select Bios. on Gen10 servers) and verify it has been selected (3). In the other terminal session and from the same server, we log into ilo-lab2 (4) without selecting any type. This second ilorest session clears off the ilorest cache including the selection we performed in the first terminal (5).
As a consequence and to be safe, you should always specify a unique cache directory location when using ilorest to avoid such contention. One possible solution is to generate a random string of ASCII characters and use it as a location for the ilorest cache.
With a random string of 16 characters (lowcase, uppercase, digits) for a cache directory name the out-of-band example becomes:
UUID=$(cat /dev/urandom | tr -dc 'a-zA-Z0-9' | head -c 16)
HPREST="ilorest --cache-dir=/tmp/$UUID"
$HPREST   login ilo-IP –u ilo-user –p ilo-password
$HPREST select computersystem.
$HPREST ls bios/current #On Gen10: replace with oem/hpe/bios/current
$HPREST logout
And the in-band example:
UUID=$(cat /dev/urandom | tr -dc 'a-zA-Z0-9' | head -c 16)
HPREST="ilorest –cache-dir=/tmp/$UUID"
ssh root@server $HPREST login
ssh root@server  $HPREST select computersystem.
ssh root@server $HPREST ls bios/current #On Gen10: replace with oem/hpe/bios/current
ssh root@server $HPREST logout
Parallel out-of-band management
We are now ready to send ilorest commands in parallel toward a set of iLOs sharing common administrator credentials.
This example applies a Bios configuration file to a list of servers. The Bios configuration has been created and customized in an ascii/json file called BiosConfig.json using the hprest save command. The list of target servers to configure is represented by a group of iLOs defined in the nodeset configuration file as explained earlier. Note that for a performance reason, I grouped the type selection (HpBios.) with the login process:
CLUSH=”clush –R exec”
HPREST=”ilorest --nologo --cache-dir=/tmp/cache-%h”
ILO_LIST=$(nodeset @myilos)
$CLUSH –w $ILO_LIST $HPREST login %h –u ilo-admin –p password --selector=HpBios. # selector is Bios. on Gen10 servers
$CLUSH –w $ILO_LIST $HPREST load -f BiosConfig.json
$CLUSH  –w $ILO_LIST $HPREST logout
I personally tested successfully this example against 24 servers. I am pretty optimistic that it works as well for bigger numbers of servers, although a risk of bumping into ilorest timeouts exists. Then, I noticed that python needs a lot of CPU resources and the time for performing this script against 24 servers lasted several minutes.

Let’s investigate the in-band method and see if we have the same or other limitation.
Parallel in-band management
Offloading ilorest processing onto remote servers reduces drastically the time to perform this Bios configuration example: from several minutes with out-of-band management, much less than one minute to is needed with the in-band method. Moreover, the management server CPU consumption is null since ilorest is running on the managed servers. Authentications time is extremely short because the ssh module of clush uses fast binary optimized libraries for key exchanges and ilorest has a fast direct connection link to the iLO when used in-band.
The only downside with ilorest in-band management is that it requires an operating environment up and running with sshd and ilorest installed and configured on all the managed nodes. However, this operating environment could be a customized LiveCD booted via the iLO virtual Drive facility as explained in a previous article.
The in-band version of our Bios configuration requires one more step compared to the out-of-band method: the copy of the JSON configuration file onto all the managed nodes. This operation is simple to perform with the --copy and --dest clush options dedicated to that purpose. Moreover, this copy will not impact the overall process time because the JSON configuration file to transfer is a small ASCII file:
UUID=$(cat /dev/urandom | tr -dc 'a-zA-Z0-9' | head -c 16)
CLUSH="clush -l root "
HPREST="ilorest --nologo --cache-dir=/tmp/cache-${UUID}"
SRV_LIST=$(nodeset -f "@lab")

$CLUSH –w SRV_LIST --copy BiosConfig.json --dest /tmp/.

$CLUSH -w $SRV_LIST "$HPREST login --selector=HpBios." #selector is Bios. on Gen10 servers
$CLUSH -w $SRV_LIST "$HPREST load –f /tmp/BiosConfig.json "
$CLUSH -w $SRV_LIST $HPREST logout
The CPU utilization during an inband ilorest load operation looks like:

Conclusion
In Linux infrastructures, ilorest combined to the clustershell offers easy out-of-band and in-band management scripting possibilities to system administrators preferring bash to pure python. Of course, there are pros and cons to both methods: out-of-band ilorest management does not require a customized operating environment running on the managed servers. However, CPU and time consumption may become a problem with large numbers of managed nodes.
For faster processing in important datacenters, you may want to prefer an hprest in-band management method with a pre-loaded customized operating environment.
In Windows environments, system managers should be able to perform similar efficient parallel configuration of their servers using PowerShell and parallel libraries.
