Menu
▾
▴
The
Storage-Management-with-Redfish
Storage management with Redfish®
Introduction
HPE Integrated Lights-Out 5 (iLO 5) in Gen10 servers introduced the management of storage controllers via its graphical user interface and via the Redfish RESTful API standard. Although videos already exist on that subject, we wanted to address this feature with a pure Redfish API approach, bypassing the ilorest interface tool and its Smart Array macro commands.
In this article we start by learning how to cleanup and prepare a Smart Storage Controller for receiving a configuration with one or more logical drives. Then on this fresh environment we will create a simple RAID array configuration prior to more complex ones to complement the API reference documentation.
Foreword
The Postman API development environment is used to illustrate our examples. This should give you the ability to implement those raw examples using your own preferred language.
The reader should have the knowledge of HTTP request methods like GET, PUT and PATCH.
Moreover, it is assumed that the reader knows how to manage Redfish sessions as described in the Redfish API Reference documentation as well as in this article.
Storage information locations
The Redfish standard defines a storage subsystem as part of the ComputerSystem type under the /redfish/v1/Systems/{item}/ location.
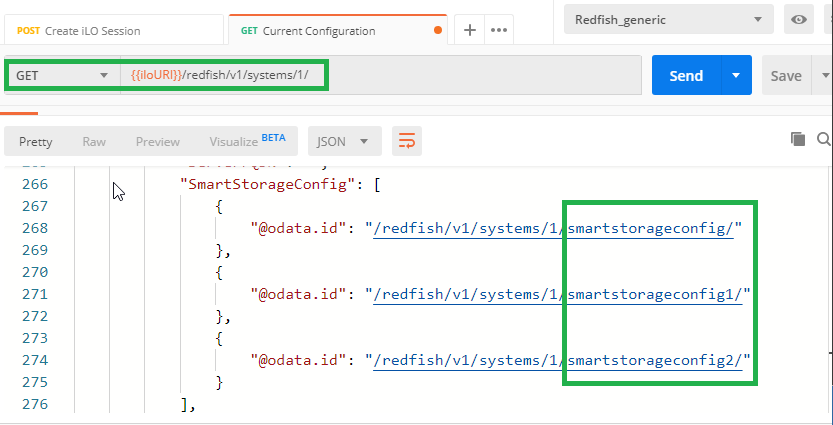
However, HPE implements the description and the configuration of its Smart Storage devices (i.e. SmartArray controllers) respectively in the SmartStorage and SmartStorageConfigX (X is being an ID number) entry points of the same ComputerSystem type. When multiple controllers are present in a system,
a SmartStorage/ArrayControllers/{item}/ entry point is present for each controller description and a SmartStorageConfigX entry point exits for the configuration entry points. Note that {item} and X are not correlated.
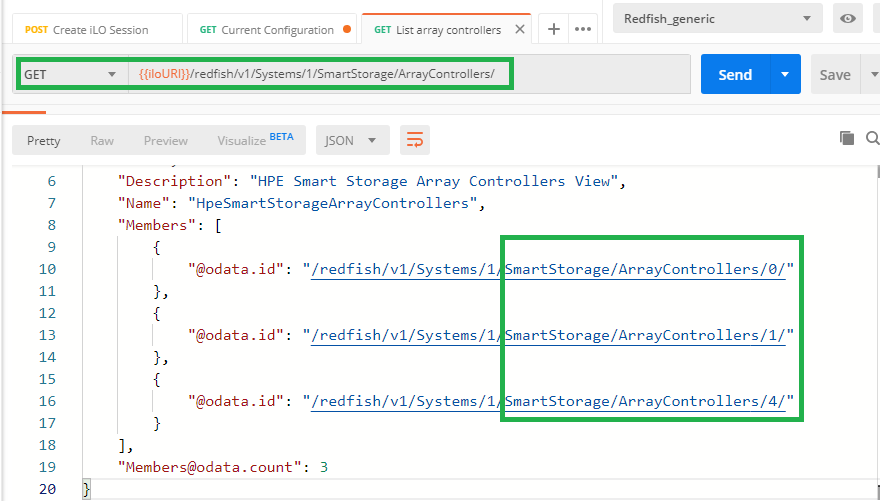
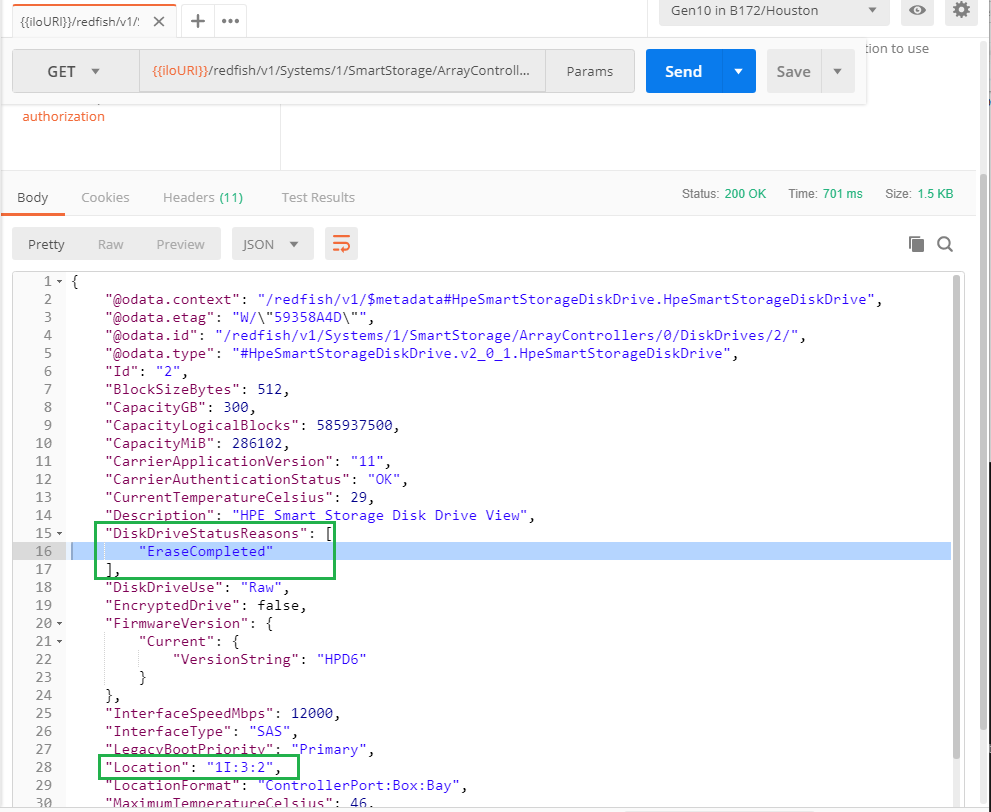
Since our infrastructure contains only HPE storage devices, the Storage entry point is not populated. Only the SmartStorage and SmartStorageConfigX locations are populated. The following picture shows the URIs of four disk drives in the first controller of our infrastructure. Their properties can be obtained with a simple GET request.
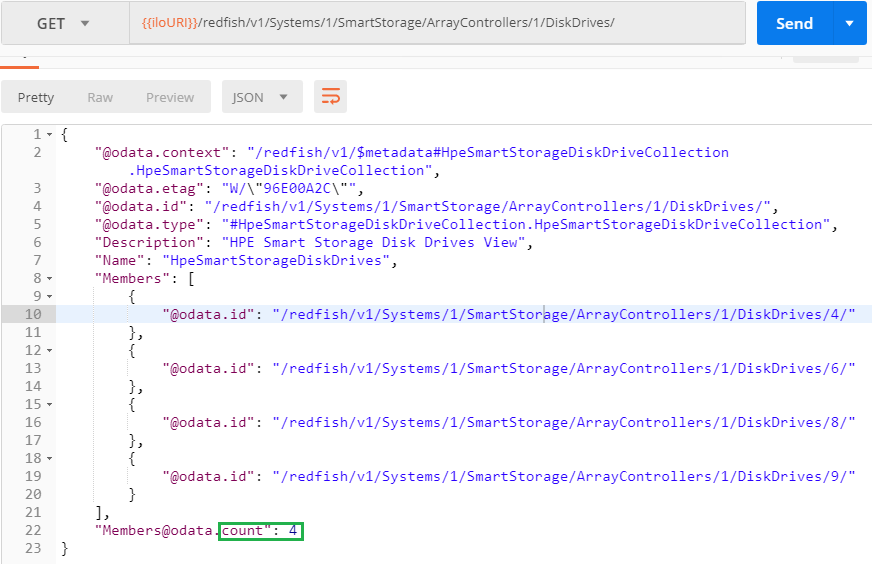
If you only need the physical location of the disks to use for your logical drives, you can GET them from the SmartStorageConfig location as shown below. Note that for the first controller found in the system, the X ID number is omitted.
Storage controller configuration process
As described in a previous blog, and to be sure the configuration process can happen smoothly, you should first verify that your managed systems are not at the UEFI/System Utilities level. Being in the Off state is a good state to start.
Modification of Bios and storage controller configurations are performed in two stages as explained in the Setting Bios and Storage Controller Properties with Redfish article. The first stage consists of setting the required parameters in the "pending settings area" of the Redfish data model (/redfish/v1/Systems/{item}/SmartStorageConfig/Settings/). During the next server reboot, parameters in the "pending settings area", after validation, are transferred to the "current configuration" at /redfish/v1/Systems/{item}/SmartStorageConfig/.
Upon reboot and once the server has finished its Pre-OS Tasks (POST) you should check carefully whether the modifications have been accepted as the current configuration.
The DataGuard property
The management of HPE Smart Storage devices requires a proper understanding of the DataGuard property part of the SmartStorageConfig sub-tree. The value of this key "indicates whether or not data destructive actions are allowed" as explained in the API Reference documentation.
This property is set in the pending settings (SmartStorageConfig/Settings) along with the directives to be performed by the Smart Storage device (i.e. Logical Volume Creation, Deletion...). During the next POST, the firmware checks its value and performs or not the requested directives.
If the value is Strict, which is the default value when not changed in the pending settings, the firmware denies any destructive data action (create/delete logical drives or clear drive metadata....).
If the value is set to Disabled, destructive data actions are allowed. Finally when the value is Permissive, only destructive data actions are allowed on the specified objects.
Refer to the documentation for more information.
Storage controller and physical disks preparation
Imagine we just received a bunch of brand new servers or we want to re-deploy servers for a new project. In this context, we would like to remove completely the entire storage configuration as well as all meta data stored in the physical drives to get a clean Smart Storage subsystem.
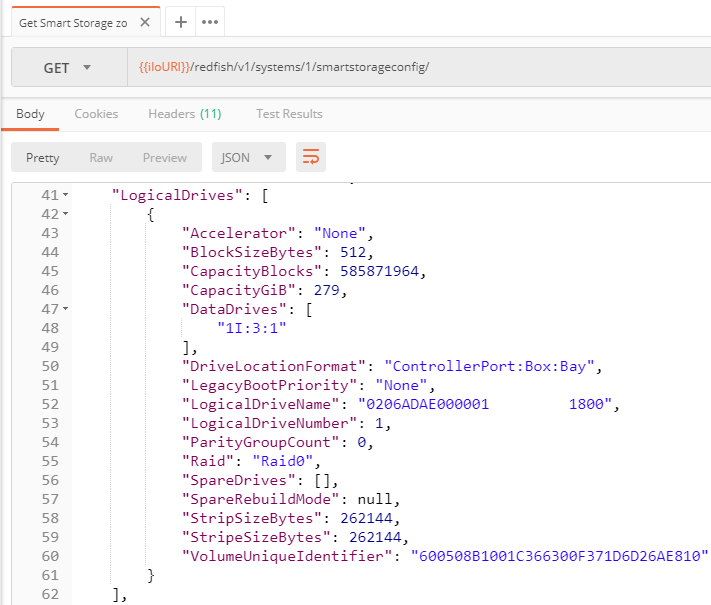
Redfish models logical drives as a JSON collection stored in an array of objects represented like: "LogicalDrives": [{ld-1},{ld-2,...{ld-n}]. Each ld-i of this array contains the necessary properties to describe precisely the corresponding logical drive.
The following screenshot shows the LogicalDrives array containing one element and its attributes. We learn that this logical drive is a RAID 0 made of a single data drive (1I:3:1).
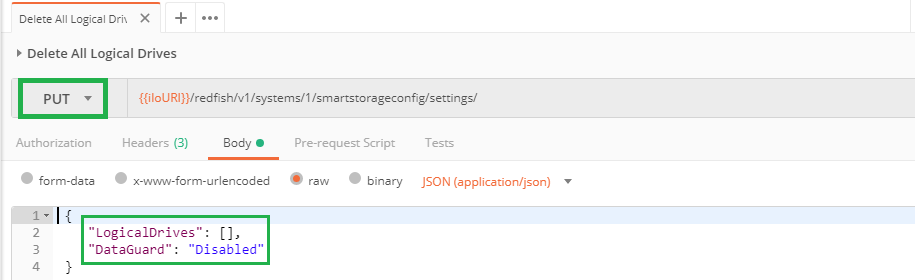
Removing all logical drives
Removing all the logical drives of a Smart Storage Controller is equivalent to the removal of all the elements of the LogicalDrives array. Practically we need to request an empty array to the Redfish server.
Since this action is data destructive we must disable the DataGuard property to make sure the firmware allows this operation during the next reboot/POST of the system.
The next screenshot contains all the necessary information to complete this remove operation: Perform an HTTP PUT to the pending settings (SmartStorageConfig/Settings/):
Clearing disk drives configuration metadata
HPE Smart Array RAID uses a reserved area at the end of each physical drive to store information about the logical drive configuration they are part of. When the Smart Storage Administrator (SSA) application or Redfish is used to delete a logical drive, the metadata is cleaned up. However, if drives are moved around, there may be leftover metadata on the drives. The controller may show a failed logical drive or keep the drive from being presented to the OS. The ClearConfigurationMetadata action with the DataGuard property disabled using the PATCH method can be used to remedy this problem.

If you want to perform a single request removing all the logical drives and clearing the metadata, you have to perform a PUT of the pending settings with the following body:
{
    "Actions": [
        {
            "Action": "ClearConfigurationMetadata"
        }
        ],
    "LogicalDrives": [],
    "DataGuard": "Disabled"
}
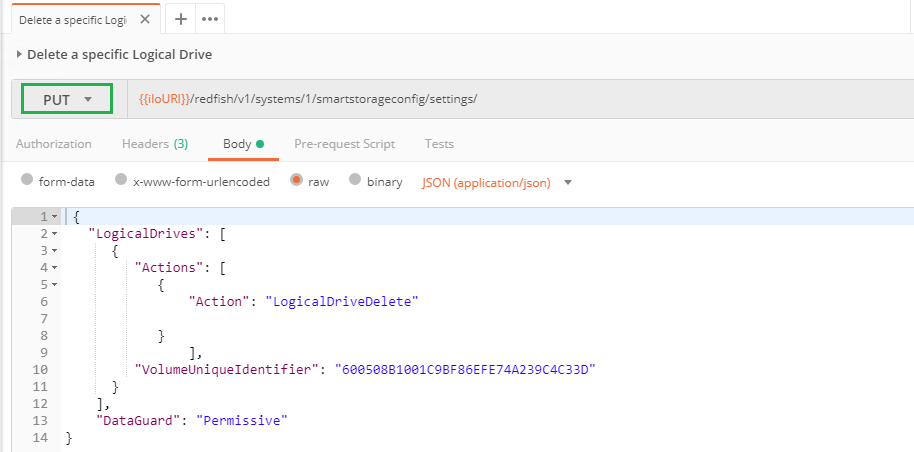
Removing a single/specific logical drive
To delete a specific logical drive you have to send a PUT request to the SmartStorageConfig/settings (pending settings). This request must contain the unique identifier of the desired logical drive as well as the DataGuard property set to Permissive to avoid the removal of other logical drives, if any:
Sanitizing / disk drives
In addition to the removal of logical drives and the meta data cleanup of physical drives you may want to erase / sanitize a list of physical drives. To perform this (long) operation, send the following PATCH action with the correct list of the drives to erase separated by a comma. Don't forget to disabled the DataGuard property as well:
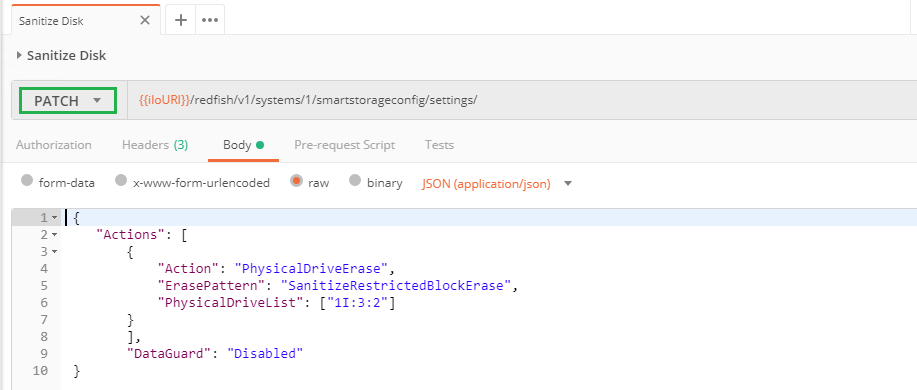
The ErasePattern property supports the following values:
    SanitizeRestrictedBlockErase
    SanitizeUnrestrictedBlockErase
    SanitizeRestrictedOverwrite
    SanitizeUnrestrictedOverwrite
    SanitizeRestrictedCryptoScramble
    SanitizeUnrestrictedCryptoScramble
    OnePass
    TwoPass
    ThreePass
As mentioned above, the sanitize process is extremely long and you can retrieve the erase status in the disk drive properties under the SmartStorage sub-tree:
Logical drive creation
Logical drives can be created using the PUT method. In some circumstances a PATCH can be used but, to keep things simple, we'll only use the PUT method.
In this section we will start with the clean infrastructure generated previously to create a 100GB RAID1 logical drive with a Roaming spare drive.
Then we will add a RAID0 Logical drive located on a single hard disk without spare drive and spanning the entire disk (300GB).
Finally we will add a second logical drive of 50 GB in the RAID1 array created earlier.
This scenario may not be completely realistic; however our goal is to more didactic than realistic.
First logical drive creation
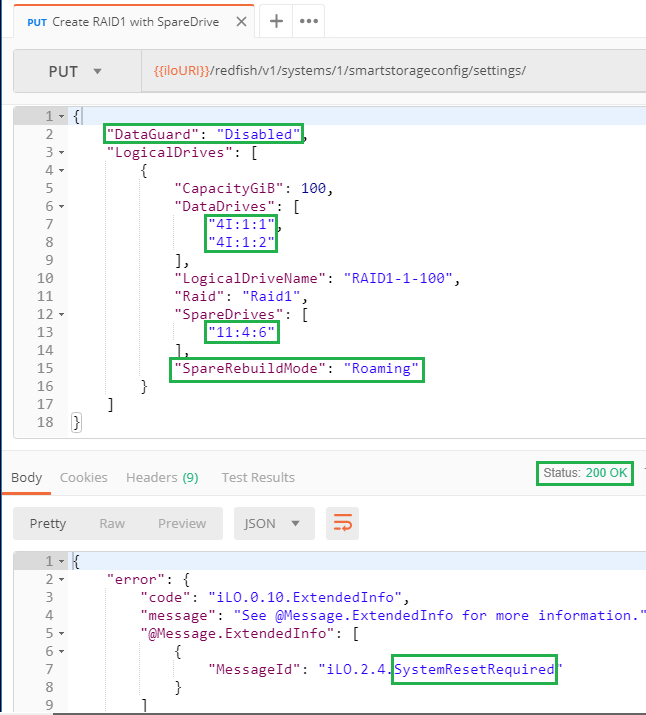
In this clean context, we just need to send a PUT request to the SmartStorageConfig/settings (pending settings) with the properties of the desired logical drive as an element of the LogicalDrives array and the DataGuard value set to Disabled.
The following picture shows the entire body of the PUT request with the mandatory properties in green boxes: DataGuard, DataDrives list, Raid type, SpareDrives list and SpareRebuildMode. Other properties will be defaulted if not supplied.
A 200 return status with a SystemResetRequired "Error"
message indicates that the remote SmartArray pending settings has been changed.
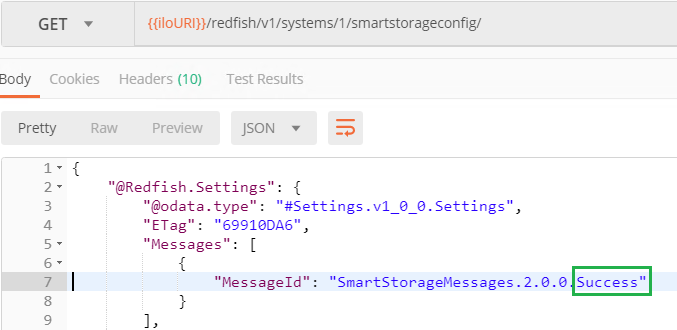
Upon reboot of the server you should verify that the current configuration contains only the Success message. This ensures that the configuration happened effectively.
Creating more logical drives
In this paragraph we want to add a logical drive without altering the existing configuration. This operation could be noted "=+" in high level programming languages and we will use this analogy to build the body of the corresponding PUT request.
The "=" portion of this process is performed by copying the entire SmartStorageConfig current configuration into the body of a PUT request. The remote iLO Redfish server is smart enough to keep only needed properties.
The "+" part consists of adding the desired logical drive into the LogicalDrives array and changing the DataGuard value.
The body of this PUT request is now ready to be sent to the SmartStorageConfig/settings (pending settings) of the managed iLO.

Again and again, you must check the return status, reboot if it is Ok and verify that the current configuration contains only a single Success message to be sure that your modification is there.
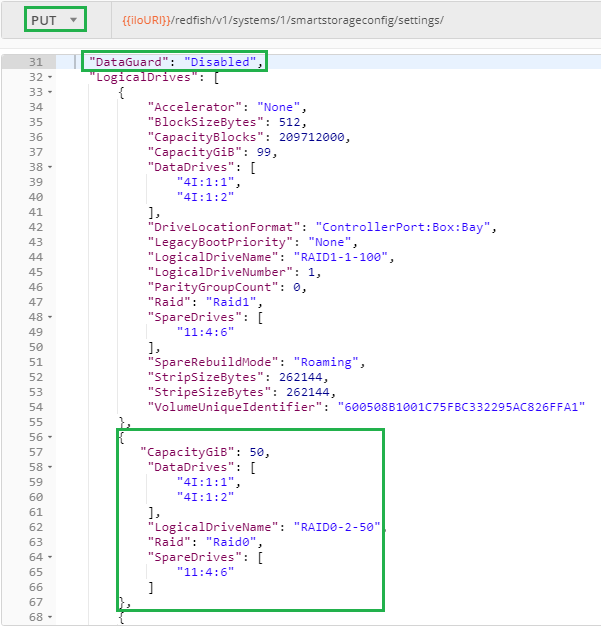
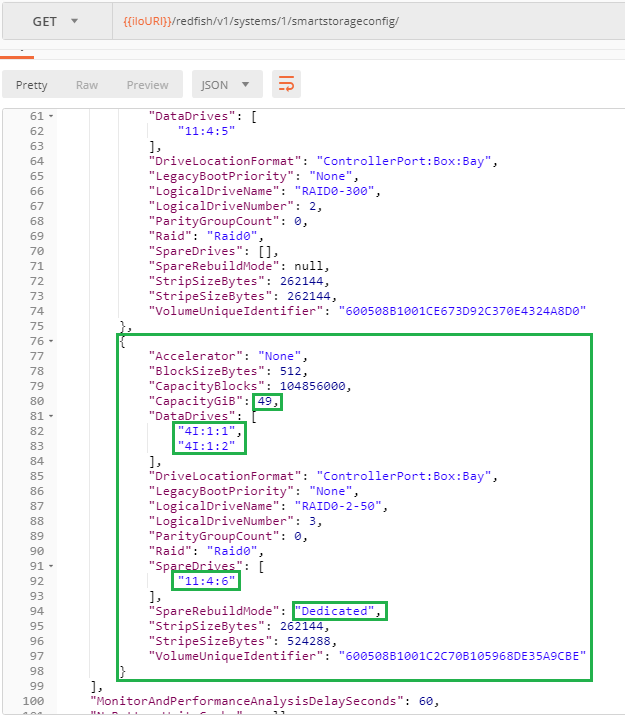
Adding a logical drive in an existing disk array
The last exercise consists of adding a RAID0 logical drive of 50GB in the first storage array we created earlier. This array has a capacity of 300GB and we are only consuming 100GB with logical drive RAID1-1-100.
Similarly to the previous paragraph we have to perform a "=+" operation including the modification of the DataGuard property and the addition logical drive .
The following screenshot shows the characteristics of the added RAID0 logical drive mentioning its size as well as the DataDrives and the spare drive used in the storage array created for the RAID1 logical drive in our first example. This ensures the creation of the desired logical drive in the right place.
After reboot, the requested RAID0 logical drive is visible in the current configuration. Note that the SpareRebuildMode has been automatically adjusted to Dedicated since Roaming is not a valid value anymore.
Conclusion
The ability of managing HPE Smart Storage with Redfish is a major step forward to the full control of Gen10 servers with a single RESTful API.