Menu
▾
▴

Use
Starting Up
For installation, see Install.
To start Amaze, use Start > Amaze 1.1 > Amaze (on Windows), or Applications > Graphics > Amaze (on Ubuntu).
If you want to use the command line options, start Amaze from the command line in a terminal window.
On Windows, the application has no standard output, so use "-out" or "-std" option to see output.
See the man-page http://qtamaze.sourceforge.net/amaze.1.html for details.
Interface
The user interface has 4 parts:
- a pretty standard menu-bar at the top,
- a set of controls on the left,
- a canvas area on the right. and
- a status-bar on the bottom (unless "-mini" option is used).
The program generates mazes for you, which you can then print, or send to a picture file.
You control what the maze looks like (colors, tile shapes, etc.) with the menus and controls.
You can also click in the canvas area, to change the departure and destination points,
or drag a (local) picture file onto the canvas, to outline the maze shape.
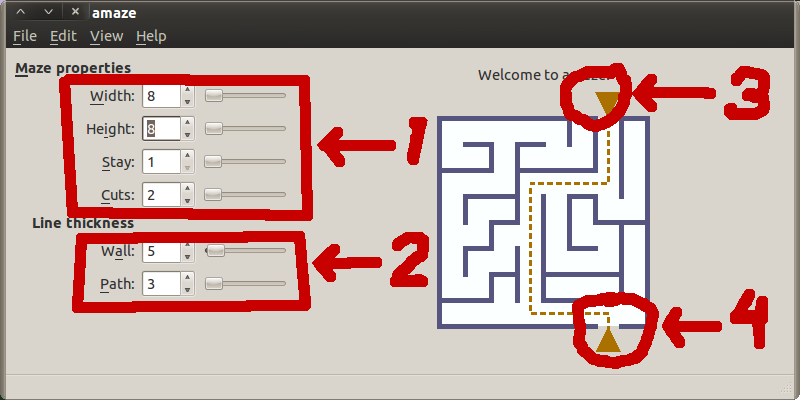
To illustrate, in the picture below you can see:
- The maze grid build controls
- The maze line draw controls
- The departure point
- The destination point
Tiles
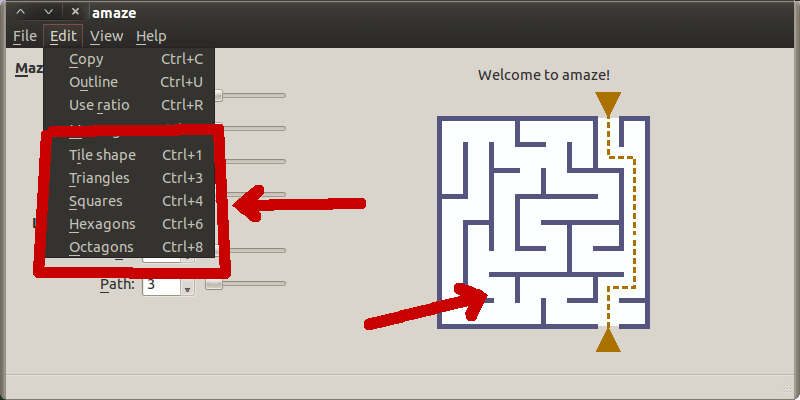
A maze is built on regular grid of tiles. Each tile has a number of edges, connected either to another tile or on the outside border of the grid. An edge can either have a wall or be open for crossing between the two tiles. The shape of the tiles determines the number of edges. We now support four tile shapes: triangle, square, hexagon and octagon. An octagon maze contains two different tile shapes: proper octagons (8 edges) and in-between-octagon squares (''octweens''); all other shapes only occur by themselves.
You can switch between tile shapes using Ctrl-''n'' where ''n'' is the number of edges: Ctrl-3 gets you triangles, Ctrl-8 octagons, etc.
The same works from the command line: -tile 3, -tile 8, etc.
Advanced
You can pick colors from the command line too: see -path-color/-pc, -tile-color/-bc, -text-color/-tc, -wall-color/-wc.
The names of the colors can take different forms, quoting the Qt documentation:
- #''RGB'' (each of R, G, and B is a single hex digit).
- #''RRGGBB''.
- #''RRRGGGBBB''.
- #''RRRRGGGGBBBB''.
- A name from the list http://www.w3.org/TR/SVG/types.html#ColorKeywords of SVG colors; for example, ''steelblue'' or ''gainsboro''.
- On X11 only: any valid X11 color name.
The GUI will not let you pick a different color for the application window itself, but see command line option -bg in the man-page http://qtamaze.sourceforge.net/amaze.1.html.
Caveats
- It is possible to pick colors that make the maze invisible, e.g. white walls on white tiles, but the result will not be very usable.
- There is no way to pick the color of the guidelines (Ctrl-H).
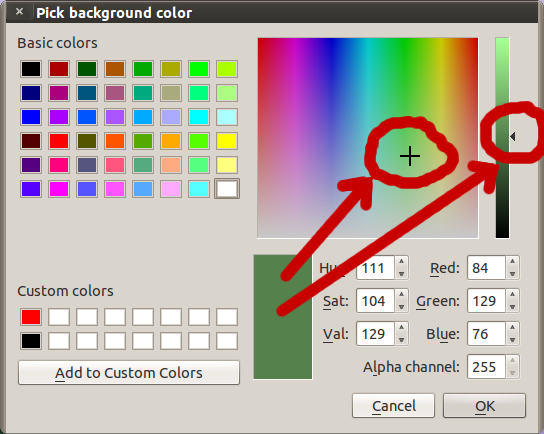
- The Qt color selection dialog can be a little confusing: it has a multi-colored square in which you can click, and a slider on the far right. You need both of these to pick a color. In particular, if the slider is all the way to the top or bottom, the resulting color will always be 100% black or white, no matter where you click in the square. To illustrate:
Message
You turn the maze into a ''mazegram'', a maze with a hidden message that you can unlock by finding the path through the maze.
Use ''Edit > Message'' or Ctrl-M to specify a message text. The letters of the text will be placed, one per tile, along the solution path through the maze. The path must be long enough for the message, otherwise you get a "path too short" error screen. If the path is longer than the message, we leave some random number of tiles between letters. Any characters in the message that are ''not'' in the given alphabet (spaces and hyphens, for example) are removed before this.
To hide the message, Amaze puts random letters in the rest of the maze. It does this for the same proportion as path tiles are covered by the actual message, picking letters at random from the given alphabet. Finally, if a "filler" is defined, any tiles left blank get one of the filler characters. The fillers should normally not be in the alphabet. For illustrations of the different possibilities, see Screenshots#Messages.
To get back to making regular mazes, instead of mazegrams, clear the "Message" field in the message dialog.
Advanced
Using a letter as a filler can hide the message a lot better than having no filler, or a non-letter filler. Using digits for a filler also works pretty well. If you use filler letters, make sure they are not in your message text, and remove them from the alphabet.
You can increase the relative frequency of letters in the alphabet on the non-path tiles by including them in the alphabet multiple times. The same works for fillers.
Caveat
Letters that are not in the alphabet are removed from the message before putting it in the maze.
Open issues
This feature is still relatively new (introduced in 1.1-20), and has much room for improvement.
- Man-pages need explanations for -text-fill, -text-chars.
- Scale letters with tiles.
- Offset letters for triangle.
- Add screenshot with mazegram to gallery.
- Test letters in other locales.
- Interface limited to 1 char per tile; what about composite chars?
- Think about [zh_CN] locale for msg: alphabetic?
- Select font for letters?
- Could stop ''msgChanged()'' from generating new grid, just replace text.
- Should init ''CryptoDialog'' from (saved) grid settings.
- Link to this page as online-help menu item.
Export
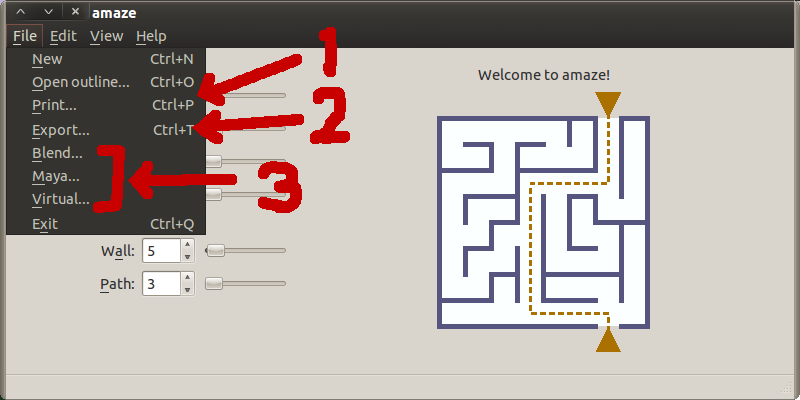
Once you have a maze on the screen, and you like it, you can decide how you want to use outside Amaze itself. Your options are:
- Print -- using a standard print dialog, with ''File > Print'' or Ctrl-P. See (1) in illustration below.
- Copy image to clipboard -- using ''Edit > Copy'' or Ctrl-C; you can then paste it (Ctrl-V) inside an image editor, like Paint, GIMP, or Photoshop.
- Export to image file -- using ''File > Export'', with a choice of different formats, like GIF, PNG, or JPEG. If not sure, pick PNG. See (2) below.
- Export as a 3D model -- for Blender, Maya, or VRML/X3D. See (3) below.
Advanced
- If you have installed "PDF" as a printer device, you can export to a PDF document by "printing" to the PDF printer, which lets you select the file to generate.
- When you select an image format during file export, some formats (like PNG) let you specify metadata information or quality settings. These options are hidden or grayed out in the export dialog unless you select a format that support them.
- The "auto-increment" checkbox in the export dialog, if activated, will automatically increment the filename for each export, if needed, to avoid overwriting existing files (from previous exports).
Caveats
- The PNG metadata tags table in the export dialog is not quite right yet: does not check for valid or double names, is not saved, etc. (see to-do list), so use with caution.
- Qt does not currently support EXIF metadata tags for JPEG, so if you want to add those, use ''exiftool'' or other 3rd-party programs to do so.
- The 3D model exports are all lacking in quality; they do not include the path, or endpoint markers, or all colors. Work is ongoing.
Open issues
Many, see to-do list.
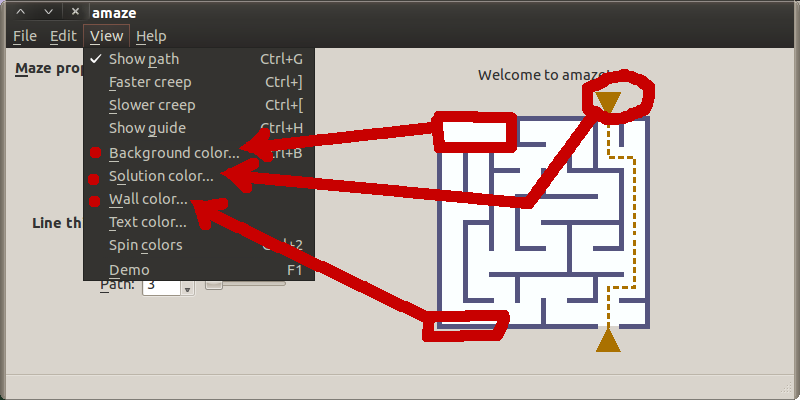
Colors
Amaze draws everything as simple, monochrome shapes and lines. You can pick the colors to use, each for a different part of the maze, using the View menu. The components are:
- Tile color (also known as background color): the floors of the tiles, seen between the walls.
- Wall color (internal and external walls): the lines between the tiles that you cannot cross when walking the maze.
- Path color (also known as solution color): the path (static or animated, when shown), and the departure and destination markers.
- Text color (only for message text): the letters in the maze for the hidden message.
Related
Wiki: (de)_Use
Wiki: (eo)_Use
Wiki: (es)_Use
Wiki: (fr)_Use
Wiki: (nl)_Use
Wiki: Contents
Wiki: Development
Wiki: Help
Wiki: Install