Menu
▾
▴
Posted by
 2018-09-30
Noise Reduction photo mode
Open Camera 1.44 introduces a new Noise Reduction ("NR") photo mode. You'll need to enable Settings/"Use Camera2 API" - and even then, only high end devices support this.
Switch to the "NR" photo mode under the popup menu, and Open Camera will take a burst of up to 8 photos, align and merge them into a single image, reducing noise in the resultant photo.
In bright scenes, images are underexposed to better handle high dynamic ranges (similar to HDR mode).
You may be thinking this sounds similar to Google's own HDR+ algorithm - I'll be the first to admit that Open Camera isn't capable of achieving Google's excellent results (in particular, Google's HDR+ works from the 12-bit RAW images, and is optimised to work with a smaller set of hardware). But I hope it's something that can improve on the standard behaviour of many phones, and I'll be looking to make improvements in future.
The image below shows - aside from my cat's favourite treats (TM) - an example with one of the input burst photos on the left, and the resultant merged photo on the right:

(Click the images for higher resolution; note that the image is scaled down from the original to reduce size.)
Also see a zoomed in portion:
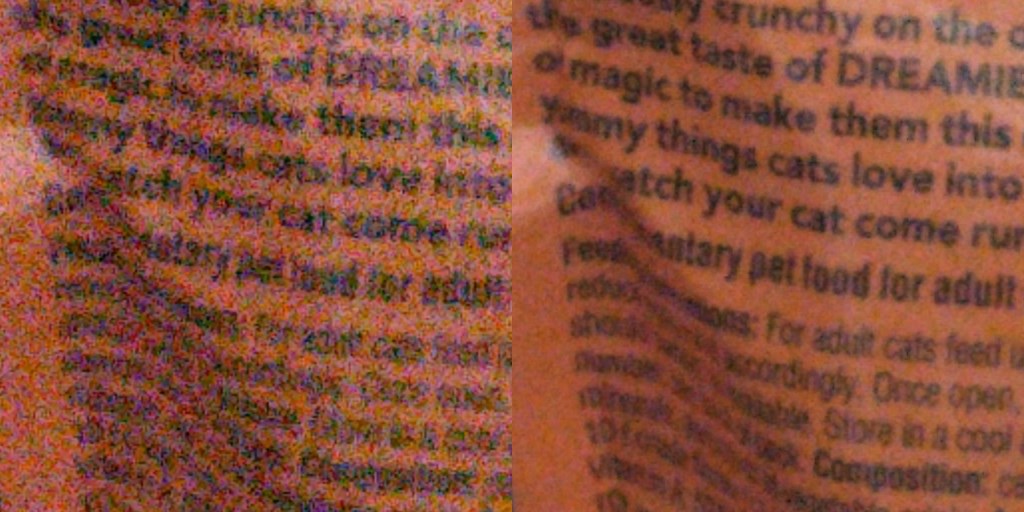
Noise reduction mode is useful in bringing out detail in dark scenes. The below image shows one of the input photos on the left, and an NR photo on the right. The middle photo shows the input photo edited to increase the brightness - trying to bring the brightness up to the NR photo's level also makes the noise more visible.

In NR mode, Open Camera turns off certain post-processing options, including the device's usual filtering options to reduce noise - the problem is that whilst such filtering might smooth out noise (especially chroma noise), it also eliminates detail. For example, see the following photos taken on the Nokia 8 (this is cropped from a full size photo). The first picture is the input image from the burst that Open Camera takes in NR mode. The middle picture shows an example taken in standard photo mode - there's notably less chroma noise, but detail is also lost and the result is still noisy. The NR result, last, reduces noise whilst preserving detail. (Note that in dark scenes such as this, NR also applies pixel binning so that resolution is reduced by 2 in width and height - for better comparison, I've scaled the NR picture back up, without smoothing, to have the same resolution as the inputs.)


![]()
Anonymous

Last image is perfect!
Não consigo usar a câmera do j7
is it possible to increase the noise reduction?
There is now a "Low Light" mode (when in NR photo mode, see "NR mode" option on the popup menu) which is low light will use longer exposures and more (15) images. But otherwise there isn't yet additional control - it's on my TODO to add further options in future e.g. for using a larger number of images.
ps:this is the best noise reduction i've seen!
Please add HEIF support to this great app. Thank you.
Please add audio noise reduction for video recorder
Open camera and iball
Dear Mark,
OpenCamera is such a great piece of software.
NR appears to work well on the Samsung S8 and S9+.
Kudos to your ongoing efforts.
Thanks for the feedback!
Hello,
Is it possible to add a preview button to toggle rapidly between STD, NR, HDR and DRO?
Cheers
Samuel
Sounds a good idea - just to clarify, to cycle between that subset of photo modes STD/NR/HDR/DRO?
I'm thinking they mean like the flash how it toggles from off to auto to on
i see that DNGs are not getting saved when NR is enabled. Is there a way both DNG and JPG for images are saved in NR mode. Also can we control the number of frames to capture instead of dynamic ?
could you link to either the paper or the library you used to achieve this? I am trying to achieve similar results but can't seem to find anything other then Google's own paper...
You don't need a paper or a library. You can use global motion compensation (get translation via dynamic programming on pixels to align two images, then repeat for subsequent images in a series). Then simply take the average pixel values on the aligned set and apply any desired post-processing (brightness increase)
BTW, results will be better if you can use the original DP matrix to infer global magnitude of motion, then segment the image into overlapping macroblocks and redo the same thing (calculate local vectors, align, take average). This accounts for cases when the entire image isn't "moving" or "jittering" the same distance (i.e. you have something moving or different parts of the image move different numbers of pixels). Ideally you'd want to start top down: whole image DP translation, then segment into quarters, and so forth until you reach 4x4 blocks with 2px overlaps. Even better if instead taking the "average of averages" at each stage, you weight the merging (relative to an arbitrary "center image") based on the per-block alignment scores. I have implemented a fast global DP (including vectorized variants for x86 but the same idea applies for arm) in my aligner, burst: https://github.com/knights-lab/BURST
Results will be better still if you can implement motion compensation directly via motion vector calculation on the macroblocks. See for instance mvtools for a pre-built library that can return the motion vectors and use them to inform weighting and denoising based on the MVs (ignore the "lambda" motion field stuff since multiframe temporal stability doesn't matter when dealing with static images). - Gabe
Mark, personally i can't thank you enough. i think I've used open camera! since it first released and from my first smart phone, HTC Evo i think it was, Galaxy 3 4 5 a few Motorola's a couple pixels and now a galaxy a03s and cashed a koobee (Obama phone) one of the first apps i install is open camera.. oh and I see you have a tabby too 😺!files are hdr nr dro std with minor adjustments in exp contrast etc applied at same levels to each to offset my settings which were off a bit. last pic is just one i like lol