Mesh2HRTF-tools Wiki
Individual SOFA HRTF related code, tutorials and helpful files.
Brought to you by:
sdx-lv
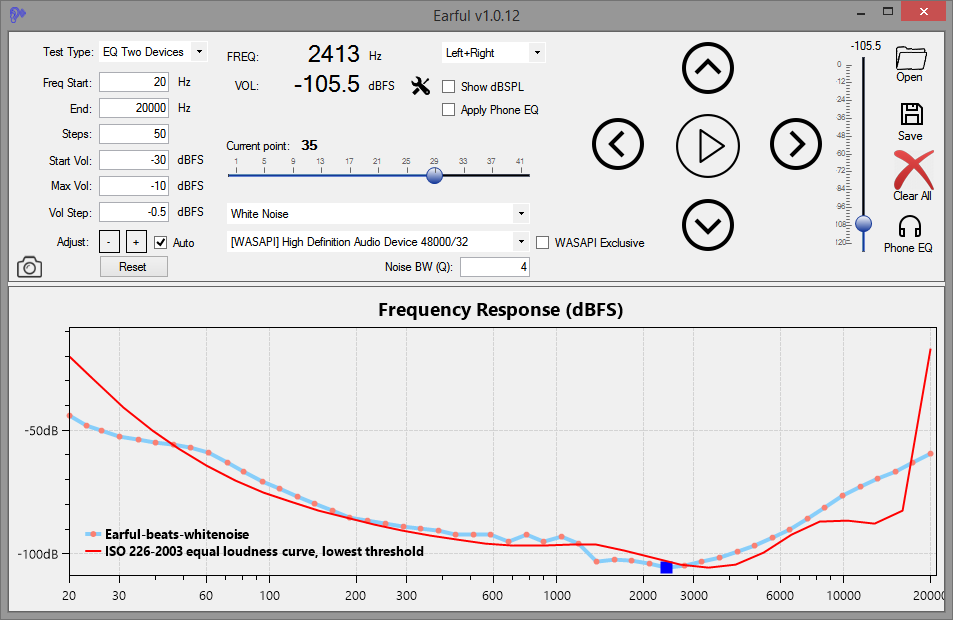
A method to calibrate headphones for use with HRTFs (or without HRTFs) using https://distortaudio.org/earful.html by Paul K.
using only a small speaker and any basic calibration microphone.
| Tutorial Status | Date Written | Date Last Updated |
|---|---|---|
| Tested Beta version for Earful version 1.0.14 or newer | 2022-07-28 | 2022-01-21 |
Headphones are very hard to measure correctly because of their complex nearfield interaction with each person’s ears, hair, and ear canal. Therefore it can be easier and more reliable to use your own hearing to perceptually equalize your headphones to reference sound from a speaker. Reference speaker can be almost any small speaker because most speakers can be easily calibrated to “perfection” for one specific spot where you will listen during headphone calibration. (Note that this “perfect” speaker calibration is easy because we do not care about sound quality across the room, dynamics, time response or sound quality with real music.)
By matching headphone volume at each frequency with a calibrated flat speaker sound, the end result should be as-good-as-possible, flat sound calibration for any headphone on a specific listener. (Note that headphone re-seating consistency is a known problem, so there are practical limits to perfection).
The resulting flat, neutral frequency response from headphones is desirable for multiple applications:
Flat response is a great starting point to apply any slope, target curve or other EQ to get the desired sound profile.
Flat response will work well for use of headphones with HRTF SOFA files generated by Mesh2HRTF.
Flat response is the reference for professional sound mixing and production.
This tutorial is heavily inspired and influenced by:
Besides free software for Windows PC, this calibration procedure requires:
Reference speaker
Any speaker that connects to a Windows PC can work, but the speaker should be physically small. A single cheap Bluetooth speaker can be good enough (as demonstrated by David Gissenger), but some small (woofer < 6") studio monitor, or a bookshelf speaker is recommended. Just do not use any big 3-way tower speakers despite them sounding much better than your portable JBL Flip - the speaker needs to be compact because we need to listen to it from close distance.
Speaker should be close to listener - up to 1m away, at the ear height and preferably free-standing or hanging to avoid table reflections or other interaction with close-by objects. If the speaker is small-enough or coaxial it can be used even closer (0.5m). Being close, reduces influence of the ceiling, floor and wall reflections as well as generally increases direct to reverberant sound ratio.
Subwoofers are a waste of time. Completely unnecessary to include Subs in the test, but they certainly don't hurt if they are well integrated. (detailed calibration is not necessary at subwoofer frequencies, and even below 500Hz it is not crucial)
One or two speakers?
If Earful calibration is done for headphone use with multichannel sound and HRTFs (5.1, 7.1, Ambisonics, binaural recordings, games, VR, Dolby Atmos content, movies as well as usual 2.0 stereo sound), it is enough to calibrate towards a single "Center" speaker right in front of the listener. This is a true mono source, symmetric, simple and fast to set up.
For use without HRTF or if you will only listen to stereo 2-channel content, it is better to set up perfect stereo configuration - 2 speakers at +/- 30deg to the sides (Left+Right). This configuration is harder to set up, but it should work for all use-cases: with or without HRTFs.
NOTE: for especially dedicated people, you are welcome to try to perform multiple Earful calibrations for multiple speaker positions + HRTF. For example, in theory the HpTF (headphone calibration) for a single Center speaker should be the same as for Left+Right speakers (assuming the HRTF is correctly applied for the same angle as the actual speaker position). Also it is possible to place speakers at any angle, match the HRTF setting and make more calibrations. Then multiple Earful results can be analyzed for differences and potentially averaged (using REW) to get the best possible calibration.
Speaker Calibration.
Reference speaker must be calibrated to the single spot where the listeners ears will be - using a measurement microphone. No matter how good or bad speaker is used, the calibration is necessary and will make most speakers sound almost the same in that single listening spot for listening to test tones.
Speaker Calibration needs to be applied by certain software or hardware, for example:
Commercial software that reliably reaches user-defined target curve: for example Dirac Live, Accurate, Sonarworks, etc. Note that some calibration systems, for example Genelec GLM, perform corrections only at lower frequencies (<1 kHz) and therefore rely on the assumed flatness of the direct sound from a high quality speaker. Depending on the room and early reflections, such low-frequency-only type of calibration may not result in a good reference.
or any other approach that gives verifiable results.
Room
Start from SOFA file: If you load your HRTF, it already has the most tricky, personal frequency response details of your hearing included. Therefore Earful calibration process should be easier (If remaining equalization is still difficult it is either a sign of not so suitable headphones or issues in the HRTF itself).
To get the correct headphone output using Earful, the sound to the headphones should pass through a system-wide HRTF solution. It can be HRTF SOFA file applied in HeSuVi, or perhaps SOFA file loaded into SPARTA Binauraliser VST plugin.
HRTF is OPTIONAL: If no HRTF is used, the calibration described here will still work well for stereo content. Note that without HRTF, even Earful calibrated stereo content will not have speaker crosstalk effect. Therefore even for stereo listening HRTF speaker virtualization is the superior solution. Important - without HRTF, you should Not calibrate to a single Center speaker - use a stereo pair of 2 reference speakers.
Diffuse-field Equalization - OFF - DIffuse field EQ is only useful if there is no individual calibration, turn it off to make the setup simpler.
Two Left+Right speakers:
No special setup is needed - as long as Earful outputs sound to "Left+Right", and Sparta Binauralizer is correctly configured following a tutorial, the HRTF should already be correct for speakers placed +/- 30deg from the center.
Singe Center speaker:
0 and 0 degrees. This will effectively make any system-wide sound sent to the Left speaker come out of the virtual Center speaker - exactly what we want.Two Left+Right speakers:
No special setup is needed - as long as Earful outputs sound to "Left+Right", and HeSuVi works, the HRTF should already be correct for speakers placed +/- 30deg from the center.
Singe Center speaker:
Because Earful can only output sound from Left or Right speaker, it is necessary to create a custom HeSuVi .wav file that places virtual Center speaker on the Left (1st) audio channel. If HeSuVi wav. file is produced using [Advanced_SOFA_to_HeSuVi_conversion], then the procedure can be as easy as making the "Azimuth" and "Elevation" changes in SPARTA Binauraliser graphical user interface. Other HeSuVi configuration methods, may require some custom command line scripting.
Using Earful program we will listen to a single frequency at a time and adjust headphone volume so that sound is equally loud compared to the speaker. As the sounds are always identical in both speaker & headphones and there is only a short interruption between them, it is very easy to do the comparison without any training or special skills.
When you first open Earful (version 1.0.14 or newer), check that audio playback works:
“Play” to test audio. When audio works, it is recommended to calibrate reference speaker level:
"Threshold".select your reference speaker as the output device (just for level calibration). The reference speaker must have its flat-response calibration applied.
Click on "Calibrate SPL Level" - and then "Start". Carefully increase the volume slider in the Earful, in Windows or in all other places till you hear the test sounds. If something is not working, do not leave the volume maxed up as you try to turn on the speaker! Turn down the volume, fix your speaker and then raise the volume carefully.
(optional, recommended step) get some SPL calibration microphone in place and adjust the volume to have loud and comfortable listening level, for example 70 dBSPL. You can use REW with UMIK microphone or in worst case, even an iPhone with SPL measuring app like "NIOSH SLM". This volume should not be changed through-out the test.
“Generate Sound” level that you will use. Select both audio devices by switching to the “EQ Two Devices” test type. Now the pop-up will offer to choose two audio devices.
“Reference Output Device” is assigned and has correct volume level which matches “Generate Sound” level in the “SPL Calibration” wizard.“Test Output Device”. Here it is important that this headphone output has correctly applied HRTF on it. If you use only a single central reference speaker, the HRTF must also be correctly applied for the sound coming from straight ahead and not a combination of two Left and Right speakers at 30 degree angles.“Play” to send audio to both headphones and the reference speakers. “Noise BW” is not too broad (default value = 4,3) when making fine adjustment with many steps.Final settings before doing the full calibration.
Start and End frequency – the default 20-20000 Hz range is good for most cases, but it can be adjusted.
Steps – Earful has an excellent ability to start with a quick overall calibration and then add more and more details to the calibration where necessary. To best take advantage of this feature you can start with number of steps at 9 to get the rough calibration in place and then increase number of steps to 17 and then to 33. Using steps of 5, 9, 17, 33, 65 every increase only adds an extra frequency step in-between already existing points, therefore we can focus only on the new points after adding more frequency steps.
Start and Max volume can be adjusted, as needed or left on defaults.
“Clear all” to apply all settings and reset calibration.Calibration process
“Play” button to start. Using shortcuts:
Left / Right arrows switch to another frequency step.Up / Down arrows change volume of the selected frequency by “Vol step” amount.PageUp / PageDown buttons change volume of the selected frequency step 5x faster.Spacebar button works as Play / Pause shortcut.Enter button manually switches between “Reference” and “Test Output” devices. If the button is not used, Earful automatically switches between “Reference” and “Test Output”, but as soon as Enter or numpad-Enter is depressed, Earful will wait for Enter to switch devices (this logic resets when you Pause the playback).Switching between headphones and reference sound: As most headphones block and interfere with the reference speaker sound, headphones should NOT block the ears which listen to the reference signal. Here are 2 proposed strategies:
Easy, rough-method - put headphone over one-ear-only and let automatic switching between sources do its thing. This is not always ideal, but the fastest and most convenient way to get the calibration done. Note, try to keep natural seal and venting of the headphone (for ex. do not cover open-back headphone outer side). Even consider additional covering to reduce amount of direct sound from a speaker entering the ear with a headphone. Remember to change sides - use one ear on one pass and another on the next one (you ay even consider making individual EQ for each ear). Re-check tricky frequencies.
Properly remove headphones - to remove all obstacles for reference sound and ensure proper fit of the headphones over both ears, headphones should be removedevery time you listen to reference speaker sound and re-seated back on the head every time. Here manual switching between devices is quite essential. Note this method may be quite tedious, so it may be best suited for final verification.
numpad Enter can be pressed by a foot to allow moving headphones with both hands – for this you need to place some extra keyboard on the floor (note that all computers support multiple keyboards at the same time).Enter. Short interruption ensures best possible use of auditory memory without distorted perception from listening to the signal while headphones are only partially in place. Important! - Correctly handle your hearing and equipment limits:
First pass: Adjust each of the 9 step frequencies to roughly get the overall correction and a feeling how it works.
Second pass: Change the number of frequency steps to 17 and make sure your Volume step is either 1.0 or 0.5 dB. (you may need to move the “Current Point” slider for changes to take effect). This will be the main calibration – check every frequency that it sounds the same as reference.
Enter should already be more natural with practice (keyboard on the floor and foot on the Spacebar).Third pass – high-resolution check:
33 and Final EQ adjustments.
65 steps to check some problematic areas. Do not forget to listen multiple times – putting headphones on and off helps to detect inconsistent frequencies that should not be boosted to avoid causing audible issues.Exporting Results for AutoEq.
"Open" your latest result file and in the "Load data file as:" choose "Invert" and "Data Set 1" (this will over-write your correction curve with an inverted curve - effectively showing not the correction but the actual headphone response)."Save as Type = All files (*.*)" and write file extension .csv. (AutoEq only opens .csv files which actually is the same .txt file but with different extension).It is good to understand that the normal output from Earful already is a headphone correction curve, but AutoEq expects the inverse of that - actual measurement of the headphone response (this is what we saved as Inverse .csv file). The reasons to run AutoEq after Earful are:
AutoEq does not just output a text file, it automatically generates headphone correction data in several formats that is compatible with convolution EQs, Equalizer APO, parametric EQs or even basic Fixed Band Equalizers. This allows for great flexibility in choice of software to apply headphone correction.
AutoEq includes algorithms to smooth out the correction and make the end result more robust. It acts as a sanity check to avoid over-correction.
This tutorial is updated for AutoEq v2.0+. Tested with Python3.10.
Create input folder & data for AutoEq processing:
C:\AutoEq_fromPIP\.Headphone_EQ_Input (inside "C:\AutoEq_fromPIP" folder).custom_compensation (inside "C:\AutoEq_fromPIP" folder).zero.csv inside "custom_compensation" folder (alternatively you can download an use this file: https://github.com/jaakkopasanen/AutoEq/blob/master/compensation/zero.csv).frequency,raw20.00,0.020000,0.0Install AutoEq in the correct Python environment using "pip install autoeq" (Python v3.10 is recommended, but earlier could work too)
Example step-by-step commands to install & run AutoEq:
cd C:\AutoEq_fromPIP\ (more details about "cd" for beginners).python -m venv AutoEq_venv or activate existing command AutoEq_venv\Scripts\activate.bat environment.pip install autoeq or update to latest version: pip install --upgrade autoeqpython -m autoeq --helpRun the AutoEq processing for headphone calibration data:
python -m autoeq --input-dir="C:\AutoEq_fromPIP\Headphone_EQ_Input" --output-dir="C:\AutoEq_fromPIP\my_Headphone_EQ" --compensation="C:\AutoEq_fromPIP\custom_compensation\zero.csv" --parametric-eq --parametric-eq-config=8_PEAKING_WITH_SHELVES --ten-band-eq --bass-boost=0.0 --tilt=0.0 --convolution-eq --fs=48000,44100--max-gain parameter or make other adjustments based on technical-challenges info.python -m autoeq --input-dir="C:\AutoEq_fromPIP\Headphone_EQ_Input" --output-dir="C:\AutoEq_fromPIP\my_Headphone_EQ_inRoomTarget" --compensation="C:\AutoEq_fromPIP\custom_compensation\zero.csv" --parametric-eq --parametric-eq-config=8_PEAKING_WITH_SHELVES --ten-band-eq --bass-boost=0.0 --tilt=-1.0 --convolution-eq --fs=48000,44100  example of output files and command line printouts after running AutoEq.
Your resulting headphone correction files will be located inside the new "my_Headphone_EQ" folder (or "my_Headphone_EQ_inRoomTarget" folder). Remember to clearly rename your correction files, specify:
Done, now you are finished with AutoEq.
Before Auto Eq v2.0 (released in 2022-11) the commands were slightly different (shown here to highlight differences):
Follow the official AutoEq installation tutorial. If you have previously installed Mesh2HRTF, then it will be easy to follow AutoEq tutorial as well.
- Note that AutoEq repository includes over 4GB of headphone measurement and equalization data, which is not needed at-all for our purposes. As soon as AutoEq is installed you can delete folders
/.gitand/resultsto free up over 4GB of space.- Note, there exists lightweight autoeq-pkg version, but it is not always up-to-date and is tricky to use. So at the moment this tutorial does not cover this AutoEq alternative.
Go to the AutoEq folder (folder with "autoeq.py" file)
- Add extra folders and files for Earful processing (these files will later be available as a download):
> 1. Create folderHeadphone_EQ_Input(next to "autoeq.py" file)
> 2. Create foldercustom_compensation(next to "autoeq.py" file)
> 3. Create a text file calledflat_flat.csvinside "custom_compensation" folder.
> 4. Copy into the "flat_flat.csv" these 3 lines of text:
frequency,raw
20.00,0.0
20000,0.0- Copy your "Inverted_Earful_result.csv" result file into the "Headphone_EQ_Input" folder.
Run the AutoEq command:
python autoeq.py --input_dir="Headphone_EQ_Input/" --output_dir="my_Headphone_EQ/" --compensation="custom_compensation/flat_flat.csv" --equalize --parametric_eq --max_filters=5+5 --ten_band_eq --bass_boost=0.0 --tilt=0.0 --convolution_eq --fs=44100,48000
> * This command should be executed in command line following the normal AutoEq instructions
> * In case the plot shows that "Equalized" curve deviates too much from "Target", you may need to adjust--max_gainparameter or make other adjustments based on technical-challenges info.
> * NOTE: the main command and the whole calibration procedure will result in a "perfectly flat" target curve (Some extra reading can be found here: ref1, ref2, ref3). While it should sound accurate with some content, to better approximate normal in-room listening conditions it can be good to set a downward sloping target curve. One example is to use -1 dB/octave tilt to get about 10 dB difference from 20 to 20000 Hz. Use the command:python autoeq.py --input_dir="Headphone_EQ_Input/" --output_dir="my_Headphone_EQ_inRoomTarget/" --compensation="custom_compensation/flat_flat.csv" --equalize --parametric_eq --max_filters=5+5 --ten_band_eq --bass_boost=0.0 --tilt=-1.0 --convolution_eq --fs=44100,48000
> * Feel free to make your own tweaks by adjusting bass_boost, tilt and other parameters. See command-line-arguments and the rest of AutoEq documentation for more info.Your resulting headphone correction files will be located inside the new "my_Headphone_EQ" folder. Remember to clearly rename your correction files, specify:
> * Headphone model (maybe even specific serial number and soundcard).
> * Used HRTF, if any (which SOFA file was used during Earful calibration and through witch software).
> * Any target curve adjustments/deviations from flat.
> * Date of the calibration.Done, now you are finished with AutoEq.
Depending on your use-case there are many different ways to apply the headphone compensation. The good news is that AutoEq provides parameters for almost any EQ that is available.
Note - Graphic Equalizers are not reliable! If you choose fixed-band graphical EQ for application of the headphone calibration, make sure that the summed filter output is what you need. It is hard to predict what will happen in most graphical EQs when nearby frequencies are boosted together (See more info).
In case your Earful audio playback does not work, you may get an error message OR the sound is simply not there.


Try this:
Device may be blocked by virtual audio device: especially virtual ASIO driver or any similar program - Re-Check that ALL your virtual audio devices are NOT configured to use the audio device that is not working in Earful (in case you intend to use the virtual audio device for calibration - then simply select it as the output).
Device may be blocked by another process - for example using WASAPI Exclusive mode or similar. In this case restarting computer and making sure no unnecessary audio software is running is a good idea.
| ---------------------------------------------- | Part of the "HRTF Application notes" | ---------------------------------------------- |
|---|---|---|
| Back to wiki home | >>> Highly recommended: Everyday use of SOFA HRTF <<< | Good to know: General HRTF usage advice |
Wiki: Advanced_SOFA_to_HeSuVi_conversion
Wiki: Application_notes_1_General_HRTF_usage_advice
Wiki: Everyday_use_of_SOFA_HRTF
Wiki: Home
Wiki: virtual_surround_with_headtracking_tutorial
