MatrixPilot Wiki
Brought to you by:
inspirati
SparkFun sells a simple and lightweight serial data logging device called the !OpenLog, which is based around an Atmel ATmega328P microcontroller and a micro SD card socket. The device implements Roland Riegel's open FAT library. The device currently only supports FAT16, which means you are basically limited to cards of 2gb or under.
All you should need to do to connect the OpenLog to your UAVDevBoard is provide power and ground, and connect the RXI line of the OpenLog to the TX line of UART1 on the dev board. A diagram of a typical connection is shown below.

You will also need a micro SD card in the device before you can talk to it via the serial port. I have had excellent results with 2gb SanDisk cards so far. I have some 4gb SanDisk cards which did not work (as expected - FAT16 limitations), and an old 64mb Nokia card that also did not work, for reasons unknown (although it works fine in phones and card readers). When powered on the device will flash the LED closest to pin 1 of JP2 twice, and then flash the second LED in bursts of 3 if no card is present. If a card is inserted and correctly initialized, the second LED will stay on solid.
Put the card into the OpenLog, connected to the UAVDevBoard, and power up the plane. Make sure the LED lights up on the OpenLog to show that it has power. After a few seconds, power down the plane, and pull out the card. Pop it into your computer and find the file called CONFIG.txt. Open the file, and edit it to read:
19200,26,3,0
Put the card back into the OpenLog, and you should be all set to record all the telemetry sent out from your UDB onto the card, one run per file, with the files sequentially numbered.
If you have an older OpenLog, it may have a firmware on it that can not communicate at 19200 baud, and can not be configured through the CONFIG.txt file. If this seems to be the case, then see the info below.
NOTE: This information is only relevant to very old OpenLog modules.
Before attempting to modify the OpenLog firmware, you should check that the device works in it's "as shipped" state. The easiest was to do this is to connect the OpenLog to your PC with a USB to serial adapter such as the FTDI Basic sold by SparkFun. If you wish to use a real hardware serial port, you will have to arrange your own level conversion, as the OpenLog does not use RS232 signaling levels. For this test, connect FTDI to the OpenLog as described in the following table:
FTDI
OpenLog
RX
TX
TX
RX
VCC
VCC
GND
GND
DTR
DTR*
*Note: The DTR pin on the OpenLog is labelled "GRN" on the silk screening.
You will also need a micro SD card in the device before you can talk to it via the serial port. I have had excellent results with 2gb SanDisk cards so far. I have some 4gb SanDisk cards which did not work (as expected - FAT16 limitations), and an old 64mb Nokia card that also did not work, for reasons unknown (although it works fine in phones and card readers). When powered on the device will flash the LED closest to pin 1 of JP2 twice, and then flash the second LED in bursts of 3 if no card is present. If a card is inserted and correctly initialized, the second LED will stay on solid.
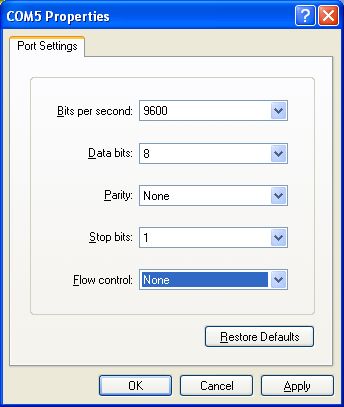
Using a terminal program (Hyper Terminal in a pinch) open a connection with settings of 9600 baud, 8 bits, no parity, 1 stop bit, no flow control.
This is sufficient to verify that you have working communcations. If you wish, take some time to familiarise yourself with the available commands. Most of the commands should be familiar to anyone who has used a DOS or UNIX console.
NOTE: This information is only relevant to very old OpenLog modules.
The next thing that needs to be done is to configure the baud rate of the OpenLog to match that of the UAV Dev Board. Unfortunately the firmware that the OpenLog ships with does not support a baud rate of 19,200 which is the default for the second telementary/logging UART on the Dev Board.
To fix this you will need to update the firmware on the OpenLog board. The modified source code can be downloaded here. (gentlenav.googlecode.com)
Next you will need to compile this code and program the OpenLog. If you have not worked with Atmel devices before you will need a copy of WinAVR
WinAVR includes Programmers Notepad, which provides you with a basic (but sufficient) IDE, as well as all the tools to build the code and program the device.
The OpenLog device uses an Stk500 compatible serial bootloader, which allows it to program itself using only a normal serial connection. For an excellent walk through of setting up Programmer's Notepad and the serial programmer, see this guide by Nate from Sparkfun, which explains everything you need to know.
I personally followed the advice in the walk through and grabbed the latest Arduino software (version 0017 at the time of writing) to use their version of avrdude.conf. You may be able to get away with using the version of avrdude.conf that comes with WinAVR, but i didn't test this.
Either way, you will need to update the Makefile that comes with the source code to reflect your development environment. The following entries are the ones you will need to update, they are under the heading Programming Options (avrdude serial bootloader) in the Makefile.
SERIAL_AVRDUDE = <PATH TO ARDUINO>\hardware\tools\avr\bin\avrdude
SERIAL_AVRDUDE_CONFIG = <PATH TO ARDUINO>\hardware\tools\avr\etc\avrdude.conf
SERIAL_AVRDUDE_PORT = COM2
SERIAL_AVRDUDE_SPEED = 57600
If you've followed the instructions in Nate's walk through, you should now be able to build the code either with a hotkey or using the Tools->[WinAVR] Make All menu item. If the build completes successfully, the next step is to program the device. This can be done using the F10 function key or with the Tools->Serial Program menu item. If everything is correct, you should see the following output in the Programmer's Notepad window, as well as lots of activity on the FTDI and OpenLog LEDs.
<IMAGE OF PROGRAMMERS NOTEPAD OUTPUT WINDOW HERE>
NOTE: This information is only relevant to very old OpenLog modules.
Once the programming process is complete, reconnect to the device using your terminal program and the settings from before. You should again be presented with the following prompt:
12>
type "set" followed by enter. You should be presented with a menu of baud rate selections. The modified firmware should display 19200 baud as option 2, where the stock firmware listed 57600 (which the Dev Board cannot achieve at it current clock speed anyway). Type "2" followed by enter. The OpenLog should display a message saying that it is changine to 19200 baud.
<image of baud rate setting in hyperterminal>
Disoconnect from your terminal program. At this point, the OpenLog requires a reboot. If you have the DTR line connected as described above, this will happen automatically when you reconnect. Otherwise a power cycle will be required.
Change the settings in your terminal program to 19200 baud, 8 bits, no parity, 1 stop bit, no flow control, and reconnect to the OpenLog. If all has gone well, you should again be greeted with the 12> prompt. The new baud rate setting is stored in non-volatile flash on the OpenLog, and will stay set unless you change it to something else, so this should only need to be done once.
NOTE: This information is only relevant to very old OpenLog modules.
As of [r203] of the MatrixPilot firmware, the UAV Dev Board operates the OpenLog as follows: At startup the Dev Board pauses to allow the OpenLog time to initialise it's uSD card. The first thing that the Dev Board sends over the UART is a CTRL-Z character. This will cause the OpenLog to flush its buffers to disk if it is already writing to a file. This would be the case when the Dev Board undergoes a soft restart (using the reset button, as opposed to a power cycle). The Dev Board then sends the command "new UDBlog.txt". This will create our logfile if it doesn't exist, or return an error if it does. We will never see this error, nor do we care about it :) Next, the Dev Board sends "append UDBlog.txt". This opens the logfile for writing, and from that point the OpenLog will record everything it receives to the file, until it receives a CTRL-Z character (ASCII 26).
With the current firmware, you can write any outstanding data to disk simply by resetting the Dev Board. This would be usefull at the end of a flight, to ensure the last of the flight data is stored before powering the system off. If the OpenLog does not receive a CTRL-Z before it is powered down, it will lose whatever is in it's write buffer. This can be anywhere up to 511 bytes, which may represent a reasonable period of data, depending on the data rate of the telementary being used.
