MatrixPilot Wiki
Brought to you by:
inspirati
The intent behind Hardware-In-the-Loop (HIL) simulation is to trick the UDB into thinking that it is flying, when it is in fact sitting stationary on your desk. This allows us to perform any testing that we would normally do at the field (except for things like RF range tests), in the safety and comfort of your home. We expect this to be extremely valuable for testing navigation algorithms, command languages, telemetry, wind estimation etc. The more risky a code change is, the more value there is in being able to simulate it before flight.
To allow the UDB to think it is flying, we need to replace the data that it uses to determine it's attitude - the sensor data. In this case, that means 3 axes each of acceleration and rotation data, plus GPS data. By controlling these, we can make the UDB think it is wherever we want, and in whatever attitude we want. To synthesize those sensor values, we are using X-Plane, by Laminar Research. X-Plane is responsible for listening to the UDB's servo output channels, running a flight model, and then synthesizing and providing sensor data back to the UDB. Basically it becomes our airframe as far as the UDB is concerned.
So, what do you need to do to get set up for HIL Simulation?
The first thing you will need to do is download and install X-Plane. A demo version is freely available, with the limitation that you can only fly for 10 minutes before it locks the joystick out. Fortunately for us, we bypass the joystick interface, so we can continue to fly after the 10 mins is up, albeit with a dialog box over the middle of the screen. If you find X-Plane to be useful, either for this HIL stuff, or just as a flight sim, the full version is only $29 USD, and includes 7 or 8 DVDs worth of scenery for the whole globe.
When you start X-Plane for the first time, i recommend setting up a hotkey to reset your aircraft to the runway. This will come in handy when you need the plane sitting still on the ground in order to reinitialize the UDB, without having to navigate the menus. Go to the "Settings" menu, and select "Joystick, Keys & Equipment". Select the "Keys" tab. Click on the "Add New Key Assignment" button. Select the new item labeled <NONE> at the bottom of the key assignment list. Press the key combo you would like to assign, in my case i used CTRL + R. In the middle pane select the "operation/" radio button, and then in the right hand pane, select "reset_to_runway". Your screen should look like the one below.
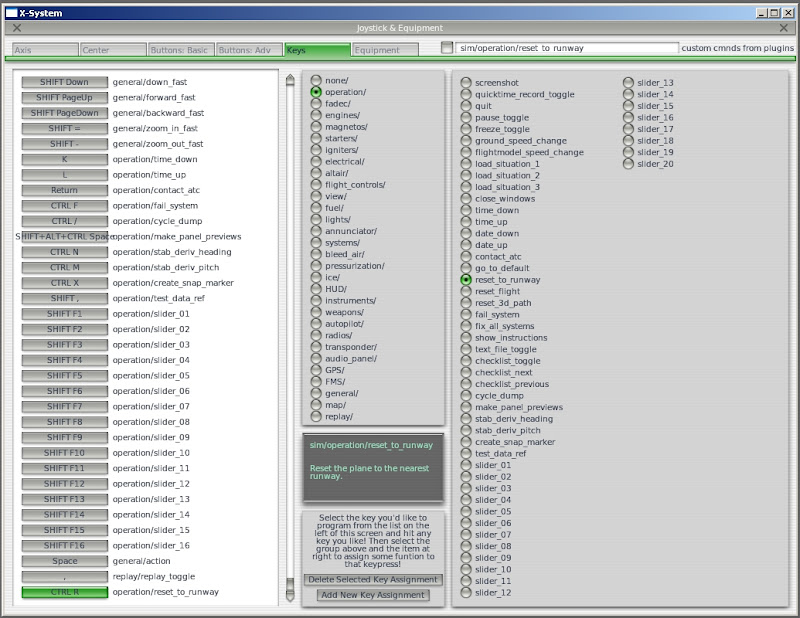
(If you have limited scenery, either because you have the demo version of X-Plane, or because you just haven't got around to installing it, you may want to select "go_to_default" instead of "reset_to_runway", to return you to the default airport and runway. The "reset_to_runway" command will just reset to the nearest runway, and with no scenery installed you can spend a lot of time flying out of airfields in the middle of the ocean :)
If you are planning to do any development on the X-Plane HILSIM plugin, you will also want the "reload plugins" plugin, that allows you to reload your plugins without having to restart X-Plane, which is a HUGE timesaver. The precompiled plugin is available as part of the X-Plane SDK examples available here: http://www.xsquawkbox.net/xpsdk/mediawiki/SDK_Example_Binaries
Place the ReloadPlugins.xpl file into your Plugins directory, which will be located in [XPLANE_ROOT]\Resources\Plugins. For example, on my demo install of X-Plane 9, the path to the plugins directory is "C:\Program Files\X-Plane 9 Demo\Resources\plugins".
The next step is to download and install our HIL plugin. The plugin source lives in SVN, it's path is http://gentlenav.googlecode.com/svn/trunk/Tools/XP_UDB_HILSIM
Check out the code using an SVN client such as Tortoise SVN, exactly as you would if you were checking out the UDB firmware, but using the XP_UDB_HILSIM path above as the repository.
We try to include up-to-date, pre-built plugins for Windows and Mac. But if you want to compile it yourself, here are instructions:
The code is now multiplatform, and can be compiled on most desktop OSes:
After you install the plugin into the Resources/Plugins directory, you'll also need to add a file called HILSIMSetup.txt into the same directory that holds the X-Plane program. Example Setup files are included in the XP_UDB_HILSIM directory. I suggest using the Advanced version (which you'll still have to rename to HILSIMSetup.txt). Inside this file, you should edit the communications port to match the port that your computer uses for the serial connection you'll be setting up to your UDB.
To configure the UDB, all you need do is download trunk of MatrixPilot from http://gentlenav.googlecode.com/svn/trunk, and set up options.h for HILSIM. I suggest using an options.h file known to already work with HILSIM and a specify X-Plane model. But to do it yourself, first set
#define HILSIM 1
and then adjust any other options to your taste. The most important are the servo reversing options. I set them all to 0, except Elevator and Aileron reversing which are set to 1. Then on my transmitter, I have just aileron and rudder channels set to be reversed.
Compile MatrixPilot and upload to the UDB as per normal.
All of the HIL communication is performed through USART2 on the UDB, which is normally the GPS port. We need to connect this port to a serial port on the PC. In most cases, a USB serial port board such as one of the variety of FTDI boards available from SparkFun is the easiest way to achieve this. To make the connection at the UDB end, I have used the DiyDrones uBlox adapter as a pin adapter with the standard 6 pin em406 cable. If you do not have one of these adapters, then you may need to rig something up, perhaps by splicing extra wires into your GPS cable.
Connecting the FTDI board to the uBlox adapter is slightly counter intuitive (i found), but if you get it wrong the symptoms are obvious, as nothing will work. :) The connections are as follows:
If you're building your own cable, note that the gray wire in the EM406 connector is actually pin 6, not pin 1. Make the following connections:
The HILSIMSetup.txt file contains information about how the radio channels should be connected to the aircraft controls. It also controls the COM port and baud rate.
There are two modes of control, basic and advanced. Basic mode connects the UDB servo output to joystick controls (roll, pitch, yaw, throttle, flaps). Advanced mode connects servo outputs to servo movements (left aileron, right aileron, left elevator, right elevator etc..). Basic mode is good for simple aircraft.
There is an example of both modes in the repository. You will need to rename the one you wish to use to HILSIMSetup.txt
The setup file also adjusts gains between servo movement and HILSIM. This includes channel reversing. By adjusting these, you can get your HILSIM aircraft movements to be closer to your real aircraft.
For advanced mode it is useful to run x-plane plane-maker to understand which flight controls to attach channels to.
To get the simulator running, follow these steps:
The simplest part of this task is simulating the GPS data. For this, we simply acquire the appropriate data from X-Plane's datarefs, change units around to match those of the UBX protocol, and then form UBX packets. The 4 different packets that we generate are NAV_SOL, NAV_DOP, NAV_VELNED, and NAV_POSLLH. Some of the values, such as all the dilution of precision values, are just dummy values as it would be very difficult (but not impossible) to generate them, and the UDB doesn't use them anyway. Once the packets are generated, a checksum is generated, and then the packets are sent out the PC comm port at 4hz. In this setup, the PC serial port is connected to the UDB USART2 connector, in place of the GPS.
At the same time as we are doing this, we also obtain the angular rates and accelerations of the aircraft from X-Plane. This is the basis for our simulated sensor data. Unfortunately X-Plane isn't nice enough to give us this data in the body fixed reference frame that the UDB operates in, so we have to perform several coordinate transformations, as well as compensations for centripetal acceleration. Additionally we need to perform a unit conversion from the MKS units used by X-Plane, to the odd scaled units that the UDB uses to make its values fit in an appropriate range for efficient integer math. Once this done, we form another UBX message (which we call NAV_BODYRATES), which has a made up class and id, and send that to the UDB at 40hz. Because we are using the UBX message format, the UDB is able to receive this information using the standard uBlox parsing code, with just an additional message definition added. This body rate data is double buffered in a similar manner, but separate to, the other GPS data.
At the UDB end of things, every time the rmat update routines run, rather than obtaining data from the filtered ADC variables, they take their acceleration and angular rate data from the double buffered variables from X-Plane. This should be the only part of the UDB codebase that operates differently during HIL mode. All other codepaths that run in real flight should still run in our simulated mode.
So hopefully if we've done our job correctly, the UDB is none the wiser, and thinks that it is flying. In response to this, it will perform its attitude estimation and generate appropriate servo outputs to try and maintain control. We take a copy of these servo outputs, and form them into a packet with a basic checksum, which we send out of the GPS UART at 40hz. If there are still servos plugged into the UDB, they will move as per normal.
Back on the PC, our HILSIM plugin receives this packet, performs a unit conversion, and writes these values into the datarefs that govern control surface deflection in X-Plane, causing the surfaces in the sim to move as commanded by the UDB.
Wiki: CompatibleSoftware
Wiki: HowToConfigure
Wiki: HowToConfigureMP25
Wiki: HowToConfigureMP30
Wiki: HowToConfigureMP33
Wiki: MatrixPilot
Wiki: Sidebar
Wiki: SidebarMP25
Wiki: SidebarMP33
Wiki: SoftwareInLoop
Wiki: UsingSubversion
