OS
Live Raizo
Linux
- Linux Debian Bookworm backport 64 bits
- Kernel : 6.7.12+bpo-amd64
The main tools
- Servers
- DHCP, DNS : dnsmasq
- FTP : proftpd
- tFTP : tftpd-hpa
- SSH : openssh
- Samba
- HTTP : module http.server of python3
- VNC : TigerVNC
- Network protocol analyzer : Wireshark 4.0.11
- Serial port communications programs :
- Web Navigator : Firefox 115.11.0esr
- PDF Reader : use Firefox
Network simulators
- GNS3 2.2.48.dev1
- GNS3 Web UI v2.2.47
- dynamips 0.2.23 : emulator of router / provided without any IOS
- VPCS (Virtual PC Simulator) 0.8.3
- QEmu 8.2.1 with the VM Debian
- Docker version 26.1.4, build 5650f9b with the image DDebian
Device QEmu "Debian"
Linux
- Linux Debian Bookworm backport 64 bits.
- Kernel : 6.7.12+bpo-amd64
- The installed softwares are similar to the ones of NetKit.
- Several services (isc-dhcp-server, bind9, freeradius, openvpn ...) are already downloaded but not installed. You can install them (apt install/apt-get install/aptitude install) without accessing to Internet for that.
- Should it be needed, additional software can also be installed (as with a real Debian Linux) in order to enable particular features that are required for specific experiments.
Device Docker "DDebian"
- It is the same as the device QEmu "Debian" except :
- If the GNS3 project is close, only the folders "/root", "/etc/network" are saved. You can add others folders
- The name of interfaces is "eth"
- You can't load kernel modules
- The command "reboot" is disable
- For virtual Wifi, you must use fast-wifi-docker instead of fast-vwifi, vwifi-client
Added
Commands
On Live-Raizo and the Debian VMs
Only on Live-Raizo
- Add-to-GNS3.sh : API to add VM to GNS3
- fast-backup-lab : To backup a GNS3 project.
- fast-battery: To display the percentage of energy remaining in the battery.
- fast-clean-crash-gns3 : To kill all the processes used by GNS3 (in case of crash for example)
- fast-gns3-server : To start gns3server
- fast-http : To start a web server on the port 80 and share by default the directory "/home/user"
- fast-memo: To display a reminder.
- fast-mount-usb : To mount the USB key in the directory /media/usb0
- fast-nat: To configure an DHCP and DNS servers and use NAT with network of the interface virbr0.
- fast-reset-vm : To reset the Virtual QEmu Machines
- fast-rescan-interfaces : To scan to detect new plugged network interfaces
- fast-restore-lab : To restore a GNS3 project, which has been saved.
- fast-save-project : Asks questions to save quickly a GNS3 project.
- fast-startup : To mount automatically the USB key in /media/usb0 and to processe the script /media/usb0/raizo.sh
- fast-vwifi-update-gns3 : To update the server "vwifi" with the geographical coordinates of each VM from GNS3
- fast-wifi-docker : To add the wlan interfaces to the Docker VMs
- minicom-usb : minicom uses the USB adapter
- cu-usb : cu uses the USB adapter
- ftp : Overlay to lftp so that the login is interactive
Only on the Debian VMs
Configuration files
On Live-Raizo and the Debian VMs
- Colorized outputs of networks commands : tcpdump, ip, ifconfig, route, arp, ...
- Colorized commands in the prompt of zsh
- For nano, a syntax highlighting for the configuration files
- For vim, a syntax highlighting for the file /etc/network/interfaces
- history command already contains useful commands
Only on Live-Raizo
- minicom of Raizo is configured to get connected to the serial port. minicom-usb (or "minicom USB") allows to use USB adapter.
- cu of Raizo is configured to colorize Cisco output. cu-usb allows to use USB adapter.
- A symbolic link "/ftp" to the directory "/srv/ftp", and the alias name "ftp" for the service "proftpd"
- A symbolic link "/tftp" to the directory "/srv/tftp", and the alias name "tftp" for the service "tftpd-hpa"
- Xterm : use "WINDOWS+ARROW_UP"/"WINDOWS+ARROW_DOWN" to increase/decrease the size of the font
On GNS3
- Basic configuration files in "/home/user/.config/GNS3/configs/" for
- Cisco routers : Raizo_ios_base_startup-config.txt
- Cisco EtherSwitch : Raizo_ios_etherswitch_startup-config.txt
- Cisco switch IOU : Raizo_iou_l2_15.2d_base_startup-config.txt and Raizo_iou_l2_15.6.0.9S_base_startup-config.txt
- VM Linux : Raizo_vbox_linux_startup-config.sh
- GNS3 colorizes the outputs of VM's console where the variable "usage" contains "ConsoleType=Cisco"
- The tools menu contains access to commands :
- Docker VM have the shared folder "/hosthome" to access to "/home/user" of LiveRaizo
Only on the Debian VMs
- For tmux
- the shortcut "CTRL+ARROW" allows to change terminals quickly,
- the shortcut "SHIFT+ARROW" allows to change order of terminals quickly
- Only with the template "Debian" : the shortcut "CTRL+B S" to adapt the size of the tmux console to the size of the console
- The folder "/etc/apt/sources.list.d/" contains the files :
The specifics
Of Live-Raizo and the Debian VMs
- No server is started automatically at boot
- Default shell of root and user is zsh (bash is also available)
- See which network interfaces are plugged : "!3" or "sudo ifplugstatus -a"
- Set dynamically an IP address : "!1" or "fast-ip dhcp" or "sudo ifup enp0s0"
Of the Debian VMs
- You are automatically logged in with the "root" account
- The password of root is root
- A simple user exists : his login is "user" and his password is "user". His default shell is bash, and it is not in sudo group
- An administrator user exists : his login is "admin" and his password is "admin". His default shell is bash, and it is in sudo group
- At the end of the boot, the VM executes the script "STARTUPFORALLVMRAIZO" and after the script with the same name of the VM. These scripts must be placed on LiveRaizo in the sub-folder "project-files/startup/" of your project
- The VM have access to the directory “/home/user” of Raizo by using their directory "/hosthome"
- After having started up, the hostname of each VM will automatically take the name that was given in GNS3
- IP Forwarding is enabled by default
Of Live-Raizo
- You are automatically logged in with the "user" account
- To start the Windows Manager, you must run the command "startx"
- The password of "user" is "user". You must use "sudo" (or "sudo su") to start commands as root
- At boot, all detected networks interfaces are activated (but not configured), and they will stay activated even if you use ifdown. If you want shutdown a network interface (enp0s0, for example), you must do : "sudo ip link set down enp0s0".
- At boot, a bridge interface, named virbr0, is created : useful if you want to do communicate your virtual network with "Live Raizo"
- Before install Debian Package, you must do : "sudo apt update"
- X starts automatically fast-battery if battery detected
- On Firefox, "Auto-detect proxy settings" is enable by default. Don't forget it if you want to use Firefox with you virtual network.
- Firefox uses the certificats of Debian. You can found them in /usr/share/ca-certificates
- Docker is configured to be used in GNS3. If you want to use Docker VM without GNS3 (docker build, docker run...), you must do :
sudo mv /etc/docker/daemon.json /etc/docker/daemon.json_No
sudo systemctl restart docker
- On X
- ALT+F1 starts xterm
- ALT+F2 starts GNS3
Your Customization
Persistence of /home
- During boot, if Live-Raizo finds a partition with the label “persistence” and the file persistence.conf with "/home" on the root, this partition is automatically mounted in /home. (cf 10.3 Persistence )
- Advice : Don't forget to erase your persistent user's home if you update "Live-Raizo"
Customization of Live-Raizo
Tips
Simulate Virtual Wifi
Sharing between the Host and your guests
Microsoft Guest
With Samba
To share folder
- On Liveraizo, start Samba
sudo systemctl start smbd
- On GNS3, connect a device "LiveRaizo" (to interconnect with the interface virbr0)
- On the Guest, go to "\\IP_of_virbr0"
With Spice
To share screen and mouse
You can use Spice :
- In GNS3, the device must use "spice+agent" as console type
- On the Guest, you must install spice (spice download) : spice-guest-tools
To share folder
You can use "Spice WebDAV daemon" :
- In GNS3, the device must use "spice+agent" as console type
- On the Guest, you must install the "Spice WebDAV daemon" of spice (spice download).
- On my tests,
- spice-guest-tools must be installed before
- After the install of the "Spice WebDAV daemon", you should perhaps start/restart the service "Spice webdav proxy"
- In the preference of the remote-viewer, you must enable the shared folder
Linux Guest
To share screen and mouse
You can use Spice :
- In GNS3, the device must use "spice+agent" as console type
- On the Guest, you must install spice : spice-vdagent xserver-xorg-video-qxl
To share folder
With spice
- In GNS3, the device must use "spice+agent" as console type
- On the Guest, you must install "Spice WebDAV daemon" of spice : spice-webdavd
- In the preference of the remote-viewer, you must enable the shared folder
With 9p
- In GNS3, you must add this in the QEmu options of this VM (With Add-to-GNS3.sh , you can use the read-only variable : OPTION_QEMU_9P_HOSTHOME)
-fsdev local,id=fsdev0,path=/home/user,security_model=none,multidevs=remap -device virtio-9p-pci,fsdev=fsdev0,mount_tag=hosthome
- In the VM, the shared folder "/home/user" of the Host can be mounted in /mnt :
mount -t 9p hosthome /mnt
Install on USB Key
From Microsoft
- To install Live-Raizo on USB Key, i recommand to use :
- imageUSB (version v1.4.1003) to install Live-Raizo on multiple USB drive.
From Linux
dd  if=Live-Raizo-v15.24.01.07i.iso  of=/dev/sdX
# with /dev/sdX, the device of your usb key
Use in a Hypervisor
Sharing between virtual and real network
-
To do communicate your virtual network with the real network (screenshot)
- On GNS3, put a "Cloud" device and a cable to the attribute "enp0s0" of this "Cloud" device.
- (If the real network is accessible by enp0s0)
-
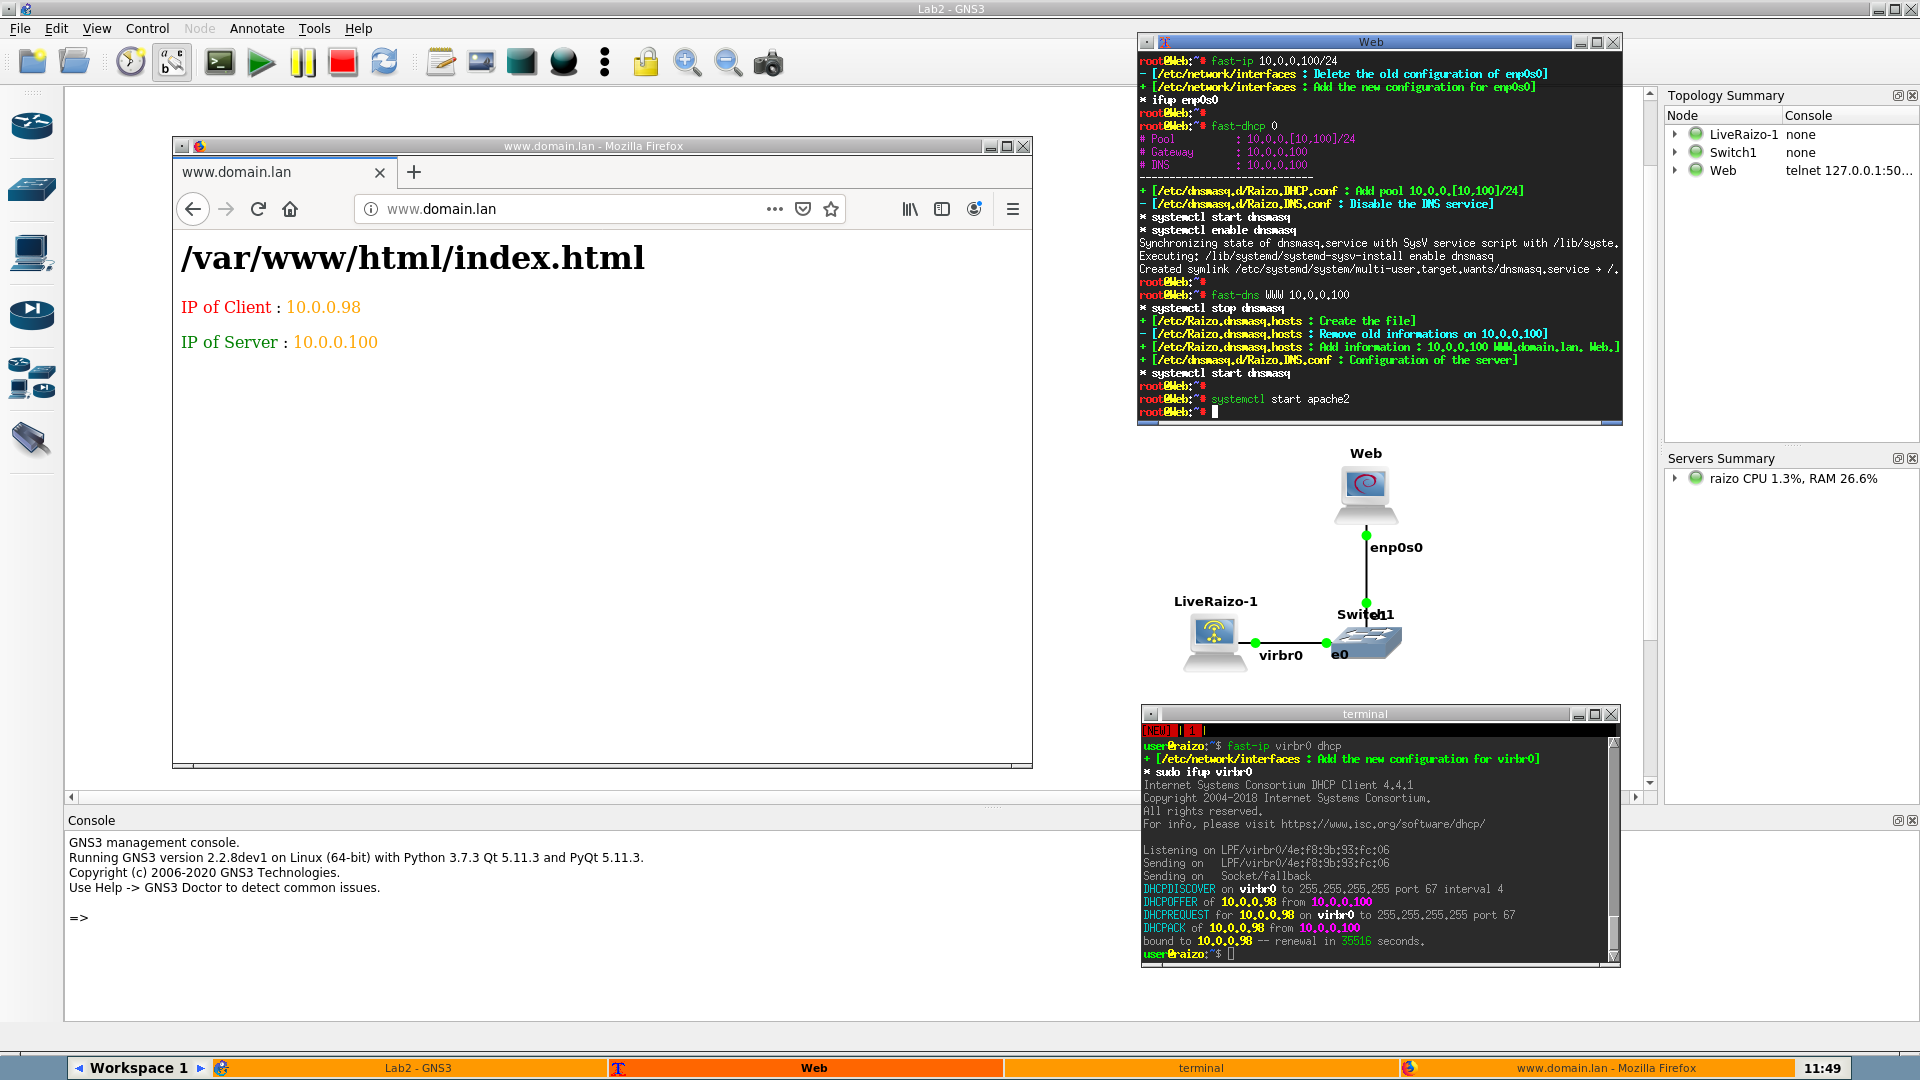
To do communicate your virtual network with Live-Raizo : (screenshot)
- On GNS3, put a "LiveRaizo" device and a cable to the attribute "virbr0" of this "LiveRaizo" device.
- On Live-Raizo, give an IP address to the virbr0 interface.
-
To do communicate your virtual network and the real network with the Wifi :
- On GNS3, put a "LiveRaizo" device and a cable to the attribute virbr0" of this "LiveRaizo" device.
- On Live-Raizo :
- Configure your Wifi
- Launch "fast-nat" command.
Use bittorrent to access to remote harddisk
Use an external disk to extend the memory
- If "/mnt/disk" mounts an external disk, you can do this before starting GNS3 :
# Create au subfolder in /mnt/disk/ which will contain the projects of GNS3
mkdir -p /mnt/disk/projects_gns3
# Create the folder used by GNS3 for these projects
mkdir -p /home/user/projects
# Associates the folder on the disk to the folder used by GNS3
sudo mount --bind /mnt/disk/projects_gns3 /home/user/projects
- Your projects are actually stored in /mnt/disk/projects
- To stop the association :
sudo umount /home/user/projects
Drawbacks
- You should not move the USB key of Live-Raizo when it is running. If you see "Input/output error" when you launch a command (or fast-syslog), it's too late and you must reboot. Sorry
- In the VM "Debian", tmux cannot detect the size change of the screen. You can :
- say to tmux to recalculate the size of the console : CTRL+B S
- or detach tmux (CTRL+B D) and re-attach it (tmux a)
- On some laptops, during the boot with the SecureBoot enabled, LiveRaizo does a kernel panic : add the boot option "trace_clock=local" on the boot kernel options
- On some laptops, LiveRaizo or X server doesn't start, then you can try :
- If you have an NVidia card, add the boot option "nouveau.modeset=0" on the boot kernel options
- On the boot kernel options, add the option "acpi=off"
- unplugged the power cord of battery before to start X. You can plugged it after
- If Live Raizo hangs after few minutes, verify that the file /var/log/syslog doesn't grow up excessively. If it is the case, seeks in this file the error that the system logs too often and corrects it.
- For example, add the boot option "pci=nomsi" on the boot kernel options
- On processor "AMD Ryzen", to run Microsoft VM with QEmu (GNS3), you must add the option "-cpu EPYC" to the options of the VM
Others
Minimal linux commands useful
Links