Tree [7baa0d] master / History
| File | Date | Author | Commit |
|---|---|---|---|
| auto | 2021-01-05 |
|
[32e726] Added Folder Attributes to pcmanfm actions |
| config | 2021-02-13 |
|
[9a3a11] Fluxbox cleanup |
| .gitignore | 2020-12-03 |
|
[97217b] Lilidog-Buster New |
| LICENSE | 2021-02-13 |
|
[7baa0d] Create LICENSE |
| Lilidog.png | 2021-02-08 |
|
[97d442] Changed Openbox cover to reflect new theme |
| README.md | 2021-02-12 |
|
[bf01c4] Readme update |
Read Me
# Lilidog-Linux Based on Debian Buster (stable)
LXDE With Openbox, Fluxbox, Jwm, and Pekwm. Optimized - 64 bit version.
Lilidog is a dark themed distro build based on LXDE.
Options are available for Openbox, Fluxbox, Jwm, or Pekwm.
Toggle freely between the four while in the default session.
All Window managers can be accessed separately through the login screen, but no toggling in this case.
Pretty much, Debian. With some of the hard parts done, and some cool stuff along the way.
Everything is easily accessible, with numerous options to customize.
This is the stable version. Buster repos only.
Versions:
There are three versions of Lilidog. This is the stable only build, and generally recommended.
For the minimal build:
https://github.com/sleekmason/Liliflux
For the Unstable build: https://github.com/sleekmason/Lilidog-buster-w-custom-kernel
Instructions on building your own ISO of Lilidog are at the end of this page. Easy peasy.
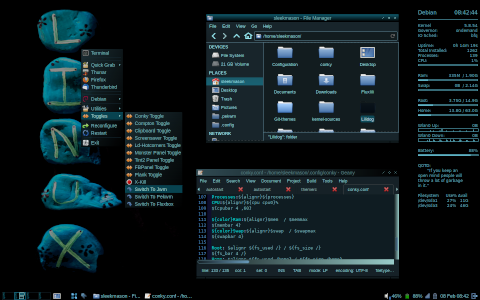
Openbox
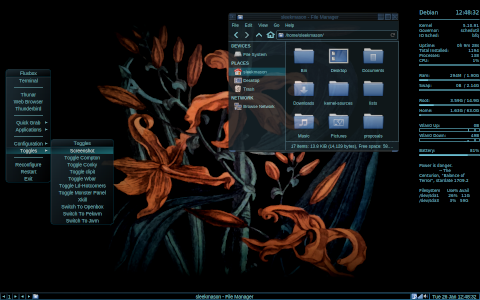
Fluxbox
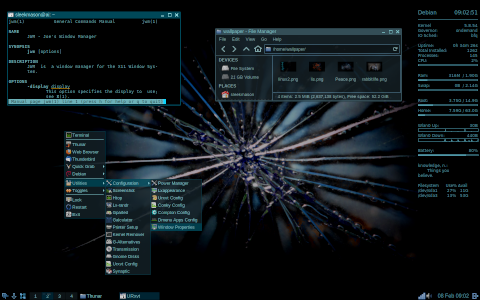
Jwm
Pekwm
Features:
-
Based on Debian Buster with contrib and non-free sources enabled by default.
Debian backport sources can be added during installation. -
Switch between all four window managers freely while in session through the toggles in the menu.
-
Switch between four different panels on the fly as well. - Customize your own to be toggled when desired.
The username and password for the live environment is "user", and "live" respectively.
-
Hybrid Monster panel by default in Openbox, with options for FbPanel, Lxpanel, or Tint2 panel.
Monster panel is a combination of the pager and icon control from Fbpanel, with everything else Tint2.
Try Fbpanel or Tint2 in the live environment under 'Toggles' in the menu. -
There are shortcuts for Alsamixer in the volume icon and xfce4-power-manager in the battery icon.
To see time format options for 24 hour vs. 12 hour, middleclick over the time for the man page.
Hover over the icons to see what they are. The live password is "live" for the screenlock. -
X-screensaver and other handy startup apps readily available through the toggles in the menu,
or can be activated on login by navigating to Lxsession Autostart in the menu, and enabling. -
Dmenu and Rofi for alternate menu sources. - ALT + F2 pulls the full Dmenu up, while ALT + F3 pulls up a
customized Dmenu with only the most commonly used apps. ALT + F5 pulls up Rofi. -
Thunar is the default file manager, with Pcmanfm and Spacefm as alternatives to explore. Custom right-click
options for each are already enabled. See what you like best. -
Custom Lilidog Openbox and GTK theme, Gnome Brave Icons, and matching themes for Geany and Mousepad.
The fonts are Liberation Sans, except for urxvt and Conky, where Dejavu is used. -
URXVT terminal has font size control (ctl+up/down), transparency and the ability to open urls.
Lxterminal is readily available in the menu and launcher for those who prefer it. -
Conky has all sorts of relevant info, including connected drives, number of packages installed, and more.
For drive information, you may wish to edit the script in ~/.config/conky/scripts. Directions included. -
Desktop icons can be enabled and customized using pcmanfm. See lxsession autostart in the menu.
-
Compton Composite Manager with transparency enabled. Change to suit.
-
Newsboat RSS reader with a custom configuration already in place and ready for new RSS feeds.
-
BFQ IO Scheduler by Default for spinning drives. "Mq-Deadline" for SSD and eMMC, and "None" for nvme.
To change this to kernel default, delete 60-scheduler.rules in /etc/udev/rules.d -
Feh sets the wallpaper directly in lxsession autostart rather than pointing to ~/.fehbg
After installation, you may want to change this to ~/.fehbg & in lxsession autostart for customization.
If you would prefer to use icons on the desktop, enable pcmanfm --desktop --profile in Lxsession autostart. -
My wife painted rocks for the wallpaper and I found I like them quite a bit:) Maybe you will too.
Feel free to use them however you like, or delete them and point to something else. No worries:)
They are mine/yours, not off the internet. -
System notifications enabled with Dunst. Set your own settings in ~/.config/dunst/dunstrc.
-
All scripts are in /usr/local/bin. Some of the fun ones are:
-
winfuncs tiler - For tiling and such. Set your own keybinds!
Try: winfuncs cascade or winfuncs showdesktop in a terminal with a couple of windows open to get the idea.
Look at the script in /usr/local/bin for the rest of the options. -
Swapid script for the frequent dual installer. This grabs your swap uuid and opens the appropriate windows to edit.
Run swapid in a terminal after installing another distro to a different partition. -
ld-hotcorners - Each corner of the screen responds to a command.
Turn it on with the button in the lower left corner or under Toggles in the menu.
Change the corners in ~/.config/ld-hotcorners.
Currently clockwise from top left: Thunar, Compton toggle, Exit menu, urxvt terminal. -
This ISO has about everything you could need for simple tasks while still quite responsive.
-
This build running live uses around 300MB ram.
Installed: around 280MB
This iso comes in at 1.18 GB
Installed extras include but not limited to:
bash-completion /
catfish /
compton /
conky /
curl /
dmenu /
dunst /
feh /
firefox-esr /
fluxbox /
fortunes /
geany /
gimp /
gparted /
kernel remover /
ld-hotcorners /
libreoffice /
lightdm-gtk-greeter-settings /
lxterminal /
mousepad /
nano /
newsboat /
obconf /
obmenu /
pcmanfm /
pnmixer /
rofi /
rsync /
rxvt-unicode /
synaptic /
tint2 /
transmission-gtk /
wicd /
winfuncs /
xbindkeys-config /
If you came here hoping to download The Lilidog Distro, I'm afraid it won't happen from here.
If somebody wanted to actually host the iso I would keep it updated and add cool stuff here and there. Well, I will anyway.
But all is not lost! You can build your own distro with everything above, and install it or just run it live.
Follow the instructions below to build your own iso using the Debian Live-build system:)
Quick instructions:
Clone or download the Lilidog-Buster zip file so you have access to all the necessary files.
Open a terminal in the resultant folder and:
sudo apt install live-build
sudo lb build
Thats it. The iso will be in the main folder when completed. Read below for potential problems.
Less quick, but you learn something and have control over the process.
Recommended
Unzip the file somewhere to reveal the folder inside. You will not be building directly in
this folder. It is to copy files from only, and can be deleted once you have a build.
Open a terminal and:
sudo apt install live-build live-config live-boot
Be aware that neither live-boot nor live-config are necessary for the build,
but having the information is good (man pages and such), and won't hurt anything.
Now make the directory we will be working from and copy the template over:
mkdir -p Lilidog/auto

cp /usr/share/doc/live-build/examples/auto/* Lilidog/auto/

cd Lilidog
Open a couple of file-manager instances to make life easier, and then:
Replace the config in Lilidog/auto with the same file from the Lilidog clone you downloaded and unzipped then:
lb config
This will populate the folder. Go up a level to see.
Now open up Lilidog/config.
Make a folder in Lilidog/config named bootloaders and make sure to copy from the
/usr/share/live/build/bootloaders on YOUR computer:
Now copy the isolinux and syslinux folders to the /config/bootloader folder you made in Lilidog.
Or easier, copy the whole bootloaders folder over to Lilidog/config, and delete everything inside but isolinux and syslinux.
In the isolinux folder, Replace the advanced.cfg and the splash.svg with those from the lilidog clone. (replace with the splash.png)
In the syslinux folder, replace just the splash.svg with the splash.png.
Next is to copy over the configuration files from the Lilidog Clone.
Replace includes.chroot, includes.installer, and package-lists with those from the Lilidog clone.
This is when you should make any other changes you wish. Look at the package list to add or remove packages.
Do you need firmware-b43legacy-installer?
Recommend running the build once before making your own changes.
Now, while still in ~/Lilidog in terminal:
sudo lb clean

Sudo lb build
The usual bit about getting some coffee/tea here is a good idea.
Live build fails occasionally during the build for no good reason I can see.
Simply try lb build again without cleaning until it builds properly,
or if obviously won't build after a few tries, use lb clean and try again.
Seriously, keep trying. Like it is meant to throw you off. Remember, NOTHING is
pushed to git unless it produced the desired results. i.e, worked.
This will leave you with an iso image you can either burn to dvd or usb (easier).
I recommend grabbing the live-usb-maker app: https://github.com/MX-Linux/lum-qt-appimage/releases/tag/19.11.02
Download the AppImage.tar.gz and open a terminal:
tar -xaf live-usb-maker-qt-19.11.02.x86_64.AppImage.tar.gz
Then:
sudo ./live-usb-maker-qt-19.11.02.x86_64.AppImage
Root is required to write to connected devices.
The boot screen gives a choice of using as a Live session, or installing Lilidog Linux if you like what you see.
The only installer I am using is the expert Debian text installer in the menu.
If you would like to work on your own distro after building, install to a separate partition ONLY to build from.
The whole system becomes your template. Think clone within a clone.
Follow the examples here for further ideas. A whole new world just opened up if you do:)
https://live-team.pages.debian.net/live-manual/html/live-manual/examples.en.html#tutorial-1
- Please "star" this site! This lets others know there is something worthwhile here.
- Email me, ask questions here, or find me in the forums:) (Private message only in the forums please).
- Feel free to link this page. This is how others also get to try new things.
Contact info: sleekmason@gmail.com
Good Luck!
Credits
The linux rocks are my wifes:) She paints rocks, and I like em.
The rabbit is a local image on the side of a building. Apt for the times.
The Cracked Window is from one of our backpacking trips. An old truck, 2000' down.
The "Lis" is a changed copy from a print we have.
The Grub image is Lili out playing in the snow.


