How-To Record Impulse Responses Digitally
HeSuVi already has a wide variety of impulse responses from different headphone surround virtualization softwares and sound card solutions to choose one that fits your ears and liking best. But you can also follow this tutorial guide about capturing an impulse response of any headphone surround virtualization software and additionally, capture HRTF recordings that use the SOFA file format.
How-To Record Impulse Responses Digitally
This tutorial will guide you through capturing an impulse response of any headphone surround virtualization software directly on your PC using audio loopback. Although this guide is written for headphone virtualization and HeSuVi in mind, the same principles and techniques can be applied to other systems.
I. Downloading Files and Installing Software
We are using MPC-HC and Audacity in this guide for playing and recording the impulse responses. I recommend you to use MPC-HC for channel mapping consistency although any media player capable of 7.1 WAVE playback should do the job. The used test files have channel mappings saved in them so all players should play the channels similarly.
HeSuVi’s Dirac delta sequence file (dirac_delta_7.1.wav) is playing Dirac’s delta signals (digital impulse approximation) for all 8 channels in order: 1, 7, 5, 3, 2, 8, 6, 4. When played with MPC-HC the impulse response sequence channel order will be: L, Ls, Lb, C, R, Rs, Rb, LFE.
On some cases HeSuVi, Equalizer APO, Voicemeeter and your existing surround processing software might not work nicely together, Windows’ audio can be a bit sensitive at times. If you have HeSuVi installed make sure “Deactivate everything” is checked, you don’t want two processors altering the sound. Deleting or renaming the config.txt file in Equalizer APO install folder might help. If nothing else works you might want try to uninstall HeSuVi, Equalizer APO and Voicemeeter, this should be a last resort though.
While I got Out of Your Head working without any distortions with HeSuVi, Equalizer APO and Voicemeeter installed I experienced some weird inconsistencies with impulse response intervals. Some silence periods between the peaks were longer than others. Only after uninstalling everything else but Out of Your Head did I get perfect consistency in interval durations.
Step by step:
- Setup your processing software into working condition.
- Install Audacity.
- Install MPC-HC.
- Download and unzip HeSuVi’s Dirac delta sequence and test sound for 7.1 surround.
II. Recording Processed Surround Test
We are using Audacity to record the impulse responses and a processed surround test file. Audacity is a popular free software for audio manipulation with heaps of useful features. It can record audio stream from the sound card in pure digital loopback when using WASAPI as the audio host. There are other ways for recording loopback audio, like using a physical cable from sound card’s output to input, but doing a direct digital loopback will give bit perfect results.
Audacity also can do overdubbing, playing existing tracks while recording a new one but it cannot play multi-channel audio so we have to use a separate media player for that. We’ll play in MPC-HC and record in Audacity.
Step by step:
- Open a new project in Audacity.
- Open test_sound_7.1.wav in MPC-HC.
- Set device configuration in Audacity Device toolbar.

- Select Windows WASAPI in host dropdown.
- Select the processor output in playback device dropdown. This could be your headphones or speakers depending on your audio hardware. If you have a hardware solution for the processing, you should select the device called Stereo Mix or What U Hear. If this is not available, you need to plug in the hardware processor’s output to your sound card’s input and select that (visible as Line In or Microphone) as the recording device.
- Select highest number of channels available in the recording channel configuration dropdown.
- Set Audacity project sampling rate to 48000Hz in bottom left corner. By default this is usually 44100Hz.
- Set your playback device and media player volume to 100% (0 dB) and make sure volume slider next to microphone icon in Audacity is at the maximum. This will ensure best signal to noise ratio for the recording.
- Start recording. The image is for impulse responses but the setup is the same for recording the surround test file.
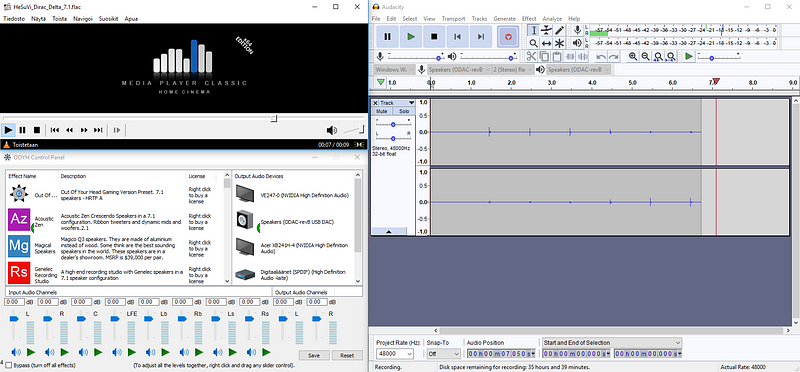
- Play surround test file in MPC-HC from the beginning.
- Wait until the file has reached the end and stop recording in Audacity.
- Remove all extra tracks if you recorded more channels than stereo. You can do this by clicking the x on the left side of the track name. If the remaining two channels are separate mono tracks, then click the drop-down menu of the upper one and select “Make Stereo Track”.
- Export from Audacity to WAV and save to desktop as test_sound_7.1_processed.wav.
- Turn off your sound processor and play the recorded file (test_sound_7.1_processed.wav), it should sound identical to playing the original surround test file (test_sound_7.1.wav) while having the sound processor on. If the recorded file is louder than the original you have to turn down volume in the media player and redo the recording or else there will be clipping with the impulse later. Make sure the recording is at least a bit quieter than the original.
III. Recording the Impulse Response
Headphone surround (7.1) virtualization is based on emulating each speaker’s signal in each ear. This can be thought as 16 different systems we are trying to emulate at the same time: left front speaker to left ear, left front speaker to right ear, left side speaker to left ear, left side speaker to right ear and so on. Capturing 16 systems requires 16 impulse responses. HeSuVi actually uses only 7 channels, the LFE is omitted because it has the same loaction as the center channel, so here we will need only 14 impulse responses. There are a lot of impulse responses but don’t worry they are all recorded in a single sequence.
Recorded impulse response sequence is a stereo track containing impulse responses for all the channels one after another. We need to turn this stereo track into 14 mono tracks for HeSuVi. This is done by cutting up the sequence, cropping out silences from the beginning and the end and reordering the tracks to match HeSuVi’s expectations.
Preserving the original channel delays is extremely important, even minuscule delay error can cause the surround effect to collapse completely. We will achieve perfect delay synchronization by cutting the impulse response sequence in exactly one second intervals (original Dirac delta sequence is in one second intervals).
Absolute delay in the beginning of the tracks is not so important as long as the delays in respect to other channels are correct. It’s smart to leave a bit (10ms or so) headroom when doing the first crop to the entire sequence. Some channels might have smaller delays than front left channel (front left is the first impulse response) so cropping exactly to the beginning of the first impulse response might lead to beginning of some channels moving to end of the previous channel. Absolute delay is reduced identically for all channels after the sequence has been cut up to individual impulse responses.
Step by step:
- Open dirac_delta_7.1.wav in MPC-HC.
- Open new project in Audacity and set the device configurations and project sampling rate if not set already.
- Start recording.

- Play the Dirac delta sequence in MPC-HC. Use the same volume (as loud as possible but not too loud) as you used for your last surround test file recording.
- Wait until the file has reached the end and then stop recording in Audacity.
- Again, make sure that you have a single stereo track in the end.
- Export this early result as WAV already: File → Export → Export as WAV. Select WAV (Microsoft) 32-bit float PCM for type and save.
- Select the recorded track by clicking the track control panel (left side of the wave forms). Or Ctrl+A.
- Make sure the loudest amplitude is below 0.985/-0.1313 dB. If you get very quiet recording (highest peaks way below 0.5), you could amplify the impulse response. In most cases, this should be avoided because one can always change the volume later in HeSuVi. You can do this by normalizing track level peak to eg. -9dB: Effect → Normalize. Do NOT normalize stereo channels independently, this will break the surround effect because channel volumes on each ear is an important localization cue. -9dB is an arbitrary value which should give roughly correct levels, you may have to check the volume afterwards and correct it with: Effect → Amplify.
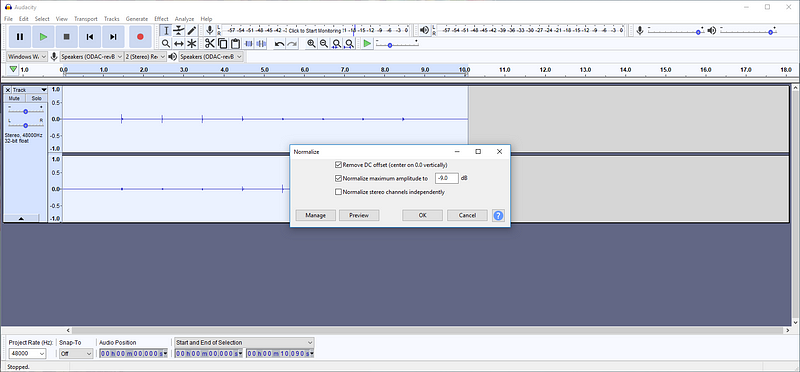
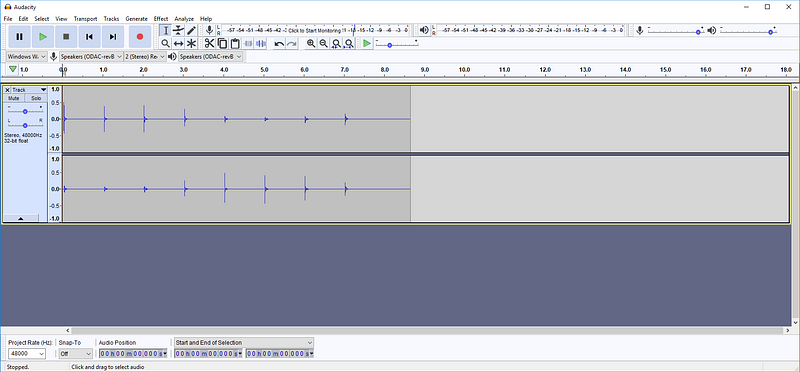
- Move the end of the selection to the left side of the first peak and leave a little headroom (10ms or so).
- Remove selected samples (Ctrl+K).
- Select exactly 1 second of audio in the beginning of the track. It’s easier if you zoom in to the 1 second marker and select “hh:mm:ss + samples” from the selection time unit dropdown.
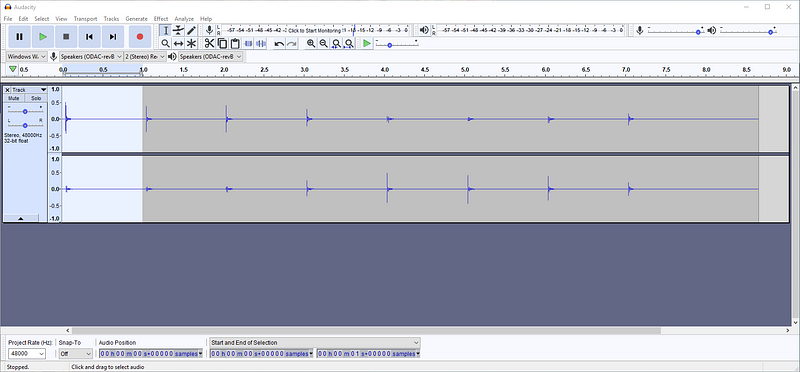
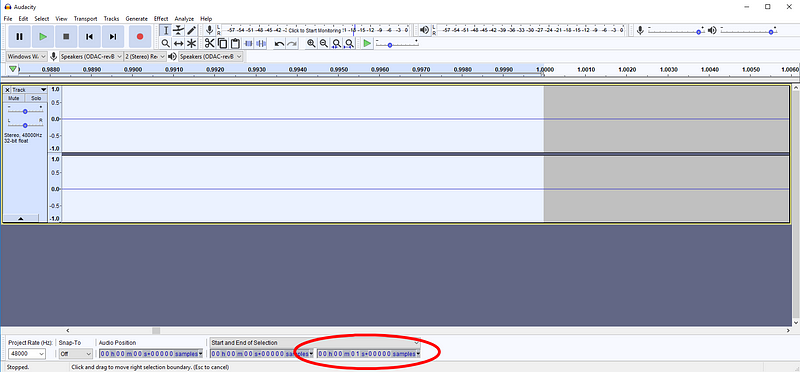
- Cut the selection (Ctrl+X), unselect track by clicking empty space under the tracks, and paste the cut section as a new track (Ctrl+V).
- Select another 1 second interval from the beginning of the first track. This time Audacity knows to snap onto the 1 second marker because the second track ends there. Cut and paste as a new track below the second track.
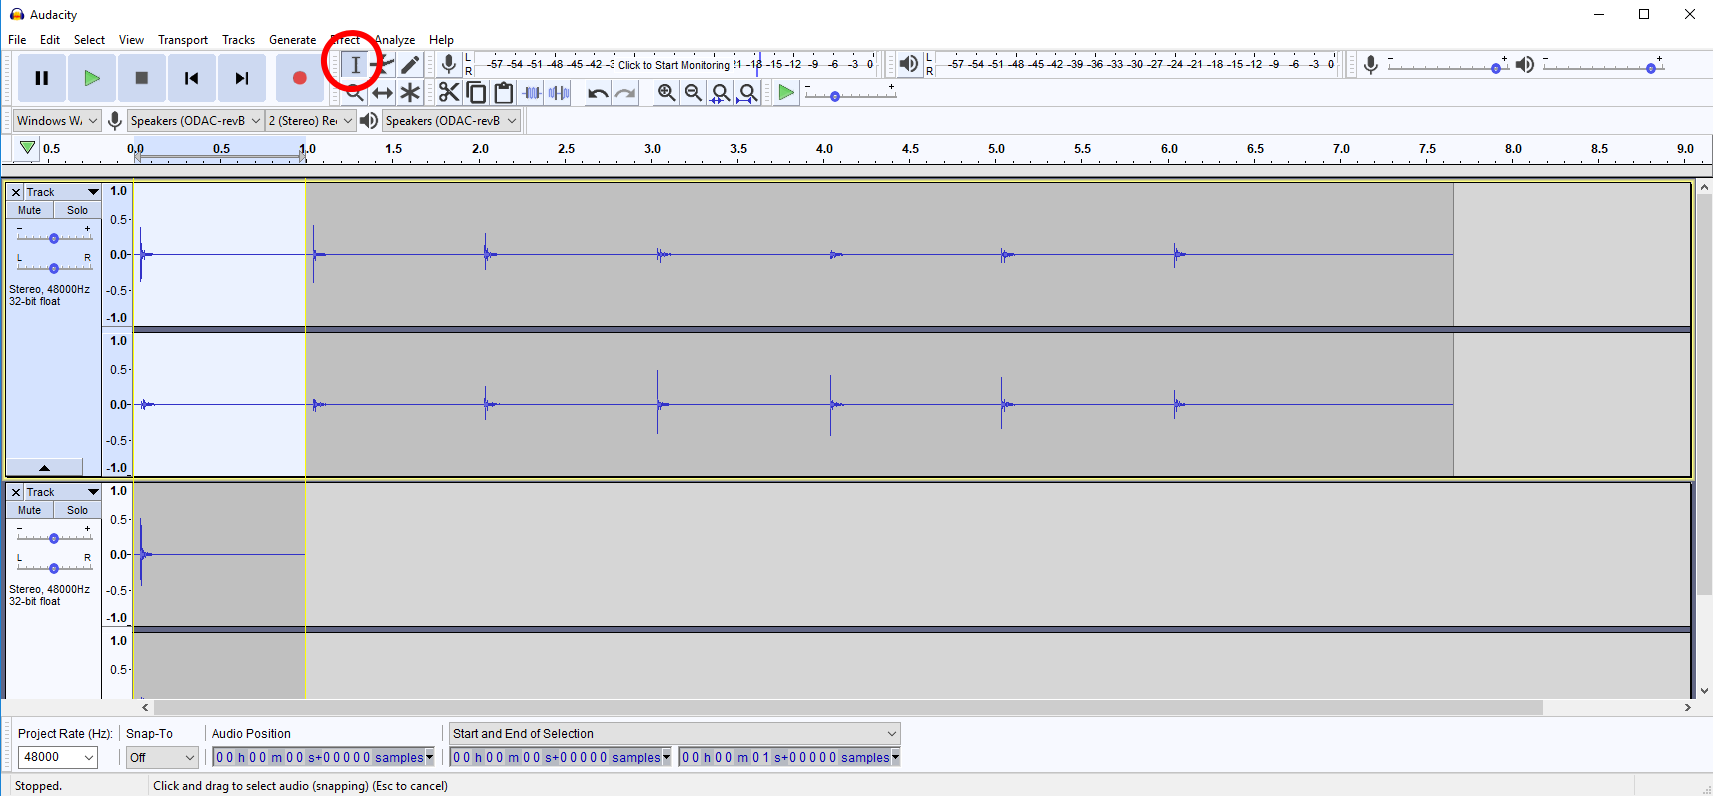
- Repeat six more times.
- Remove the tail of the recorded track by clicking the X button in the track control panel.
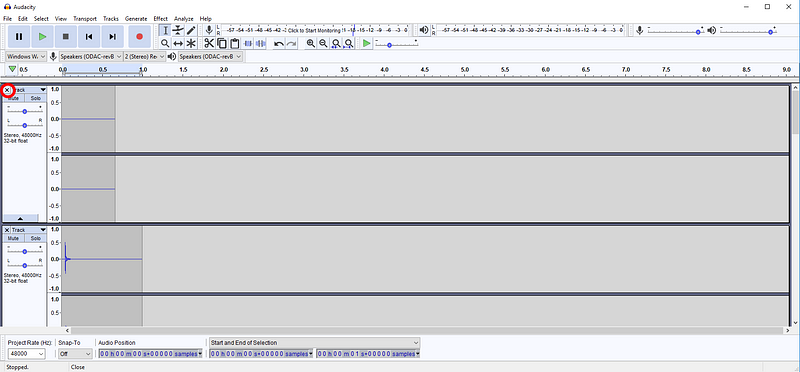
- Zoom in all track vertically by clicking the vertical scale (or Ctrl+Wheel) until the range is about -0.003 to 0.003.
- Select all tracks (Ctrl+A) and move the end of the selection to the left side of the peaks.
- Zoom in fairly close to the peaks and move the end of the selection to about 1ms left of the first non-noise value. Silence in the beginning only causes delay but does nothing else for the processing so it’s not critical to crop the beginning silence super tightly.
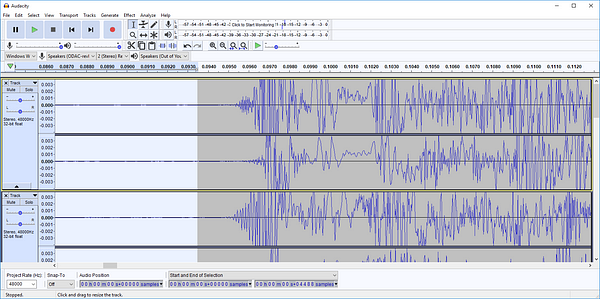
- Remove the selected samples from all tracks (Ctrl+K).
- Select all tracks (Ctrl+A) and move the beginning of the selection to the right side of the last sample with value over 0.001 or 0.0001 of all tracks. End crop is not critical, too long tail will only increse the file size a bit so it’s safer to have too long tail than too short.
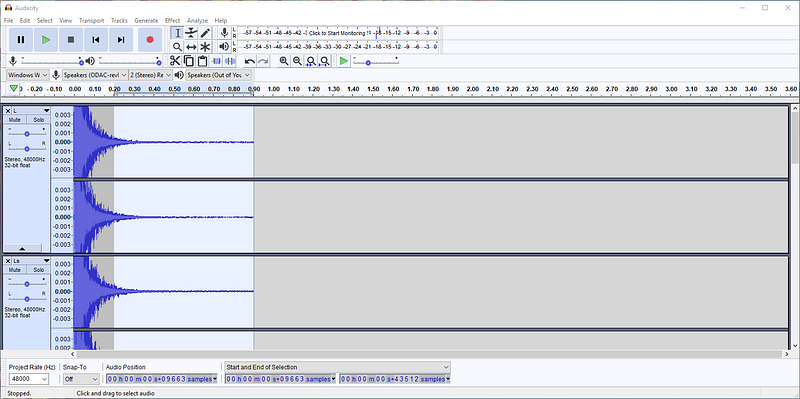
- Remove selected samples.
- Rename all tracks. Track order from top to bottom is L, Ls, Lb, C, R, Rs, Rb, LFE. This is optional but decreases the risk of mixing up the channel order by accident.
- Remove the LFE track
- Swap stereo channels for tracks 5 (R), 6 (Rs) and 7 (Rb). These are right side speakers and for those the right ear channel has to be first.
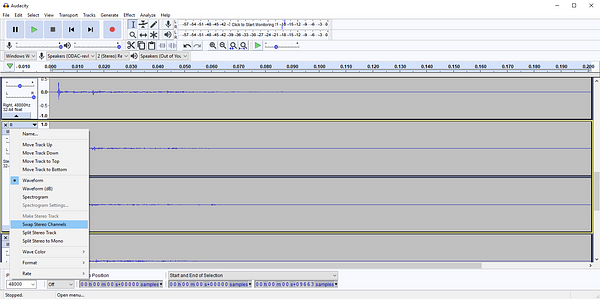
- Split track 4 (C) as two mono tracks: Track name → “Split Stereo to Mono”. The first mono track is for left ear and the second is for right ear.
- Move the second mono track to bottom: Track name → “Move Track to Bottom”.
- Save the project: File → Save Project As…
- Make sure that Audacity exports to a multi-channel file: Edit → Preferences → Import / Export → Select “Use custom mix”
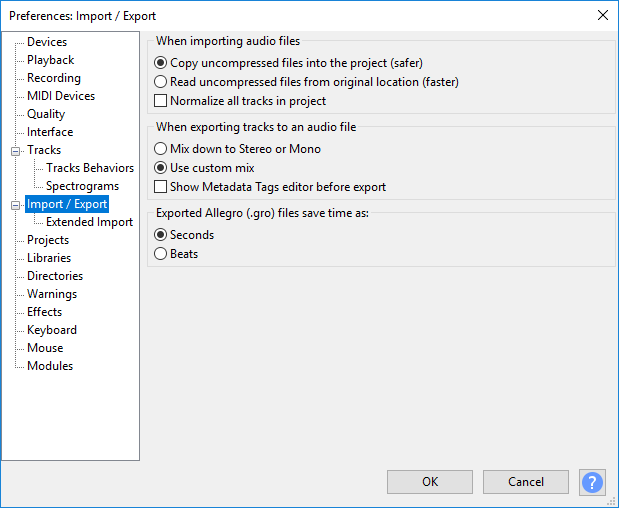
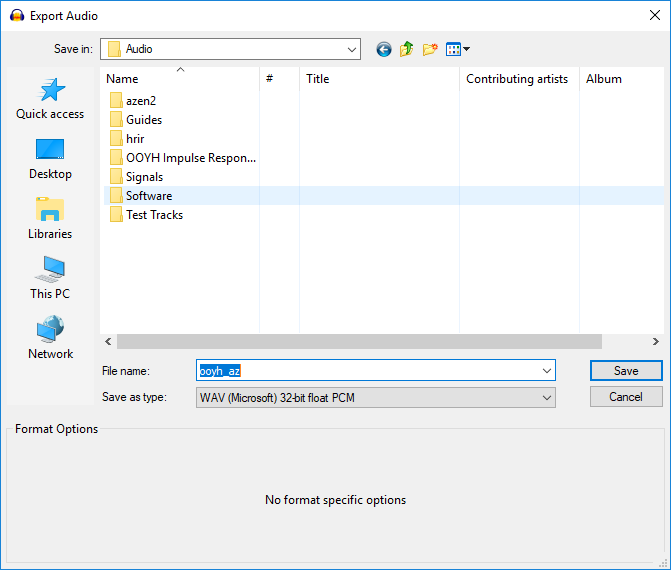
- Finally, export as WAV: File → Export → Export as WAV. Select WAV (Microsoft) 32-bit float PCM for type and save. Keep the channel mapping at their default values.

IV. Confirming Results
Impulse responses are incredibly sensitive to any kind of errors and mistakes in the capturing process. Detecting if the impulse response was recorded correctly might not be easy when testing with real material. Surround test file has all the channels separated (playing only one channel at a time) so it’s easier to detect errors with it. Also comparing the live processing with HeSuVi against the surround test file recorded when using the original sound processor make it easy to detect any differences in the two systems.
Step by step:
- Install Equalizer APO and HeSuVi (and Voicemeeter if your sound card doesn’t allow surround configurations). See HeSuVi’s install instructions.
- Copy the new impulse response to the hrir folder under HeSuVi’s install folder.
- (Re-)Start HeSuVi. You should see your new impulse response in the first list, select it and make sure HeSuVi is not deactivated.
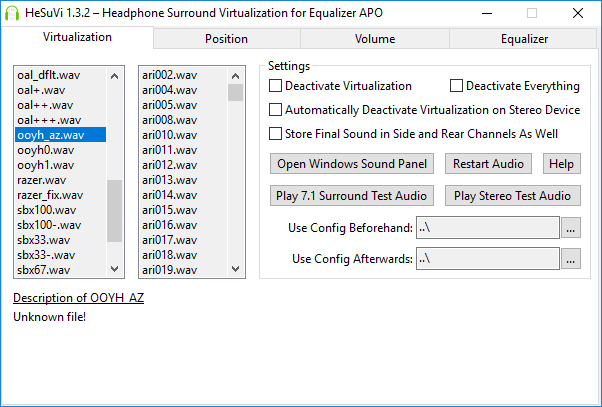
- Play surround test (test_sound_7.1.wav).
- Deactivate HeSuVi and play the processed surround test (test_sound_7.1_processed.wav). Raw surround test processed with HeSuVi should sound identical to the recorded processed surround test. Pay attention to virtual speak locations.
- Enjoy!
Pitfalls
There are many things that can go wrong while capturing the impulse responses. Here’s a list of a few possible pitfalls.
- Other sounds playing in Windows while recording impulse response
- Any error, delay or clipping in Dirac delta sequence playback
- Cropping silence in the beginning too tightly removing non-noise samples
- Doing the first crop for the entire sequence too close to the first impulse response leading to beginning of other impulse responses moving to the end of previous intervals
- Cropping silence in the end too tightly removing non-noise samples
- Stopping recording in Audacity too early while there is still reverb going on in the last impulse response
- Cropping tracks individually leading to desynchronization of channel delays
- Messing up the channel order
- Exporting the final file as mono or stereo instead of 14 channels
- Incorrect amplification leading to quiet or loud playback
- Normalizing or amplifying tracks or channels independently leading to false amplitude localization cues
Record Impulse Responses from SOFA Files
You might find HRTF measurements from human and dummy heads on the internet which use the SOFA file format. You can use the tool FFmpeg (needs configuration with libmysofa) to apply those to a direct delta (same collection as above) and then use the resulting HRIR with HeSuVi. Just place your <name_of_the_hrtf>.sofa file, dirac_delta_mono.wav, sofa.cmd and ffmpeg.exe in one folder and run the batch file. The PCM file called <name_of_the_hrtf>.wav will be useable with HeSuVi so please share it in the forum.
