Menu
▾
▴
UserManual
Anonymous
1. Introduction
GLMixer allows to gather several dynamic graphical objects called 'sources' and to control the way they are mixed to form a 'rendering output' image, displayed in a separate window.
The sources can either be a movie, an image, a live camera flow, or a computer-generated image. All of them play simultaneously and are mixed together --i.e. 'blended' in the computer graphics terminology.
Requirements
GLMixer is optimized for real time graphics efficiency using OpenGL. Therefore, your computer shall have a graphics acceleration card (e.g. NVidia or ATI) which is recent enough, powerful enough, and has enough RAM (256Mb recommended). Up to date OpenGL drivers are required (use of GL extensions).
But not all processing is done on the graphic card; typically the concurrent reading of several movie files requires a good CPU (Core DUO or QUAD are best as the processing is heavily multi-threaded), a sufficient amount of RAM, and a fast hard-drive (the limit you may hit is the ability of the HD to read at several places simultaneously, thus limiting the number of movie files to read at a time).
There are no hard-coded limits on the number of sources creation, and you shall discover the limits of your computer by seeing the framerate drop (displayed in red when it becomes critical). On a decent and recent PC, you shall run a dozen of movies (depending on their resolution, it may be less) and a very large number of images or other sort of sources. Every image processing operations like applying filters obviously cost both in CPU and GPU.
Quick start guide
- Lanch GLMixer; the main window starts in the mixing view (with a disk at the center) and another window is black (called the Output Window).
- In the menu, do 'Sources' / 'Add source(s) from Media file(s)'
- In the file browser, select some movie files from a directory (.mov, .avi, etc), and confirm. You can also drop them from your file browser.
- The mouse cursor in the mixing view now carries empty frames of the sources you loaded; drop them in the disk by clicking (repeat for each loaded file). The movie starts playing immediately.
- When you move a sources to the periphery of the disk (hold left mouse button and grab), you will see in the output window that a source becomes transparent as you move it away.
- Select two sources (either hold CTRL and clic them sequentially, either draw a green selection box around them); selected sources are highlighted in green and linked with a dash line.
- Double-click on one of the selected source; the selection disappears and is replaced by a color line; you just made a group.
- Move the group by holding one of its source; all the sources of the group move together. You just made a smooth transition between two videos.
Now, you can switch to the other views (Geometry and layer) and start playing with GLMixer; move them, scale or rotate them, add algorithm sources, modify the attributes of the properties of the sources, etc..
2. Windows and Menus
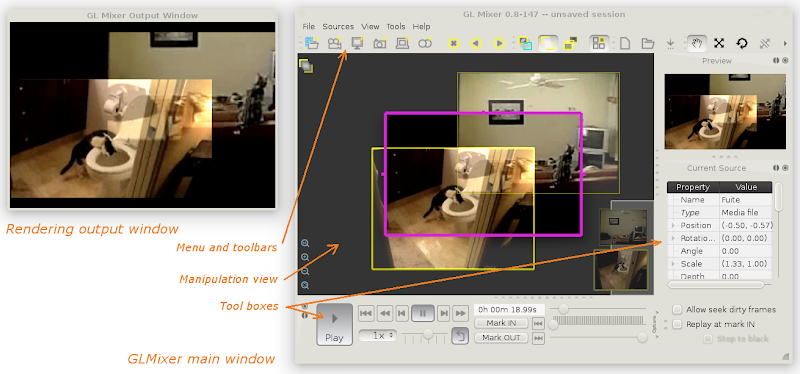
Main window
The main window contains a manipulation view (in dark grey background) and a set of tool boxes.
The manipulation view shows the sources active in the program, and allows to manipulate them in various ways, according to the view selected. See section 3 for details.
The layout of the window can be customized by moving the toolboxes and sticking them on the borders.
Output window
The rendering output window shows the result of the mixing of the sources. It can be freely moved independently from the main window. Typically, this window would be in full-screen in a second monitor configured in your system (e.g. to be projected with a beamer).
To set it full-screen :
- With the cursor in the output window, press (SPACE) or (ENTER), or double clic.
- With the cursor in the main window, select the menu option 'view' / 'Output Window' / 'Full Screen' (keyboard shortcut (CTRL)+(F) )
The rendering image area in the output window has a fixed aspect ratio by default; there is therefore a black border on the sides of the area (like the black on top and bellow the 16/9 image area of a movie in a 4/3 screen). The resolution of the rendering image area is not configurable as of now (v0.8).
However, there is an option which can make the rendering image area follow the size of the output window; if you check the option 'view' / 'Output Window' / 'Free aspect ratio', then the rendering adjusts to cover the whole window. Be careful though; this also means that it will change every time you resize the window!
Menus and toolboxes
There are 4 main menus (feel free to explore the extra 'Help' menu by yourself):
File
The loading/saving of GLMixer sessions
Sources
The creation and selection of sources
View
The selection and configuration of the display
Tools
The selection of the tool to use
There are 3 main toolboxes :
Control
Control buttons for the current source, typically play / pause a movie, but a lot more. See the section 4 for more info.
Current Source
List of the properties of the current source; you can always directly modify the values and select the options you want. See section 5 for more details
Preview
Clone of the output view, just because you need to see the outcome of your actions in the same screen if the output window is hidden or somewhere else
The toolbars only facilitate the access of actions from the menu. The can also be hidden, moved and arranged at your convenience.
3. Views
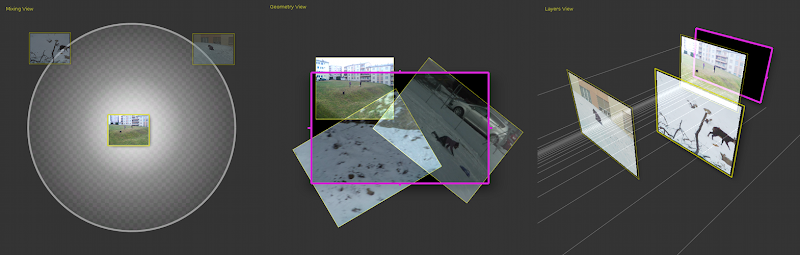
Mixing view Geometry view Layers view
Each of the 3 views allows you to dynamically and easily manipulate one or multiple sources in a different way. You can change view by using the corresponding item in the 'View' menu, clicking on the toolbar icon, or pressing the corresponding Function key (the "F" keys 1 to 3 of your keyboard).
The Views toolbar icons : 
Still, many actions are the same in every views;
- clic on a source to select it; its border becomes bolder and, being the current source of focus, it is the one controlled by the control and the current source toolboxes.
- zoom in and out; use the menu 'View' / 'Zoom', the side-view icons, the context menu (right clic), but the scroll wheel of the mouse is certainly the more practical (hold (CTRL) down for a faster zoom). You can also pan to explore the whole working area; to do this, hold the middle mouse button down and grab the background.
Mixing view (F1)
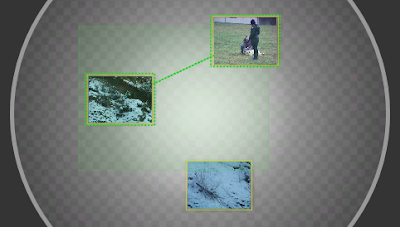
The mixing view controls the transparency of the sources. The distance to the center of the disk determines the transparency in a continuous scale; sources close to the center are fully visible, sources at the periphery are transparent. A source which is outside of the central disk is fully transparent, and not displayed in the output mix (but keeps playing). You can arrange the source as you want in the canvas; only the distance to the center matters!
The 'transparent' sources are still partially visible in this view (as a pixelated grid), but this is just for you to be able to still see which video it is;
Example of source fully 'transparent' as shown in the mixing view: 
To move a source and change its transparency, simply drag it inside the canvas (the mouse cursor changes into a hand).
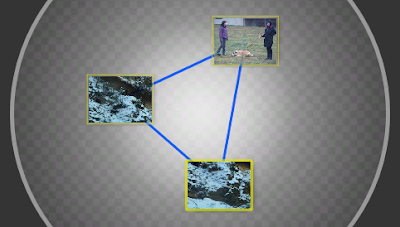
You can also make groups of sources; this allows to drag more than one source at a time, therefore simultaneously changing their transparency. To group several sources, consecutively clic them while holding the (CTRL) key, or draw a selection rectangle (shown in green) around them. This selection of sources is shown by surrounding and connecting dashed green lines; but this selection will be discarded if you don't convert it into a persistent group. To convert a selection into a group, simply double clic on one of the source of the group (NB: double clic again to reverse).
 1. Select sources by drawing a selection rectangle around
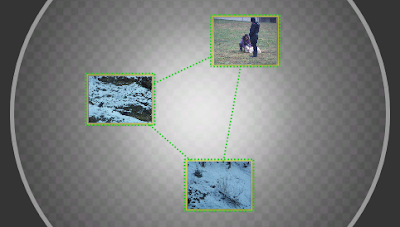 2. The selection of source is temporary
 3. A group is made out of the selection by a double clic.
Why using groups? For instance, place a source A at the center (visible) and a source B on the left side (invisible); make a group with the two; now drag the group to the right; this causes the source A to fade out and the source B to fade in; you have a smooth fading between two videos! Now, add one or more videos to your group, and you can fade all of them with one single mouse cursor...
Tip: a group rigidly links multiple sources together (that's its purpose), but sometimes one wants to adjust the distance between them; to do this, use the right mouse button (instead of the left one) and you will move one source at a time without breaking the group.
Geometry view (F2)
The geometry view controls the shape and position of the sources. The pink rectangle in the middle shows the area rendered as an image in the output view; the geometry view covers a larger area so you can make the sources larger, partially covering the rendering area, or even outside (invisible to the output view).
Layers View (F3)
4. Mouse controls and shortcuts
In general, the CONTROL key (PC CTRL, Apple CMD) is for the SELECTION mode, the META key (PC Win, Apple CTRL) is for NAVIGATION, and the SHIFT is to do the action in a SPECIAL way.
modifier
Left clic
right clic
middle clic
double clic
wheel
None
use the tool (current or selected sources)
context menu
Panning
clic behind
Zoom
Control
Select
-
-
-
-
Meta
Panning
-
-
Zoom best fit
fast Zoom
Shift
use the tool (current only)
-
special panning
-
special zoom
SELECTION
Multiple sources can be selected to perform a common action on them. To select, maintain the CONTROL key and clic on the source to add/remove it from selection. Selected sources are surounded by a green dashed frame. In addition, the mixing view allows to select by drawing a rectangular area (normal clic in the background to draw a green selection area). Additive (and subtractive) area selection can be done by keeping the CONTROL key down while drawing the green selection rectangle.
The selection is kept when switching views. To clear selection, CONTROL-clic in the background (or draw another area).
NAVIGATION
Panning in the view (i.e. move the background = navigate in the workspace) is performed by holding the middle mouse button (or META + left button) and dragging the background.
Zooming in the view (i.e. get closer or further) is performed with the mouse wheel or with the zoom in & out actions of the view menu. The view menu is in the menu bar or contextually appears by right-clic in the background or the workspace.
Zoom best fit can be used to automatically zoom and pan in order to see : - all the sources in the workspace (use the menu action, or META-double clic in the background) - only the current source (use the menu action, or META-double clic in the source)
Special panning allows to move the background but not the sources ; this is equivalent of selecting all the sources and moving them all.
Special zoom is specific per view (e.g. in layers view, you move the camera forward / backward)
5. Control of blending and filtering
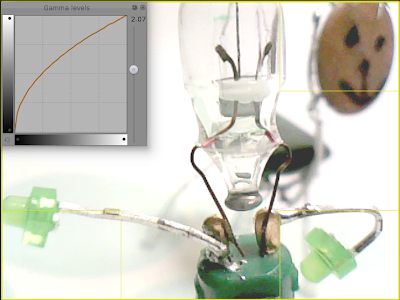
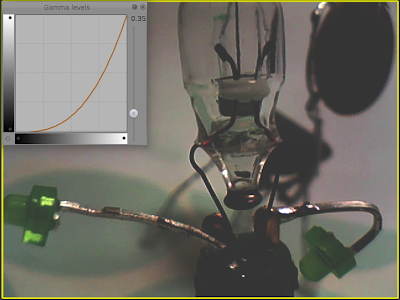
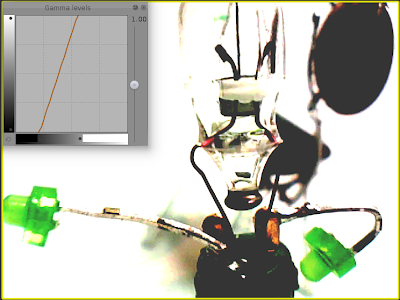
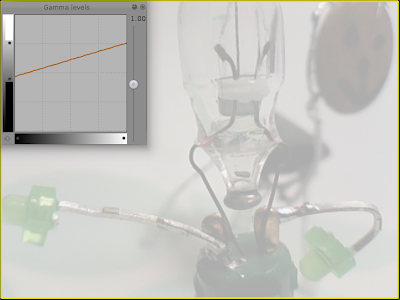
Gamma correction is available for all type of sources. Just modify the gamma value on the slider and move the in-out little sliders on the axes (horizontal and vertical) to modify the gamma correction curve. I decided to favor gamma correction instead of brightness & contrast for two reasons; the visual result is often better, and one slider only is equivalent to the two combined (faster for live performance)
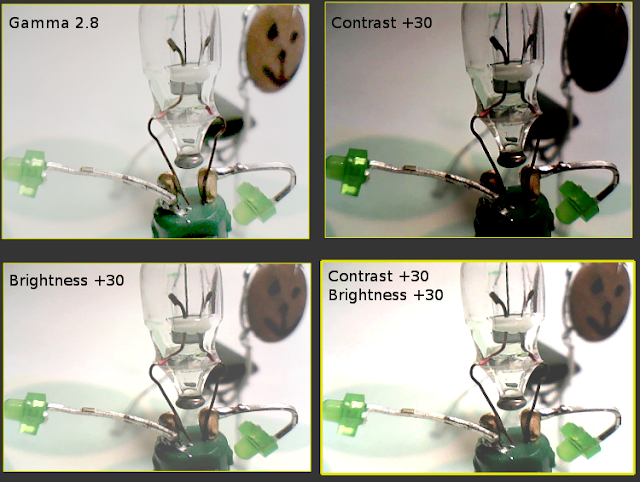
Here are some more examples :