Menu
▾
▴
Posted by
 2020-02-26
How to Execute a Custom Script from Your IVR
This step-by-step recipe will allow us to create an IVR that will store the
digits or user’s input in a log file after playing a welcome prompt. It will
then return an exit code to the IVR to signal the next action to take, e.g.
play another prompt, end the call or play another script-based IVR.
How to Launch a Script on Linux
The “Launch Script” IVR type can be used in both Linux or Windows. On Linux,
you can use scripts written in bash or even use more advanced and complex
languages like Python or Perl. The only limit is your imagination. First,
let’s create the script following these steps:

- Create the script on the Linux host running the PBX.
**vim /home/pi/script/test_ivr_script_0.sh**
- Enter the following code in the file, type the escape key and press “:sq” to save and exit. Note the parameters $0 to $3 passed to the script by position.
`**#!/bin/bash
Set log file path
logFile="/var/log/3cx_automation.log"
Show script name and variables
echo Ran script $0 with parameters: >> "${logFile}"
echo CallerID: $1, DIDNumber: $2, CallerInput: $3 >> "${logFile}"
echo _________ >> "${logFile}"
Return exit code
exit 3**`
- Change the ownership of the script to the “phonesystem” user:
**chown phonesystem:phonesystem /home/pi/script/test_ivr_script_0.sh**
- Create the log file and assign the ownership to the same user:
**touch /var/log/3cx_automation.log
chown phonesystem:phonesystem /var/log/3cx_automation.log**
Creating a Script-based IVR
Now to create a new script-based IVR, go to “Digital Receptionist” in the PBX Management
Console and follow these steps to add a New Digital Receptionist:
- Set a name for the IVR, e.g. “Script Input to Log IVR #1”.
- Select type “Launch Script”.
- Upload the audio prompt you would like to play as the exit message.
- In “Script Options”, enable “Collect user input and pass it to the script”, disable “Expect digit length” and enable “Playback user input and request confirmation”.
- Add a new Exit Code with the value “3”, as specified in our code.
- Set the action to “Play Prompt and Exit”, select an audio prompt to play when the script returns the suitable exit code and click on “OK” to save.
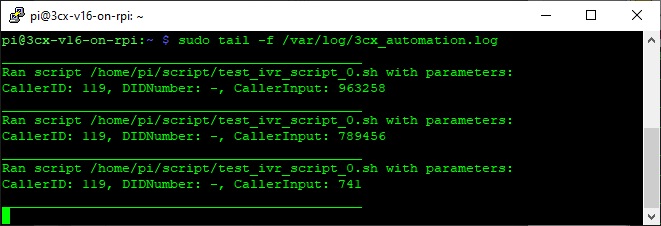
- Now let’s monitor the log file in a terminal with the command:
**tail -f /var/log/3cx_automation.log**
- To test, call the virtual extension assigned to the new script-based IVR. After the initial prompt, enter some digits as input and confirm by pressing “#”.
- The IVR now executes the script. If the script ran OK, you should now hear the exit message you specified to be played back, triggered by the exit code returned by the script. Otherwise, you will hear the “Internal Error Occurred. Sorry.” prompt before ending the call, meaning we need to return to our drawing board and troubleshoot.
Endless Possibilities
Though this is a straightforward and easy recipe, script-based IVRs have a
limit of up to 101 exit codes and can call another IVR menu, script-based or
not. As you can see, possibilities are endless, as you can include in your
script database access, employ third-party APIs, etc. For example, the code we
used for this example can execute another script, with the user’s input as a
parameter for storing in a database.
Read our guide on Creating Script-based IVRs for more info.
The post How to Execute a Custom Script from Your
IVR appeared
first on Elastix.