Menu
▾
▴

writing_your_first_track
Basics
Main Editor
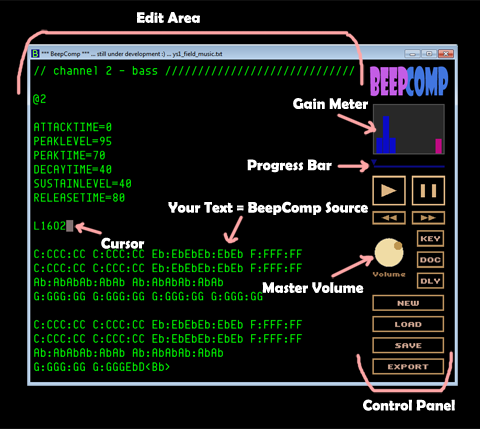
- Editor Area ... You edit your music source text here.
- Control Panel ... Play/pause/save/load/export the music you write and control other things.
- Cursor ... Your point of control over the text.
- Your Text ... This single text file is your whole track - simple, eh?
- Gain Meter ... For visualizing each channel's activity in real time.
- Progress Bar ... Keeps track your song's progress in time.
- Master Volume ... Controls how loud the master output is. (Each channel has a separate volume control, too)
Writing Your First Track
Let's write a very basic "Hello BeepComp" source. Start up BeepComp, press the NEW button, choose "Yes", and type the folloing into the text editor:
// My first BeepComp track! :)

@G
TEMPO=100
MASTERVOLUME=80

@1
CDEFG
And press the play button (with a triangle). You heard an endless series of "do-re-mi-fa-sol...," right? Let me explain the source.
Two forward slashes // adds a comment. Following two slashes, you can write anything to make a note to yourself or others. The comment ends at the end of the line.
@ is used to declare the beginning of each "section." @G starts the "global section" where you can set parameters that affect your entire track. Your section declaration stays effective until you declare another section (@1 in this case).
TEMPO= sets the tempo of the track. MASTERVOLUME= sets the master output gain. The volume knob will change accordingly to the master volume when you play your track from the beginning.
@1 declares the start of the first music channel section. Everything you write thereafter will be written to the first channel until you declare another section.
Then we have the musical notes CDEFG. Note that you have to write musical pitches in UPPERCASE.
You actually heard CDEFG over and over because BeepComp defaults the player to looping mode. (More about looping later...)
Easy? Let's expand this a little:
// My first BeepComp track! :)

@G
TEMPO=100
MASTERVOLUME=80

@1
O5L4 CDEFG~

@2
O4L4 EFGAB~

@D
L4 KKKSSS
Now play this. You now hear a mix of three channels.
O followed by a single digit number sets the octave. O4 is the default octave where the middle C is, so O5 is just one above the default octave. L followed by a number ranging from 1 to 64 changes the note length. L4 sets up the note length to 1/4 of the measure length (quarter notes).
~ is quite useful. It elongates a note by the currently set note length. You can actually chain multiple ~s, for instance, B~~~.
Now we have @2 so commands after that goes to the second music channel. You can play up to 9 music channels simultaneously, so you can declare sections up to @9.
And you can use the drum channel by declaring @D. Write K for kick, S for snare, H for high-hat. In fact, you can use lower case k, s, h which will play a little quieter.
Note that you see some white spaces in above examples. You can insert any amount of white space between commands because they're ignored by the interpreter.
Saving and Loading Your Work
Now let's save your work. Click the SAVE button (or F11), type in hellobeep.txt, and click the Save button. Now open NotePad or any text editor of your choice, choose to open a file, navigate to the userdata folder in your installation directory, and open up the hellobeep.txt file we just created.
(Note that default userdata folder will be at following locations:)
- C:\Program Files\BeepComp\userdata (32bit Windows)
- C:\Program Files (x86)\BeepComp\userdata (64bit Windows)
See? Your BeepComp source is simply a text file. And you could even continue to work on your track in your text editor if you want.
Copying and Pasting Source
A nice thing about working with text is that you can easily copy and paste between BeepComp and other sources!
Try this - Start a new file (NEW button or F9), Go to this page, copy all the code inside the grey box, and press CTRL + V in BeepComp, and play.
I hope you see how easy it is to share work with each other on the web :)
Of course, you can easily copy your work from BeepComp by pressing CTRL + A (select all) then CTRL + C (copy), to email your music to a friend, for instance.
Exporting Your Work
You can create audio files of your work by pressing the EXPORT button(or F12). Currently supported formats are: WAV, MP3 and OGG files. After you export your work, you can add fades and other finishing touches on audio editors like Audacity.
Your music won't be looped in your exported file.
Here is a tip if you want the exported data to be looped (so you can fade out after the loop point etc.) - Enclose the entire content of each channel with {}. Your exported file will come with your entire music repeated once.
Related
