Menu
▾
▴


Getting started with unit testing of SAS programs
Terminology
Test Macro:
SAS Code that needs to be tested.
Test Case:
A call of a test macro in a controlled environment to test a single(!) feature of the test macro.
Assert:
A macro that ensures the adherence to a single feature of the test macro.
Test Scenario:
The collection of all test cases for one or more test macro. A scenario covers all test cases for a specific business case (see examples scenario database_test.sas)
Test driver:
A program that represents a test scenario.
Installation
Prerequisites
Windows or Linux or AIX
SAS® 9.4, 9.3 or 9.2 in English or German
Download and unpack ZIP-file
Download the current SASUnit-Version from
sourceforge.net/projects/sasunit/
Unpack the downloaded ZIP-file at your preferred location. For example C:\sasunit.
For non-Windows users: Since the zip-file was packed in Windows you need to unpack it on a windows client and copy the files to your target platform using WinSCP or similar. This ensures correction of CR/LF (carriage return / line feed) in text and program files. Unpacking the archive directly on LINUX requires additional steps to clean CR/LF in text and program files.
After installation your folder structure should look like this:

example: includes a sample program to practice SASUnit and to ensure the proper functionality of SASUnit (Operational Qualification). Inside the example folder there is a predefined example to test SASUnit and to learn what SASUnit is all about.
saspgm: includes the macro code for the Unit Testing Framework
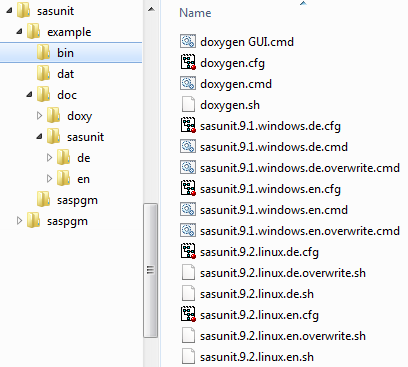
bin: Includes all the scripts to run the SASUnit-code depending on which version of SAS® and which operating system you are running.

dat: Contains test- and reference data that is used in the SASUnit
examples.
doc: Contains the SASUnit- and code documentation including links that
refer to the results page. The SASUnit documentation is stored in
subdirectories depending on the chosen language.

en: includes the sample database and the control modul logfile
en\log: includes logfiles of test scenarios
en\rep: includes the SASUnit documentation
en\tst: includes the intermediate results of the test scenarios
Configuration
Windows Users need to adapt paths in case their SAS®-Installation does NOT use the standard installation path.
First the installation path in the shell script needs to be adapted to the used folder structure. Here for example you can see sasunit.9.3.windows.en.cmd

Second the installation path in the config file needs to be changed. For example sasunit.9.3.windows.en.cfg

Linux-Users need to adapt one path in any case.
The script file for example sasunit.9.3.linux.en.sh contains a path to the SAS® executable. Please adapt this path so it suits your folder structure.

Documentation
Running SASUnit examples
First let the SASUnit examples script run so you can have a look at the generated example files and the documentation. You find the script files under sasunit/example/bin. There you have different versions of script files depending on which version of SAS® you are using and which operating system you are working on.
The naming convention is as follows: Sasunit.\<SASVersion>.\<OS>.\<Language>
| Filename | SAS® Version | Operating System | Report Language |
|---|---|---|---|
| sasunit.9.2.windows.de.cmd | 9.2 64bit | Windows | German |
| sasunit.9.2.windows.en.cmd | 9.2 64bit | Windows | English |
| sasunit.9.2_32.windows.de.cmd | 9.2 32bit | Windows | German |
| sasunit.9.2_32.windows.en.cmd | 9.2 32bit | Windows | English |
| sasunit.9.3.windows.de.cmd | 9.3 64bit | Windows | German |
| sasunit.9.3.windows.en.cmd | 9.3 64bit | Windows | English |
| sasunit.9.3_32.windows.de.cmd | 9.3 32bit | Windows | German |
| sasunit.9.3_32.windows.en.cmd | 9.3 32bit | Windows | English |
| sasunit.9.4.windows.de.cmd | 9.4 | Windows | German |
| sasunit.9.4.windows.en.cmd | 9.4 | Windows | English |
| sasunit.9.2.linux.de.sh | 9.2 | Linux | German |
| sasunit.9.2.linux.en.sh | 9.2 | Linux | English |
| sasunit.9.3.linux.de.sh | 9.3 | Linux | German |
| sasunit.9.3.linux.en.sh | 9.3 | Linux | English |
Double click on the filename that fits your system environment. A console and a batch version of SAS® will start. If you start one of the above script files only the changed test scenarios will be executed.
The suffix .overwrite will execute all test scenarios independent of any changes made in the test macros.
The suffix .ci contains scripts for requests from ci-server without user interaction.

SASUnit now checks the example code, which you find in sasunit\example\saspgm. This folder contains a program and testcase for each example. The testcase is always named *_test.sas at the end.
SASUnit Test Documentation
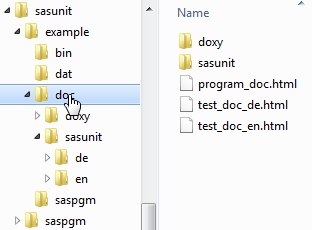
Once the script is done you will find the results in the folder sasunit\example\doc.

Have a look at the documentation. Depending on the language settings you chose you double click on the equivalent HTML-file. Your standard browser will open and forward you to the main page of SASUnit Test Documentation.

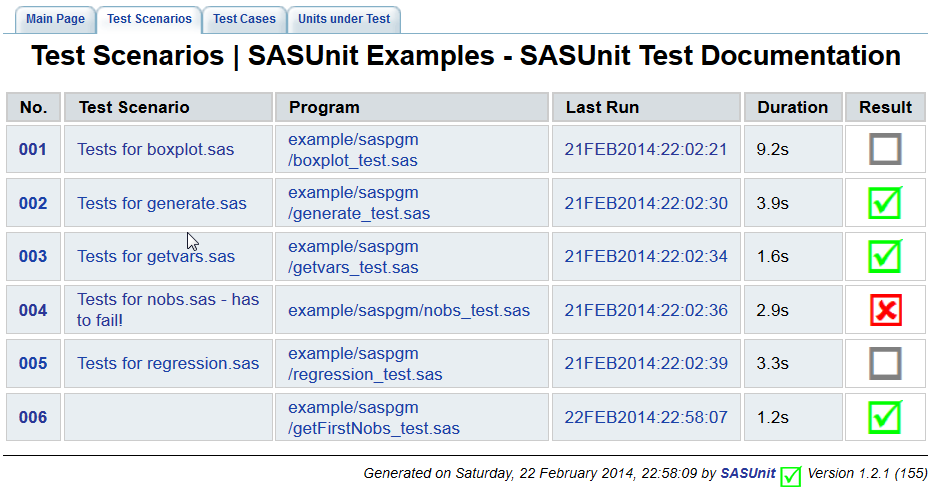
The Tab „Test Scenarios“ shows an overview of the different tests, where you can find them and when they were executed.
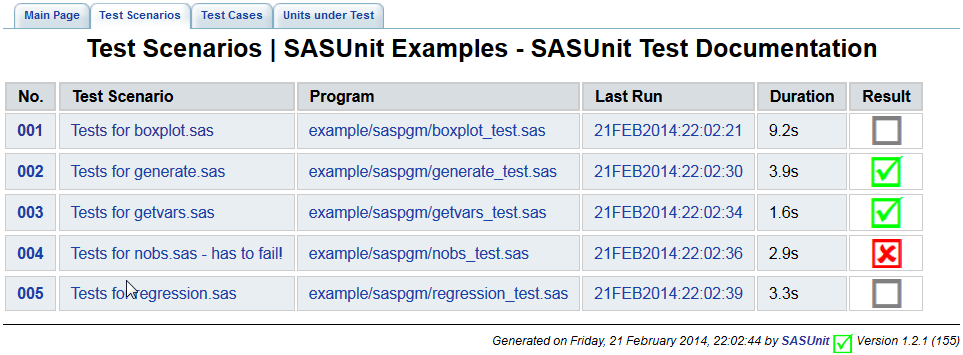
In SASUnit you see at a glance if your code is correct. The checkbox shows the results.
 - test turned out correct
 - test needs a manual check
 - test result is not correct
When clicking on the failed scenario (No. 004) you can see that the test scenario contains 6 tests and one of them failed. This is also the tab “Test cases” which lists all test cases for each test scenario with detailed information and a link to the log file when clicking on the Last Run.
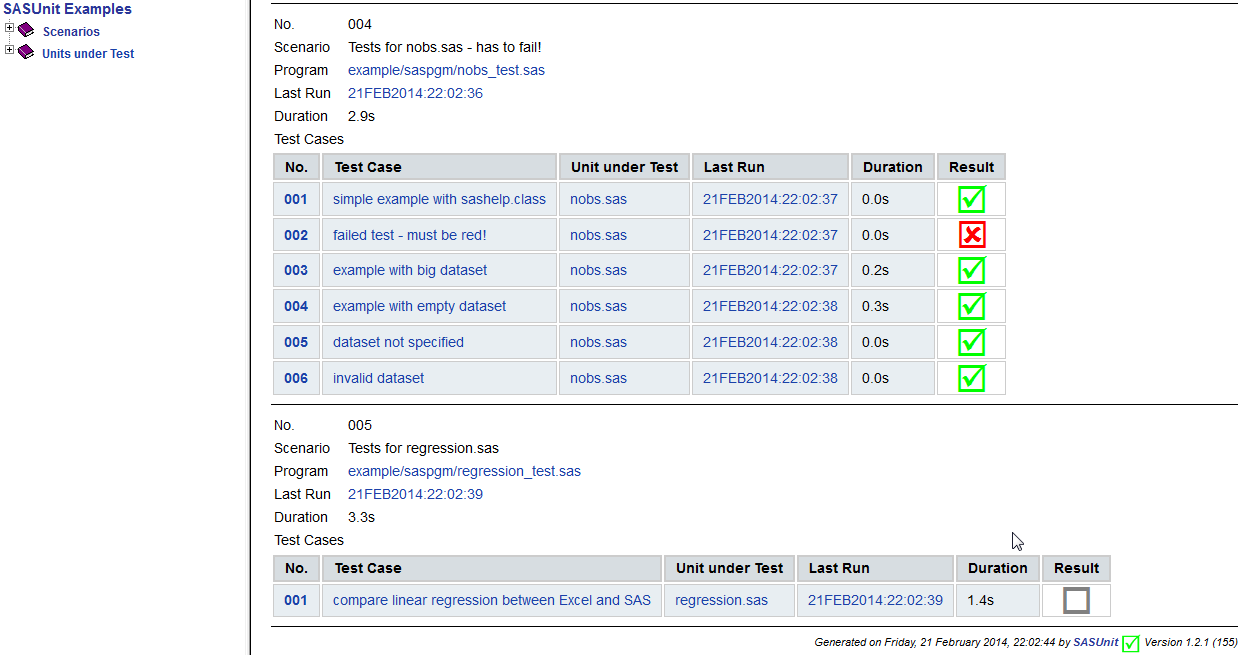
You will get a detailed description of every executed assertion when you click on a test scenario and then on a test case. Here for example you find an overview of test scenario 1 and test case 3. As you can see it shows which assertion was executed, some details about the ran test and the expected and actual results.

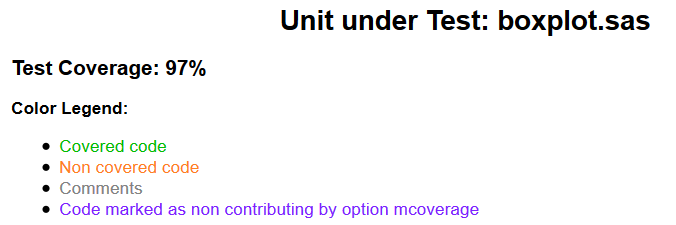
When clicking on the last tab you will find an overview of all units that where tested in this test scenario. There is a Column “Test Coverage” – this is only shown when using SAS9.3 or higher.

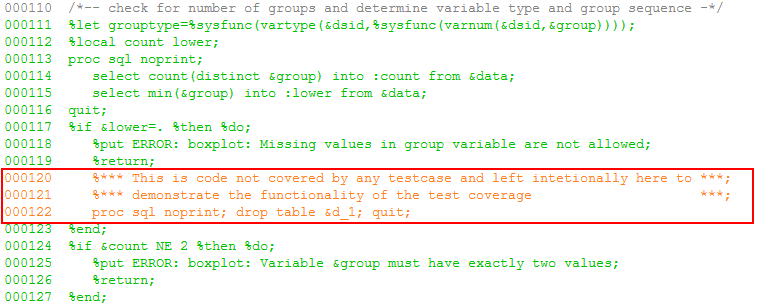
The Column “Test Coverage” gives you an overview of how much code is covered. For example when looking at the Unit under Test boxplot.sas one can see that not all of the code is covered. When clicking on the 97 you will get coloured code with a colour legend.
Logfiles
Each SASUnit Session generates its own logfiles and stores them in doc\sasunit\\<language>\log. The log of controller and report are combined into one log which is called run_all.log and can be found directly in the sasunit\\<language> folder.
For each test scenario there is one logfile per test case and a different logfile for the rest like the preliminary code and asserts.

SASUnit Macros
Controller Macros
-
SASUnit
- initSASUnit
- runSASUnit
- reportSASUnit
-
Testscenarios
- initScenario
- initTestcase
- endTestcall
- endTestcase
- endScenario
initSASUnit
Initialization of a test suite that may comprise several test scenarios.
An existing test repository is opened or a new test repository is created.
runSASUnit
Invokes one or more test scenarios.
Procedure:
- Check whether test repository was already initialized with %initSASUnit, if not: End.
- Determination of the test scenarios to be invoked.
- For every test scenario:
- Check whether it already exists in the test repository.
- if yes: Check whether the test scenario was changed since last invocation.
- if no: Creation of the test scenario in the test repository.
- In case the test scenario is new or changed: The test scenario is executed in an own SAS session which is initialized by _scenario.sas. All test results are gathered in the test repository.
reportSASUnit
Creation of a test report.
initScenario
Start of a new test scenario, necessary for interactive mode .
internally:
- Insertion of relevant data into the test repository
- Setting of flag g_inScenario
initTestcase
Start of a new test case that comprises an invocation of a program under test and one or more assertions.
internally:
- Insertion of relevant data into the test repository
- Redirection of SAS log
- Setting of flag g_inTestcase
- Setting of flag g_inTestcall
endTestcall
Ends an invocation of a program under test.
internally:
- Ensure sequence
- End redirection of SAS log
- Reset ODS destinations
- Re-Setting of flag g_inTestcall
endTestcase
Ends a test case. Result and finish time are added to the test repository.
internally:
- Re-Setting of flag g_inTestcase
- Updating test database
endScenario
Start of a new test scenario necessary for interactive mode
- Re-Setting of flag g_inScenario
- Updating test database
Asserts
assertColumns
Check whether there are differences between the values of the columns of two sas data sets (PROC COMPARE).
The values of the two data sets are considered to match each other if all columns existing in data set i_expected are also existing in data set i_actual. Optionally one can define a deviation for numerical values so that all corresponding values can be deviating from each other less than a maximal deviation of i_fuzz (Caution: this corresponds to the parameter 'criterion' of PROC COMPARE, the parameter 'fuzz' has a different meaning in the context of PROC COMPARE)
assertEquals
Check whether there are differences between the value of a macro variable and an expected value.
The values can be character string or numerical. Optionally one can define a deviation for numerical values so that the values can be deviating from each other less than a maximal deviation of i_fuzz.
assertForeignKey
Checks whether a foreign key relationship between the columns of two data sets exists.
This assert supports simple and composite keys. The number of specified columns in parameters i_mstKey and i_lookupKey must be the same and columns have to be in the same order. If more than one column is specified the parameter i_cmpKeyLen has to be provided containing the number of columns. Eventually needed renaming of key variables takes place automatically.
assertLibrary
Check whether all files are identical in the libraries i_expected and i_actual.
The comparison report is created later, as PROC REPORT does not support ODS Document.
assertLog
Check whether errors or warnings appear in the log.
If number of errors and warnings does not appear in the log as expected, the check of the assertion will fail.
assertLogMsg
Check whether a certain message appears in the log.
If the message does not appear in the log as expected, the check of the assertion will fail. If i_not is set to 1, the check of the assertion will fail in case the message is found in the log.
assertManual
assertManual serves as placeholder for manual Tasks.
assertPerformance
Check whether runtime of the testcase is below or equal a given limit.
assertPrimaryKey
Checks whether a set of columns can be used as primary key for the data set.
assertRecordCount
This assert checks whether a certain number of records exist in a data set specified by parameters i_libref and i_memname.
Furthermore a where condition can be specified (if not specified set to 1) as well as the number of expected records in the data set that meet the given where condition.
assertRecordExists
Check whether at least one record exists which satisfies a certain WHERE condition.
assertReport
Check whether a report file exists and was created during the current SAS session.
It is possible to write an instruction into the test protocol indicating the need to perform a manual check of the report. Writes an entry into the test repository indicating the need to perform
a manual check of the report and copies the report and a given report template (optional).
assertRowExpression
Checks if all observations meet a given WHERE expression.
assertTableExists
Check whether a certain data set, view or catalogue exists.
Setting the optional parameter i_not to 1 allows to test whether a certain data set, view or catalogue does not exist.
Step 1: Check whether library has been assigned successfully.
Step 2: Check for existence with exist function
assertTrue
Check whether a condition is true.
Getting started
Write a simple test
Add two new SAS® files to the folder sasunit\example\saspgm.
Call them for our example getFirstNobs_test.sasandgetFirstNobs.sas. The test will check if
your SAS® program writes the first 5 observations of a SAS® table to a new table.
Open the test file getFirstNobs_test.sas in your preferred SAS® development environment and write the following code into it:
%initTestCase (i_object = getFirstNobs.sas, i_desc = %STR(My first Testscenario))

DATA work.expected;
   SET SASHELP.class (obs = 5);
RUN;


%getFirstNobs (i_input = SASHELP.class, i_output = work.output)


%endTestcall()

%assertColumns (  i_actual     =  work.output
                , i_expected   = work.expected
                , i_desc       = compare estimated values)
%assertLog()

%endTestcase
Paste the following code to the getFirstNobs.sas file
%Macro getFirstNobs ( i_input =, i_output = );

   DATA &i_output.;
      SET &i_input. (obs = 5);
   RUN;

%Mend getFirstNobs;
Execute the test
After you have written and saved your macro and test code start the batch file again.
SASUnit now checks for all the test files in the saspgm folder and executes new and changed tests.
Look at the results
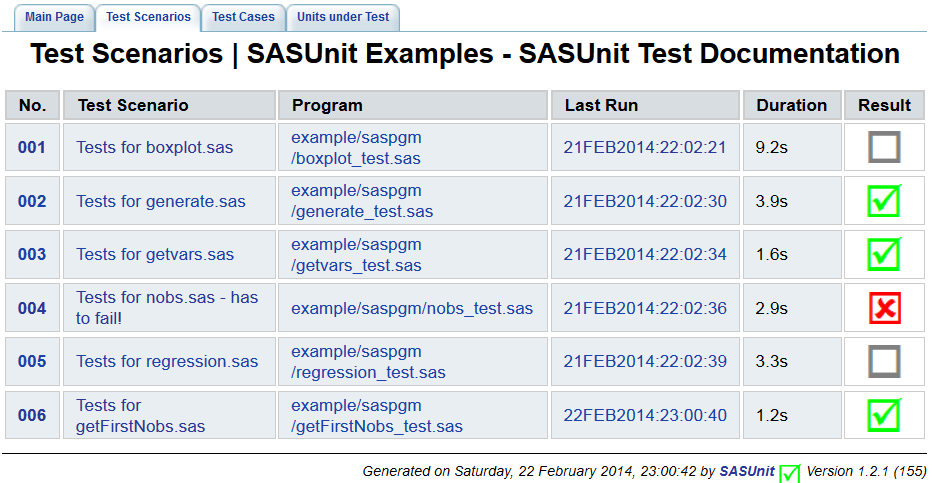
So now you can refresh your browser showing the SASUnit Test Documentation and will find the new generated test in the tab “test scenarios”. Here you can see that No. 006 is our newly written SASUnit test and that it works correctly.
When you click on No. 006 you will see more details for this test case and that each assertion succeeded.

When looking at the overview of the test scenarios you can see that the description of our test scenario is missing. For this description we need a DoxyGen tag in our macro getFirstNobs_test.sas. So we need to add the following code at the beginning and end of our test program.
SASUnit uses a built-in documentation feature for program documentatio since release 1.6 though no DoxyGen resources are used any more and there is no need to install DoxyGen anymore. SASUnit supports some DoxyGen tags and has a similar behaviour. A list of supported tags is onclude in the How to section (read more...).
Please make sure to leave a blank line after your tag because a DoxyGen-Tag ends at a blank line or a new tag. For more information about how to use DoxyGen and further tags refer to DoxyGen Documentation.
/**
\brief Tests for getFirstNobs.sas

*/ /** \cond */


%initTestCase (i_object = getFirstNobs.sas
               , i_desc = %STR(My first Testscenario))

DATA work.expected;
   SET SASHELP.class (obs = 5);
RUN;

%getFirstNobs (i_input = SASHELP.class
             , i_output = work.output)

%endTestcall()

%assertColumns (  i_actual     =  work.output
                , i_expected   = work.expected
                , i_desc       = compare estimated values)

%assertLog()
%endTestcase

/** \endcond */
After adding the DoxyGen tag save your SAS code and execute the batch file again. The overview of the test scenario should look like this now.
For SASUnit 1.3 and higher you do not need to set a DoxyGen tag. If nothing is set the Documentation will show the name of the test scenario as shown as follows for test scenario 2:

Creating your own project
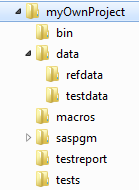
1. Create a folder structure that includes the following folder:
- bin
- a folder for your data, maybe with subfolders for test and reference data
- a folder for your macro code
- a folder for your tests
- a folder for the documentation
This is what your folder structure could be like:
2. Copy all needed script files to your bin folder

-
Adjust SASUNIT_ROOT in the script file
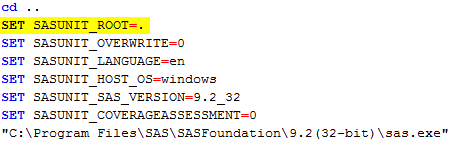
-
Adjust installation paths in script and config file

3. Copy or generate macros in your macros folder. These macros can either be the code to be tested or supplementary code. Generate tests in your tests folder.
4. Copy the file run_all.sas from example\saspgm to your tests folder
5. Adjust autocall paths in the run_all file
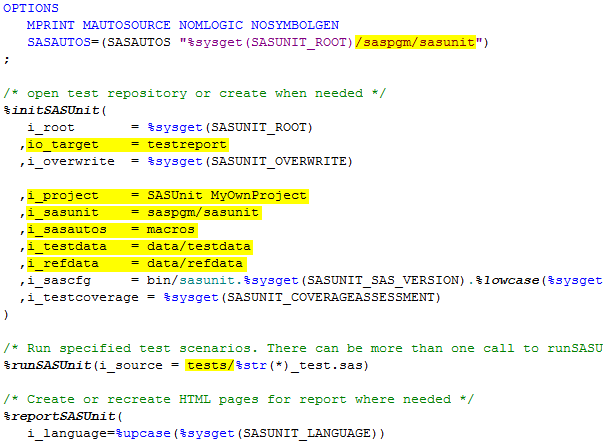
Now you can start the script file and have a look at Documentation output when clicking on myOwnProject\testreport\rep\index.html
Back to User's Guide
Related
Tickets: #100
Tickets: #184
Documentation: How to and Best Practices
Documentation: Release Notes Version 1.5
Documentation: Release Notes Version 1.6.1
Documentation: Release Notes Version 1.6
Documentation: Release Notes Version 1.7
Documentation: Release Notes Version 2.0.2
Documentation: Release Notes Version 2.0
Documentation: Release Notes Version 2.1
Documentation: User's Guide